


HKP1477AVR245om 8/29/06 5:46 PM Page 37
37
OPERATION
The Bridge sources, and the HDMI 1 and HDMI 2 sources. The first
press of any of these three Input Selectors will select the source whose
name appears on the button, i.e., DVD, Tape or HDMI 1. Press that
Input Selector again to select the source whose name appears above
the button (i.e., CD, The Bridge or HDMI 2), and the LED on the remote
will light in green to indicate that you have selected the source whose
name is printed in green above the button. Each additional press
toggles between the two sources.
The AVR 245 will switch to the audio and video inputs assigned to the
source. If you set the BASS MGR setting in the Speaker X-over menu
to INDEPENDENT, as described in the Advanced Functions section,
the AVR 245 will change the speaker size configuration to the one you
programmed for the source. If you selected a surround mode for the
source, the AVR 245 will switch to that mode.
The source name will appear in the upper line of the front-panel display.
If you retitled the source, only the new title will appear. Otherwise, the
audio input assigned to the source (analog or one of the digital audio
inputs) will also appear. The surround mode will be displayed on the
lower line. The same information will also appear on screen in the
semi-OSD, unless you have set the semi-OSD to OFF in the System
Setup menu, as described in the Advanced Functions section.
Audio Input Selection
The AVR 245 is programmed at the factory to use the analog audio
inputs for each source (except for the DVD, Video 2, HDMI 1 and
HDMI 2 sources; see Table 4). To assign a digital audio input to a
source (if you have not done so using the Input Setup menu during
Initial Setup), press the Digital Button on the remote or front panel. The
current audio input selection will flash in the display, and you may press
the
⁄
/
¤
(or
‹
/
›
on the front panel) Buttons to scroll through the
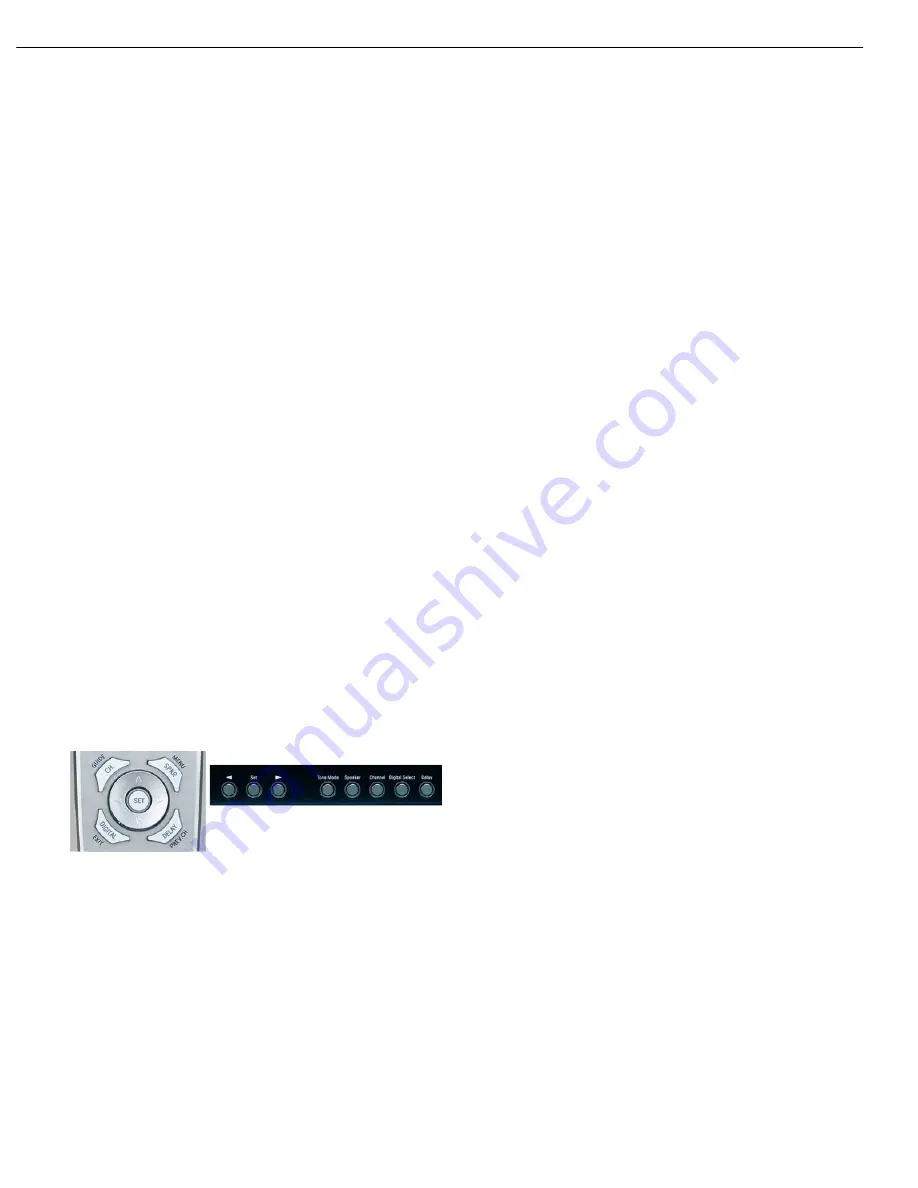
audio inputs. When the desired input appears, press the Set Button to
select it. See Figure 66.
Figure 66 – Digital Input Selection
If the Auto Poll feature is ON in the Input Setup menu, and if a digital
audio input has been assigned to the source, the AVR 245 will first
check the digital audio input for a signal. If a signal is present, the
AVR 245 will select the digital audio input. If no signal is present,
the AVR 245 will switch to the analog audio inputs for the source.
Video Input Selection
When a source is selected, the AVR 245 switches to a video input
as follows:
The COMPONENT IN line of the Input Setup menu indicates which
of the component video inputs on the AVR 245 is assigned to each
source. By default the Component Video 1 input is assigned to the DVD
source, the Component Video 2 input is assigned to the Video 1 source,
and the Component Video 3 input is assigned to the Video 2 source. All
other sources default to the CONVERT setting, meaning that they may
only be used with their composite or S-video inputs (or the HDMI inputs
for the two HDMI sources). The AVR 245 will transcode the incoming
composite or S-video signal and make it available using the component
video monitor outputs, enabling a single-cable connection to your televi-
sion. Only signals originating at one of the two HDMI inputs will be avail-
able at the HDMI output.
The component video inputs may be reassigned to other source inputs
as needed, depending on the physical connections you made during the
Installation procedure.
If a signal is present at the component video input assigned to that
source, it will be selected.
If no signal is present at the component video input, then the S-video or
composite video input for the source will be selected. It is not possible
to reassign the S-video or composite video inputs to other sources.
For audio-only sources, such as the tuner or CD inputs, when no
component video signal is present, the last-used video source will be
selected.
6-/8-Channel Direct Inputs
If you wish to hear audio through the 6-/8-Channel Direct Inputs togeth-
er with video, then connect your multichannel player to the Component
Video 1 Inputs, and connect the player’s 6- or 8-channel analog audio
outputs to the 6-/8-Channel Inputs on the AVR. Assign the component
video inputs you selected to the 6-/8-Channel Input source. The AVR
will automatically select the correct component video and audio inputs
when you select this source.
If you need to use composite or S-video for your multichannel player,
e.g., if your video display does not have component video inputs, then
you will need to use the video inputs for another source. Since the AVR
automatically selects the last-used video inputs for audio sources, you
would first select the source you connected the video cables to, and
then the 6-/8-Channel Inputs for the audio.
Example 1: You would like to connect a DVD-Audio player to the
AVR 245. You plan on playing a variety of discs using this player,
including conventional DVDs and even CDs as well as multichannel
discs. When playing DVDs and CDs, it is preferable to use a digital audio
connection to obtain the best sound quality and the benefit of any digital
surround formats contained on the DVD. However, when playing DVD-
Audio discs, you will need to use the 6-/8-channel analog audio con-
nections. In addition, some of these discs contain video materials,
although the player does not have an HDMI output.
We recommend that you connect this player as follows:
a) Connect the player’s coaxial digital audio output to the Coaxial 1 input
on the AVR. This input is assigned by default to the DVD source.
b) Connect the player’s component video outputs to the Component
Video 1 inputs on the AVR, which are assigned by default to the DVD
27
AVR245
harman/kardon
Summary of Contents for AVR 245
Page 39: ...39 AVR245 harman kardon ...
Page 41: ...41 AVR245 harman kardon ...
Page 42: ...42 AVR245 harman kardon ...
Page 43: ...43 AVR245 harman kardon ...
Page 44: ...44 AVR245 harman kardon ...
Page 45: ...45 AVR245 harman kardon ...
Page 46: ...46 AVR245 harman kardon ...
Page 47: ...47 AVR245 harman kardon ...
Page 48: ...48 AVR245 harman kardon ...
Page 49: ...49 AVR245 harman kardon ...
Page 50: ...50 AVR245 harman kardon ...
Page 51: ...51 AVR245 harman kardon ...
Page 52: ...52 AVR245 harman kardon ...
Page 97: ...97 AVR245 harman kardon ...
Page 98: ...98 AVR245 harman kardon ...
Page 99: ...99 AVR245 harman kardon ...
Page 100: ...100 AVR245 harman kardon ...
Page 103: ...103 AVR245 harman kardon ...
Page 104: ...104 AVR245 harman kardon ...
Page 105: ...105 AVR245 harman kardon ...
Page 110: ...110 AVR245 harman kardon ...
Page 112: ...112 AVR245 harman kardon ...
Page 113: ...113 AVR245 harman kardon ...
Page 114: ...114 AVR245 harman kardon ...
Page 121: ...121 AVR245 harman kardon ...
Page 123: ...123 AVR245 harman kardon ...
Page 126: ...126 AVR245 harman kardon ...
Page 128: ...TC90A49P F BLOCK DIAGRAM PIN ASSIGNMENT 128 AVR245 harman kardon ...
Page 132: ...132 AVR245 harman kardon ...
Page 133: ...133 AVR245 harman kardon ...
Page 134: ...134 AVR245 harman kardon ...
Page 135: ...135 AVR245 harman kardon ...
Page 136: ...136 AVR245 harman kardon ...
Page 137: ...137 AVR245 harman kardon ...
Page 138: ...138 AVR245 harman kardon ...
Page 139: ...139 AVR245 harman kardon ...
Page 140: ...140 AVR245 harman kardon ...
Page 144: ...144 AVR245 harman kardon ...
Page 145: ...145 AVR245 harman kardon ...
Page 146: ...146 AVR245 harman kardon ...
Page 147: ...147 AVR245 harman kardon ...
Page 148: ...148 AVR245 harman kardon ...
Page 149: ...149 AVR245 harman kardon ...
Page 150: ...150 AVR245 harman kardon ...
Page 151: ...151 AVR245 harman kardon ...
Page 152: ...152 AVR245 harman kardon ...
Page 153: ...153 AVR245 harman kardon ...
Page 154: ...154 AVR245 harman kardon ...
Page 155: ...155 AVR245 harman kardon ...
Page 158: ...158 AVR245 harman kardon ...
Page 159: ...159 AVR245 harman kardon ...
Page 160: ...160 AVR245 harman kardon ...
Page 161: ...161 AVR245 harman kardon ...
Page 162: ...162 AVR245 harman kardon ...
Page 163: ...163 AVR245 harman kardon ...
Page 164: ...164 AVR245 harman kardon ...
Page 165: ...165 AVR245 harman kardon ...
Page 166: ...166 AVR245 harman kardon ...
Page 167: ...167 AVR245 harman kardon ...
Page 168: ...168 AVR245 harman kardon ...
Page 169: ...169 AVR245 harman kardon ...
Page 170: ...170 AVR245 harman kardon ...
Page 171: ...171 AVR245 harman kardon ...
Page 172: ...172 AVR245 harman kardon ...
Page 173: ...173 AVR245 harman kardon ...
Page 174: ...174 AVR245 harman kardon ...
Page 175: ...175 AVR245 harman kardon ...
Page 176: ...176 AVR245 harman kardon ...
Page 177: ...177 AVR245 harman kardon ...
Page 185: ...185 AVR245 harman kardon ...
Page 199: ...199 AVR245 harman kardon ...
Page 200: ...200 AVR245 harman kardon ...
Page 202: ...202 AVR245 harman kardon ...
Page 203: ...203 AVR245 harman kardon ...
Page 204: ...204 AVR245 harman kardon ...
Page 216: ...216 AVR245 harman kardon ...
Page 217: ...217 AVR245 harman kardon ...
Page 218: ... SCH sch 2 Mon Oct 23 17 36 38 2006 218 AVR245 harman kardon ...
Page 219: ...061011 SCH sch 2 Fri Oct 13 14 43 06 2006 219 AVR245 harman kardon ...
Page 220: ...61011 SCH sch 1 Fri Oct 13 14 42 17 2006 220 AVR245 harman kardon ...
Page 221: ...0512 sch 1 Fri Oct 13 16 28 00 2006 221 AVR245 harman kardon ...
Page 222: ...3 SCH sch 1 Mon Oct 23 17 34 44 2006 222 AVR245 harman kardon ...
Page 223: ...61023 SCH sch 3 Mon Oct 23 17 22 48 2006 223 AVR245 harman kardon ...
Page 224: ...CH sch 1 Mon Oct 23 18 35 13 2006 224 AVR245 harman kardon ...
Page 225: ...3 SCH sch 1 Mon Oct 23 17 10 00 2006 225 AVR245 harman kardon ...
Page 226: ...226 AVR245 harman kardon ...
Page 227: ...23 SCH sch 1 Mon Oct 23 17 14 10 2006 227 AVR245 harman kardon ...
Page 228: ...ING sch 1 Mon Oct 23 16 41 57 2006 228 AVR245 harman kardon ...


