background image

 Explanation of Webinterface 

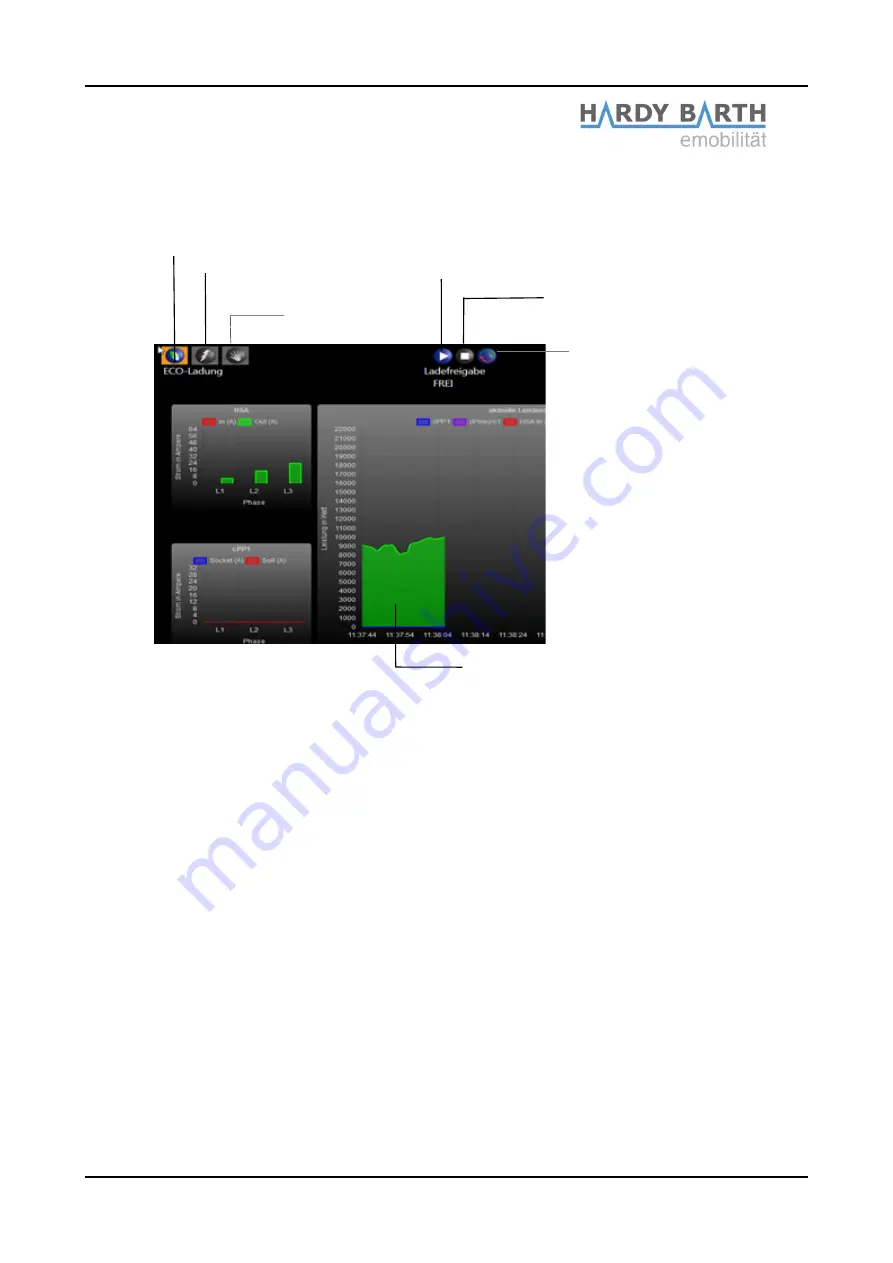
ECO-Charging Mode

 = ensures minimum charge (see page 16) through a PV-System 

and/or with power from the power supply net if needed. Purchase of energy from power
supply net is only the case if AI-Mode is deactivated.

AI-Mode

 = Only available if ECO-Charge Mode is activated (Button will be marked in 

orange). In AI-Mode the charging process will automatically start in case of surplus PV-
power or turn off when there is too little PV-power. For this, section „Eco Min-Max 
Ampere“ in the later configuration is the most important setting.

Fast-Charging Mode

 = A charging process with maximum capacity of the charging 

station is started.

Manual-Charging Mode 

= In this charging mode, you can set the charging power 

manually.

Start Charging process

 = Press this button to start the charging process.

Stop Charging process

= Press this button to stop the charging process.

Current charging graph

= Shows the current power output at the house connection as

well as single power graphs of the charger connection.

Configuration manual 

eCB1


Smartmeter

Version: 1.2.1

13

Fast-Charging Mode

Manual-
Charging Mode

Start charging process

Stop charging process

AI-Mode

Current charging 
graph

Eco-Charging Mode

Summary of Contents for eCB1-LR

Page 1: ...Smartmeter eCB1 LR Configuration manual Configuration manual eCB1 Smartmeter Version 1 2 1 1 English...

Page 2: ...turer eCHARGE Hardy Barth GmbH Leinbergstra e 14 92262 Birgland Schwend Telephone 49 0 9666 188 1350 Fax 49 0 9666 188 1351 Web www echarge de Mail support echarge de Configuration manual eCB1 Smartme...

Page 3: ...MP metering point 8 Opening the Webinterface 8 Language 8 Date and time 9 Networksettings 10 Internal 11 Charge connector 11 Setup finish 12 Explanation of Webinterface 13 Configuration of eCB1 LR PV...

Page 4: ...Green flashing Network activity Bus LED Off Device is not configured Green connection is okay Orange No device detected Red BUS error Reset function You can reset the ecB1 to network settings or simp...

Page 5: ...r network a PC or a laptop with help of a LAN cable see image Please Note Please make sure that only one unfigured eCB1 is connected to your network in order to avoid name collisions 1 Start your brow...

Page 6: ...tors L1 and the neutral conductor N are connected to the eCB1 3 The Status LED glows or blinks in red If the Status LED glows or blinks in red an error has occurred Please restart the eCB1 by pressing...

Page 7: ...Image 1 Image 1 cP 1 charging station Image 2 ecB1 and Bus terminal These have to be connected as follows plug the brown wire second slot on the eCB1 in clamp 1 shown in Image 1 plug the black wire t...

Page 8: ...dress of all eCB1 including this one If therer is no other configured eCB1 in your Network you can contact the eCB1 MP with http ecb1 local for first configuration If the Domane Name System should not...

Page 9: ...e settings will be saved Automatic setting In this case Date and Time do not need any entries There are pre set internet pages in section NTP Server 1 and NTP Server 2 These will connect you automatic...

Page 10: ...re no other settings to be made in the section except giving a hostname If you choose static as protocol please contact your network administrator in order to fill the remaining forms according to you...

Page 11: ...ted when there is a measuring transformer needed installed Press on the button to activate orange and deactivate grey Usually by German law a measuring transformer is required when the house connectio...

Page 12: ...process can take up to five minutes Should no interface appear after five minutes please refresh the page or enter the IP address again The setup finish ends the configuration process of the eCB1 LR M...

Page 13: ...the later configuration is the most important setting Fast Charging Mode A charging process with maximum capacity of the charging station is started Manual Charging Mode In this charging mode you can...

Page 14: ...rol Open the Webinterface Click on Proceed to get to the following selection Here you can set the language the country in which you are installing the charging station and the time zone Configuration...

Page 15: ...ttings will be saved Automatic setting In this case Date and Time do not need any entries There are pre set internet pages in section NTP Server 1 and NTP Server 2 These will connect you automatically...

Page 16: ...e are no other settings to be made in the section except giving a hostname If you choose static as protocol please contact your network administrator in order to fill the remaining forms according to...

Page 17: ...e house connection another eCB1 an eCB1 LR MP is installed at the house connection B control Energy Manager a B Control Energy Manager EM 100 EM 210 EM 300 is installed at the house connection SMA Ene...

Page 18: ...http Post via API gateway updated measuring point No measuring point There is no measuring point installed Please note If you choose No measuring point because no smartmeter is installed in that case...

Page 19: ...arging station Phoenix Contact Measuring point Phoenix Contact measuring point is built in the charging station Serial The system fills the serial number of the measuring point automatically after com...

Page 20: ...ivate measurement via current transformer when a current transformer is installed This usually is only the case when the house connection exceeds 63 A If an eCB1 LR MP has already been installed and t...

Page 21: ...ess can take up to five minutes Should no interface appear after five minutes please refresh the page After restarting the following page should appear automatically Here you can adjust settings in se...

Page 22: ...ent of eCharge Hardy Barth GmbH in order to issue a firmware update if needed Via e mail support echarge de Important settings for operation In order to guarantee the best operation possible according...

Page 23: ...consumption at house connection be lower than the required minimum charging power the car will continue charging It will get the remaining power needed to fill up the balance until the required minimu...

Page 24: ...d 8 255 letters Deleting username and password Changing username and password 1 Open the webinterface and log in 2 Go to Configuration Settings 3 Delete the username and the password 4 Press Apply 1 O...

Page 25: ...the charging processes into Excel Exports the charging processes into CSV Exports the charging processes into PDF Prints directly Hide single columns Restore visibilty settings Additionally you can fi...

Page 26: ...ar form This is an example with solar battery Fronius OhmPilot a cP 1T13 8 Wallbox The section Data lists up the values from the graph PV System Solarbattery cP 1T12 8 Fronius Ohm Pilot Configuration...

Page 27: ...arging and discharging is shown Only possible in combination with the Fronius Hybrid Series Ohmpilot The power consumption is displayed Only possible in combination with the Fronius Ohmpilot cP 1T13 8...

Reviews: