background image

9

KHLI2110

ASSEMBLY INSTRUCTIONS

Printed in China

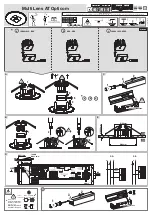
10. After completing installation, caulk mounting 

surface of fixture (A) with silicone weather 
sealant (not included).

      WARNING:


Failure to caulk fixture 

mounting surface with silicone weather 
sealant may result in water damage in outlet 
box, which may cause electrical malfunction 
or electrical shock. 

10

A

The distributor warrants all of its lighting fixtures against defects in materials and workmanship for 

one (1) year from the date of purchase. If within this period the product is found to be defective, take 

a copy of the bill of sale as a proof of purchase and the product in its original carton to the place of 

purchase. The distributor will, at its option, repair, replace or refund the purchase price to the consumer. 

All costs of installation and removal of the fixture is the responsibility of the consumer. This warranty 

does not cover fixtures becoming defective due to misuse, accidental damage or improper handling 

and/or installation and specifically excludes liability for direct, incidental or consequential damages, 

improper packaging of returned products and acts of God. As some states do not allow exclusions of 

limitations on an implied warranty, the above exclusion and limitation may not apply. This warranty gives 

you specific rights and you may also have other rights which may vary from state to state.

WARRANTY

TROUBLESHOOTING

       WARNING: 

Before beginning work, shut off the power supply to avoid electrical shock.

  PROBLEM 

          POSSIBLE CAUSE 

CORRECTIVE ACTION

CARE AND MAINTENANCE

Shut off main power supply. Wipe fixture with soft, damp cloth. Use window cleaner to clean glass. 
Do not use an abrasive cleaner on glass or fixture.

Fuse blows out or 
circuit breaker trips.

Bulb will not light.

1. Bulb is burned out.
2. Power is OFF.
3. Faulty connection.
1. Crossed wires.
2. Power wire is grounding out.

1. Replace bulb.
2. Make sure power supply is ON.
3. Check wiring and all connections.
1. Check wiring.
2. Check all connections.

Summary of Contents for WL137MW

Page 1: ...ment at 1 888 251 1003 8 a m 8 p m EST Monday Sunday You could also contact us at partsplus lowes com or visit www lowespartsplus com ITEM 4145468 MODEL WL137MW ATTACH YOUR RECEIPT HERE ADJUNTE SU REC...

Page 2: ...y Information 3 Preparation 4 Assembly Instructions 5 Care and Maintenance 9 Troubleshooting 9 Warranty 9 TABLE OF CONTENTS B C A A Fixture 1 B Mounting Plate 1 preassembled to fixture A C Mounting Pl...

Page 3: ...subject to electrical shock which could cause serious injury or death DO NOT connect the bare or green insulation fixture ground wire to the black HOT current carrying wire or the white NEUTRAL house...

Page 4: ...malfunction install fixture at least 4 ft above the ground floor SAFETY INFORMATION WARNING TURN OFF ELECTRICITY at main fuse box or circuit breaker box before beginning installation by removing the...

Page 5: ...ilure to disconnect power supply prior to installation may result in serious injury or death 1 1 Remove existing fixture and disconnect all electrical wiring 2 2 Outlet Box 3 3 A B C C Remove mounting...

Page 6: ...ears on mounting plate B are level horizontally This will help ensure the fixture A is level when attached Tighten machine screws BB completely to secure mounting plate B CAUTION The fixture must be m...

Page 7: ...lectrical shock or personal injury wire connectors AA are designed to accept only one 12 gauge house wire and two lead wires from the light fixture If your house wire is larger than 12 gauge or there...

Page 8: ...use level to check fixture A adjust if necessary 7 A C Restore power and test fixture A If light does not function please refer to TROUBLESHOOTING on the following page 9 B C 8 Install one 60 watt max...

Page 9: ...ver fixtures becoming defective due to misuse accidental damage or improper handling and or installation and specifically excludes liability for direct incidental or consequential damages improper pac...

Page 10: ...s reservados Preguntas problemas piezas faltantes Antes de volver a la tienda llame a nuestro Departamento de Servicio al Cliente al 1 888 251 1003 de lunes a domingo de 8 a m a 8 p m hora est ndar de...

Page 11: ...e seguridad 12 Preparaci n 13 Instrucciones de ensamblaje 14 Cuidado y mantenimiento 18 Soluci n de problemas 18 Garant a 18 B C A A L mpara 1 B Placa de montaje 1 preensamblada a la l mpara A C Torni...

Page 12: ...l mpara al conductor negro DE CORRIENTE que lleva la corriente o al conductor blanco NEUTRO de la casa Conectar el conductor de tierra desnudo o verde de la l mpara al conductor negro o blanco de la...

Page 13: ...un cable en la casa para conectar los cables conductores de la l mpara correspondientes preg ntele a un electricista cu l es el tama o adecuado de los conectores de cables que debe utilizar Para reduc...

Page 14: ...l suministro de electricidad antes de la instalaci n pueden producirse lesiones graves o la muerte 1 Retire la l mpara existente y desconecte el cableado el ctrico 2 1 2 Caja de salida ON OFF ON OFF 3...

Page 15: ...das horizontalmente Esto ayudar a garantizar que la l mpara A est nivelada al fijarla Apriete los tornillos para metal BB para fijar la placa de montaje B PRECAUCI N la l mpara se debe montar en una c...

Page 16: ...incendios descargas el ctricas o lesiones personales los conectores de cables AA incluidos con esta l mpara est n dise ados para soportar solo un cable de la casa de calibre 12 y dos cables conductor...

Page 17: ...a de montaje C examine la l mpara A con un nivel y aj stela si es necesario 7 A C 9 B C 8 Instale una bombilla incandescente de base est ndar de 60 vatios como m ximo no se incluye o una bombilla CFL...

Page 18: ...e espec ficamente toda responsabilidad por da os directos accidentales o resultantes embalaje incorrecto de productos devueltos y da os por fuerza mayor Debido a que algunos estados no permiten exclus...

Reviews: