9
1
Remove motor housing (D) from J-hook. Gently slide
remote control receiver (M) flat-side up into top of
motor housing (D), pushing wires, wire connectors
and antenna within.
NOTE:
The remote control included with this fan
meets the following requirements:
a.
Electrical rating: 120V / 60 Hz;
motor amps:1.00 MAX.
b
. MAX light watts: 190W (incandescent, CFL
or LED bulbs.)
Should you choose to use a different remote control
with this fan, it must also meet these same
requirements.
1.
FINAL INSTALLATION
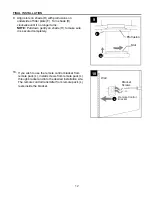
Raise ring (C) and align tabs on ring (C) with
grooves on motor housing (D) until you hear tabs
snap into grooves.
NOTE:
Ring (C) should fit flush to ceiling when
done correctly.
Slide motor housing (D) over mounting plate (A),
aligning slotted holes in motor housing (D) with
loosened mounting plate screw/washers (B) in
mounting plate (A). Twist motor housing (D) to lock.
Re-insert the other two mounting plate
screws/washers (B) previously removed (Step 3,
page 6). Tighten all mounting plate screw/washers
(B) securely.
2.
3.
Tab
Grooves
Antenna
D
M
A
2
D
B
3
C
D


