background image

12

FINAL INSTALLATION

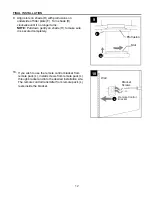
 10.  If you wish to use the remote control bracket from 

remote pack (L), install screws from remote pack (L) 
through bracket and into the desired installation site. 
The remote control transmitter from remote pack (L) 
rests inside the bracket. 

 9.  Align slots on shade (H) with protrusions on 

underside of fitter plate (F). Turn shade (H) 

clockwise

 until it no longer turns.

NOTE:

 Pull down gently on shade (H) to make sure 

it is secured completely.

9

Slot

Protrusion

H

F

Wall

Bracket

Screws

10

Remote Control

Bracket

L

Summary of Contents for FWH60BNK3LRS

Page 1: ...60BNK3LRS Purchase Date 1 Espa ol p 18 APPROVED FOR USE IN DAMP LOCATIONS ATTACH YOUR RECEIPT HERE Questions problems missing parts Before returning to your retailer call our customer service departme...

Page 2: ...ng the blades SAFETY INFORMATION READ AND SAVE THESE INSTRUCTIONS Do not discard fan carton or foam inserts Should this fan need to be returned to the factory for repairs it must be shipped in its ori...

Page 3: ...ne house wire to connect to the corresponding fan lead wires consult an electrician for the proper size wire connectors to use To reduce the risk of fire or electrical shock do not use the fan with an...

Page 4: ...crew Washer 4 preassembled C Ring 1 D Motor Housing 1 E Motor Plate Screw 3 preassembled F Fitter Plate 1 DESCRIPTION PART QUANTITY PACKAGE CONTENTS 4 DESCRIPTION PART QUANTITY G LED Light Kit 1 H Sha...

Page 5: ...Assembly Time 120 minutes Tools Required for Assembly not included Electrical Tape Phillips Screwdriver Pliers Safety Glasses Stepladder and Wire Strippers Helpful Tools not included AC Tester Light T...

Page 6: ...n outer edge of mounting plate A directly opposite the one was just removed Partially loosen the other two mounting plate screw washers B Save mounting plate screw washers B for later use 3 Secure mou...

Page 7: ...gauge house wire and two lead wires from the fan If your house wire is larger than 12 gauge or there is more than one house wire to connect to the corresponding fan lead wires consult an electrician...

Page 8: ...labeled TO MOTOR N from remote control receiver M to WHITE wire from motor housing D Connect BLACK wire labeled TO MOTOR L from remote control receiver M to BLACK wire from motor housing D Connect BLU...

Page 9: ...th this fan it must also meet these same requirements 1 FINAL INSTALLATION Raise ring C and align tabs on ring C with grooves on motor housing D until you hear tabs snap into grooves NOTE Ring C shoul...

Page 10: ...underside of the motor housing D Tighten both motor screws washers BB Repeat for the other two blades I NOTE Make sure all blades I are completely secure before proceeding 10 Hardware Used Blade Scre...

Page 11: ...e F to ensure wires do not get pinched when attaching the LED light kit G Align slotted holes in LED light kit G with loosened fitter plate screws K on fitter plate F Twist light LED light kit G to lo...

Page 12: ...ed installation site The remote control transmitter from remote pack L rests inside the bracket 9 Align slots on shade H with protrusions on underside of fitter plate F Turn shade H clockwise until it...

Page 13: ...user is encouraged to try to correct the interference by one or more of the following measures Reorient or relocate the receiving antenna Increase the separation between the equipment and receiver Con...

Page 14: ...periods Store the remote control transmitter away from excess heat or humidity 2 Remote Control Transmitter OPERATING INSTRUCTIONS Operation buttons on the panel of the remote control transmitter 3 bu...

Page 15: ...weather setting the reverse switch in the RIGHT position will result in upward airflow that can help move stagnant hot air off the ceiling area 4 Use the fan reverse switch located on the motor housin...

Page 16: ...ll connections Noisy operation 1 Blades are loose 2 Cracked blade 3 Motor housing is loose 4 Fan is new 1 Tighten all motor screw washers BB 2 Replace blade I 3 Verify mounting plate screw washers B a...

Page 17: ...when protected from varying weather conditions Any glass provided with this fan is not covered by the warranty Any replacement of defective parts for the ceiling fan must be reported within the first...

Reviews: