13
FINAL INSTALLATION
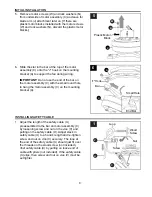
To attach light kit fitter (D) to motor assembly (C),
align holes in switch housing cap with holes in
switch housing. (Make sure to align gap on top
edge of the switch housing cap with the reverse
switch on switch housing for the correct fit.)
Re-insert switch housing cap screws (L) previously
removed (Step 5, page 12). Tighten all switch
housing cap screws (L) securely.
7.
8. Install bulbs (M).
WARNING
: When you need to replace bulbs,
please allow bulbs and light kit to cool down before
touching the bulbs or the light kit.
8
M
Switch
Housing
Cap
Switch
Housing
L
D
C
9. Locate rubber washer (T), 14 mm hex nut (X), finial
plate (H), and finial (I) that were previously removed
(Step 5, page 12). Place rubber washer (T) inside
glass shade (E) over center hole. Align hole in center
of glass shade (E) with threaded rod on light kit fitter
(D), allowing pull chains to come through
corresponding holes in glass shade (E). Push up
gently on glass shade (E) until threaded rod comes
through hole. (
Be sure fan pull chain will not rub
against bulbs during fan operation.
) Secure glass
shade (R) with previously removed 14 mm hex nut
(X).
Align hole in center of finial plate (H) with threaded
rod, allowing the pull chains to come through
appropriate holes in finial plate (H) and push up.
Thread center pull chain through hole in finial (I) and
secure glass shade (E) by tightening finial (I).
CAUTION:
Do NOT overtighten 14 mm hex nut
(X) or finial (I) as glass may crack or break.
7
9
E
I
T
D
X
H


