background image

Freezing foods/storing frozen foods

Page EN-24

Defrosting food

Observe the following basic rules when de-
frosting food:

•  To defrost food, remove it from the freezer 

and let it defrost at room temperature or 
in the refrigerator. 

•  To defrost food quickly, use the defrost 

function on your microwave, for example. 
Observe the manufacturer’s instructions 
and note that bacteria and germs can form 
in this way. 

•  Cook or use thawed foods as soon as 

possible. 

•  Dispose of the defrosting liquid. 
•  If you only want to defrost part of a pack, 

remove the portion you need and imme-
diately close the rest of the pack. In this 
way, you will avoid “freezer burn” and will 
reduce ice formation on the remaining 
foods.

•  Always defrost meat, poultry and fish in 

the refrigerator. Make sure that the frozen 
food is not immersed in its own thawing 
liquid.

Cook or use thawed foods as soon as 
possible. Dispose of the defrosting liq-
uid.

Summary of Contents for HSBS17990WETEI

Page 1: ...y Side K hl Gefrier Kombination mit Wasserspender und Eisbereiter Gebrauchsanleitung Anleitung Version 2001 00999 DE 20210830 Bestell Nr 46716440 Nachdruck auch auszugs weise nicht gestattet HSBS17990...

Page 2: ...iter in Betrieb nehmen DE 29 Zersto enes Eis Crushed Ice entnehmen DE 29 Eisw rfel entnehmen DE 30 Eisbereiter sperren entsperren DE 30 Pflege und Wartung DE 31 T rdichtungen kontrollieren und reinige...

Page 3: ...RSICHT Dieser Signalbegriff bezeichnet eine Gef hr dung mit einem niedrigen Risikograd die wenn sie nicht vermieden wird eine geringf gige oder m ige Verletzung zur Folge haben kann HINWEIS Dieser Sig...

Page 4: ...fizierte Person ersetzt werden um Gef hrdungen zu vermeiden Verwenden Sie das Ger t ausschlie lich wie in dieser Gebrauchsanleitung beschrieben Jede andere Verwendung gilt als nicht be stimmungsgem un...

Page 5: ...nd darf nur an eine Steckdose mit ordnungsgem installiertem Schutzleiter angeschlossen werden Beim Anschlie en darauf achten dass die richtige Spannung anliegt N here Informationen hierzu nden Sie auf...

Page 6: ...uckreiniger ab spritzen Abdeckungen von der Innenraumbe leuchtung nicht entfernen Nicht ver suchen die Innenraumbeleuchtung auszutauschen Wenden Sie sich im Bedarfsfall an unseren Service siehe Seite...

Page 7: ...df hi ges Gas Luft Gemisch entstehen kann muss der Aufstellraum laut Norm EN378 eine Mindestgr e von 1 m3 je 8 g K ltemittel haben Die Menge des K ltemittels in Ihrem Ge r t nden Sie auf dem Typschild...

Page 8: ...en um Schimmelbildung zu ver meiden Gesundheitsgefahr Das Ger t arbeitet eventuell nicht ein wandfrei wenn die Umgebungstempe ratur ber l ngere Zeit den vorgeschrie benen Temperaturbereich ber oder un...

Page 9: ...t an die Wand stellen und die Mindestabst nde einhalten siehe Geeigneten Standort w hlen auf Seite DE 37 Gefahr von Sachsch den Unsachgem er Umgang mit dem Ge r t kann zu Sachsch den f hren Keine Glas...

Page 10: ...eislauf gelangt sein Das K hlger t m glichst nur aufrecht stehend transportieren Vor Inbetriebnahme das K hlger t 2 h aufrecht stehen lassen W hrend dessen ie t das Schmiermittel in den Kompressor zur...

Page 11: ...ind Allzweckreiniger mit ei nem neutralen pH Wert T rdichtungen und Ger teteile aus Kunststoff sind empfindlich ge gen l und Fett Verunreinigungen m glichst schnell entfernen Nur weiche T cher verwend...

Page 12: ...ein 3 T rablage 1 Eierablage 1 Schraubschl ssel Lieferung kontrollieren 1 Transportieren Sie das Ger t an einen ge eigneten Standort und packen Sie es aus siehe Inbetriebnahme auf Seite DE 37 2 Pr fen...

Page 13: ...als Abdeckung f rdiegro eObst undGem seschublade 7 gro e Obst Gem seschublade 8 kleine T rablagen 9 kleine Obst Gem seschublade 10 2 Sterne T rablagen 11 kleine Gefrierschublade 12 gro e Gefrierschub...

Page 14: ...LOCK UNLOCK Wenn das Bedienfeld gesperrt ist erscheint das Symbol Wenn das Bedienfeld entsperrt ist erscheint das Symbol 25 Anzeige Kaltwasserentnahme 26 Wahltaste DISPENSER zum W hlen zwischen Eisw...

Page 15: ...innenraum beleuchtet Der Kompressor beginnt zu arbeiten das K ltemittel str mt durch die Rohre und Sie h ren ein leises Rauschen Das Ge r t ist eingeschaltet Bedienung 2 Macht das Ger t st rende Ger u...

Page 16: ...auf Seite DE 4 Wenn Sie eine niedrigere Temperatur einstellen ben tigen Sie mehr K hl leistung Das erh ht den Energiever brauch ber die Tasten FRZ TEMP 17 und REF TEMP 22 k nnen Sie die Temperatur im...

Page 17: ...en Schnelles Einfrieren und Schnelles K hlen manuell Schnelles Einfrieren 33 18 19 W hlen Sie die Einstellung QUICK FRZ 19 Schnelles Einfrieren um den Gefrierbereich vor dem Einlagern von Lebensmittel...

Page 18: ...Einfrieren und Schnelles K hlen auszuschalten dr cken Sie die Wahltaste MODE so oft bis auf dem Dis play die Symbole QUICK FRZ und QUICK REF erl schen Urlaubsmodus WARNUNG Gesundheitsgefahr Durch unzu...

Page 19: ...rn ert nt ein Signalton wenn eine oder beide T ren der K hl Gefrier Kombination l nger als 2 Minuten ge ffnet sind Schlie en Sie die ge ffnete T r bzw die ge ffneten T ren Wenn Sie die Ger tet r des K...

Page 20: ...m erheb lichen Temperaturanstieg in den F chern des Ger tes kommen Die Fl chen die mit Lebensmitteln und zug nglichen Ablaufsystemen in Ber hrung kommen k nnen regel m ig reinigen Wassertank reinigen...

Page 21: ...tung der T rscharniere zu min dern stellen Sie volle Beh lter dichter ans T rscharnier Bewahren Sie kleine Flaschen und Tu ben in den gro en T rablage 2 auf Legen Sie gut verschlossene Flaschen in die...

Page 22: ...lagerte Gefriergut aus dem Ger t nehmen und in einem ausreichend k hlen Raum oder einem anderen K hlger t lagern Die maximale Lagerzeit bei ei ner St rung entnehmen Sie dem Typ schild des Ger ts Nach...

Page 23: ...ienteste Energienutzung f r Ihr Ger t zu erzielen Lebensmittel vorbereiten Frieren Sie nur qualitativ einwandfreie Le bensmittel ein Frieren Sie frische und zubereitete Spei sen ungesalzen und ungew r...

Page 24: ...fen Sie deshalb keine Ware die in bereiften stark vereisten Truhen liegt oberhalb der vorgeschriebenen Markie rungsmarke gestapelt ist teilweise verklumpt ist vor allem bei Bee ren und Gem se leicht f...

Page 25: ...n Sie dass sich so vermehrt Bakterien und Keime bilden k nnen Bereiten Sie aufgetaute Lebensmittel so schnell wie m glich zu Entsorgen Sie die Auftaufl ssigkeit Wenn Sie nur einen Teil einer Packung a...

Page 26: ...rzehr von Eisw rfeln die mit verunreinigtem oder abgestandenem Wasser bereitet wurden kann die Ge sundheit gef hrden Durch falsche Handhabung besteht die Gefahr einer Lebensmittelvergiftung Zur Bereit...

Page 27: ...0 Tagen dauerhaft aufleuchtet und nach 180 Tagen blinkt um Sie daran zu erinnern den Wassertank 5 zu reinigen Nachdem Sie den Wassertank gereinigt haben k nnen Sie das Symbol ausschalten indem Sie Wah...

Page 28: ...rfelklumpen 4 Verteilen Sie die Eisw rfel gleichm ig im Eisw rfelbeh lter Weitere M glichkeiten werden im Abschnitt Eisw rfelbeh lter reinigen auf Seite DE 34 beschrieben Um zu verhindern dass der Mot...

Page 29: ...es blasenfrei aus dem Eis und Kaltwasserauslass 36 flie t Der Eisbereiter sollte dabei mit mindestens 5 Litern Wasser durchsp lt werden Verwenden Sie das Sp lwasser nicht Um den Eisbereiter mit Wasse...

Page 30: ...is w rfel zu verhindern 3 Dr cken Sie das Gef gegen das Ent nahme Pad 34 Eisw rfel beginnen in das Gef zu fallen 4 Nehmen Sie das Gef vom Entnah me Pad um die Eisentnahme zu been den Eisbereiter sperr...

Page 31: ...rdichtungen und Ger teteile aus Kunststoff sind emp ndlich gegen l und Fett Verunreinigungen m g lichst schnell entfernen Nur weiche T cher verwenden Einzelne Ger teteile nicht in der Sp l maschine w...

Page 32: ...K hlgut heraus und la gern Sie es in einem k hlen Raum 3 Nehmen Sie die T rablagen 2 und 8 den Wassertank 5 die Glasablagen 3 die Flaschenablage 4 sowie die Obst Gem seschubladen 7 und 9 heraus Reinig...

Page 33: ...lter 15 Gefrier schubladen 12 und 11 1 Stern T rabla ge 16 und 2 Sterne T rablagen 10 Reinigen 1 Reinigen Sie den Eisw rfelbeh lter 15 wie im Abschnitt Eisw rfelbeh lter reini gen auf Seite DE 34 bes...

Page 34: ...e Eisw rfel im Eisw r felbeh lter 15 verklumpt sind In diesem Fall wird es n tig den Eisw rfelbeh lter zu reini gen bzw die Blockade zu beseitigen Reinigen Sie den Eisw rfelbeh lter re gelm ig um eine...

Page 35: ...e Anzeige ICE OFF leuchtet wenn der Eisbereiter gesperrt ist Dr cken Sie die Taste 31 ICE OFF um den Eisbereiter einzuschalten Die Anzeige ICE OFF er lischt Eisspender reinigen Eisw rfel k nnen den Ei...

Page 36: ...Unsachgem er Umgang mit dem Ge r t kann zu Sachsch den f hren Innenbeleuchtung ausschlie lich zur Beleuchtung des Ger teinneren ver wenden Sie ist nicht zur Beleuchtung eines Raumes geeignet Die Innen...

Page 37: ...zen verwenden HINWEIS Besch digungsgefahr Unsachgem er Umgang mit dem Ge r t kann zu Besch digungen f hren Das Ger t m glichst nicht in die Hori zontale kippen Nach dem Transport und vor dem An schlie...

Page 38: ...n eingehalten werden zu Elektroherden 10 cm zu l und Kohleherden 10 cm zu anderen K hlger ten 10 cm zu Wasch Geschirrsp lmaschinen 10 cm Wenn am Aufstellungsort eine Fu bodenhei zung installiert ist s...

Page 39: ...te DE 39 Grafik Raumbedarf bei geschlossener und bei ge ffneter T r 1788 mm 895 mm 396 mm 487 mm 774 mm 745 mm 691 mm 1728 mm 30 mm 315 mm 350 mm 1126 mm 36 mm 135 90 1580 mm 36 mm 1139 mm Mindestabst...

Page 40: ...er Inbetriebnahme gr ndlich den Ger teinnenraum sowie Eis spender Eisw rfelbeh lter Wasserspender und Wassertank siehe Kapitel Pflege und Wartung ab Seite DE 31 Ger t aufstellen 1 Stellen Sie das Ger...

Page 41: ...aktabstand vorge schaltet sein hierzu z hlen Sicherun gen LS Schalter und Sch tze Netzanschlussleitung nicht knicken oder klemmen und nicht ber scharfe Kanten legen Die Folge kann ein Kabel bruch sein...

Page 42: ...sich der Kompressor selbstt tig ein Ger t k hlt zu stark Temperatur ist zu niedrig ein gestellt H here Einstellung w hlen siehe Tempera tur einstellen auf Seite DE 16 Ger t k hlt nicht ausreichend Te...

Page 43: ...rungscode z B EE angezeigt bis die St rung behoben ist Zur Beseitigung der St rung nehmen Sie bitte Kontakt mit unserem Service auf siehe Seite DE 44 St rungscode betroffener Ger tebereich L sungen T...

Page 44: ...eklamation und Bestellung Wenden Sie sich bitte an die Produktberatung Ihres Versandhauses wenn die Lieferung unvollst ndig ist das Ger t Transportsch den aufweist Sie Fragen zu Ihrem Ger t haben sich...

Page 45: ...ektronikger ten insbe sondere die Verl ngerung ihrer Lebensdauer durch Reparatur defekter Ger te und die Ver u erung funktionst chtiger gebrauchter Ge r te anstelle ihrer Zuf hrung zur Entsorgung in B...

Page 46: ...Ger ts finden Sie unter Technische Daten Technische Daten Bestellnummer 46716440 Ger tebezeichnung Side by side K hl Gefrierkombination Modellkennung HSBS17990WETEI Ger tema e H he Breite Tiefe 1765 m...

Page 47: ...Side by Side Fridge freezer with water dispenser and ice maker User manual Manual version 2001 00999 EN 20210830 Order no 46716440 Reproduction even of ex cerpts is not permitted HSBS17990WETEI...

Page 48: ...d ice EN 28 Dispensing ice cubes EN 28 Locking unlocking the ice maker EN 29 Care and maintenance EN 30 Checking and cleaning door seals EN 30 Clean exterior EN 30 Defrosting EN 30 Cleaning the fridge...

Page 49: ...or serious injury CAUTION This symbol indicates a hazard with a low lev el of risk which if not avoided could result in minor or moderate injury NOTICE This symbol warns against possible damage to pro...

Page 50: ...ely as described in this user manual Any other use is deemed improper and may result in damage to prop erty or even personal injury The manufactur er accepts no liability for damage caused by improper...

Page 51: ...e found on the nameplate To disconnect this appliance from the power supply pull the mains plug out of the socket The appliance must therefore be connected to an easi ly accessible socket so that it c...

Page 52: ...to a multi socket ex tension cable or a multi socket plug To ensure adequate air circulation do not close the ventilation openings in the appliance housing Risks associated with using refrigerants WA...

Page 53: ...e propel lants inside the appliance as they may create ignitable gas air mixtures Never use defrosting sprays to de frost They can generate explosive gases Risks when dealing with fridge and freezer a...

Page 54: ...a suf ciently cool place or in another refrigerator The maximum storage time in the event of a fault is shown on the appliance s type plate After a malfunction check wheth er the stored food is still...

Page 55: ...bes produced during the rst 6 hours If the water dispenser ice or cold wa ter has not been in used 5 days or longer replace the entire water sup ply Dispose of the water used to rinse the system Risks...

Page 56: ...liance unless they are of the type recommended by the man ufacturer Do not use mechanical devices or oth er means to accelerate the defrost ing process other than those recom mended by the manufacture...

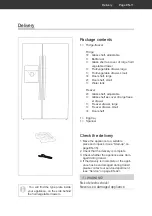
Page 57: ...awer large 1 Freezer drawer small 3 Door shelf 1 Egg tray 1 Spanner Check the delivery 1 Move the appliance to a suitable place and unpack it see Start up on page EN 35 2 Check that the delivery is co...

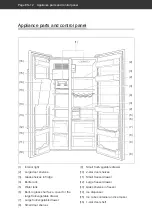
Page 58: ...helf as a cover for the large fruit vegetable drawer 7 Large fruit vegetable drawer 8 Small door shelves 9 Small fruit vegetable drawer 10 2 star door shelves 11 Small freezer drawer 12 Large freezer...

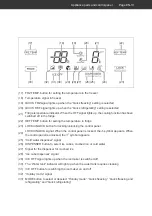
Page 59: ...the control panel 24 LOCK UNLOCK signal When the control panel is locked the symbol appears When the control panel is unlocked the symbol appears 25 Cold water dispenser signal 26 DISPENSER button to...

Page 60: ...he appliance to stand upright for approx 2 hours after transport and before connecting Switching on 1 Insert the mains plug into an easily acces sible socket 220 240 V 50 Hz When you open one of the a...

Page 61: ...the temperature CAUTION Health hazard The appliance may not operate proper ly if exposed to low ambient tempera tures for extended periods of time This can then lead to an increase in temper ature in...

Page 62: ...Quick refrigerating the appli ance automatically switches back to normal mode You can also end Quick freezing and Quick refrigerating manually Quick freezing 33 18 19 Select the Quick freezing mode QU...

Page 63: ...appear on the display To turn off Quick refrigerating and Quick freezing press MODE selection button enough times until the QUICK FRZ and QUICK REF symbols disappear from the display Holiday mode WAR...

Page 64: ...time To avoid an excessive loss of cooling a tone will sound when one or both doors of the fridge freezer have been open for more than 2 minutes Close the open door s When you open the door of the ref...

Page 65: ...temperature in the compartments of the appliance Clean regularly surfaces that can come in contact with food and acces sible drainage systems Clean the water tank if it has not been used for 48 hours...

Page 66: ...ce the load of the door hinges place full con tainers closer to the door hinge Store small bottles and tubes in the large door shelf 2 Place securely closed bottles in the bot tle rack 4 Place cooked...

Page 67: ...lure or malfunction of the appliance remove the stored frozen food from the appli ance and store it in a suf ciently cool place or in another refrigerator The maximum storage time in the event of a fa...

Page 68: ...ne the drawers glass shelves and door shelves as shown in the diagram on page EN 12 to achieve the most efficient use of energy for your appliance Preparing food Only freeze high quality food Freeze f...

Page 69: ...ys be at least 18 C Therefore do not buy any goods that are in frosty over icy chests are stacked above the stipulated high load marker partially clumped particularly easy to identify with berries and...

Page 70: ...note that bacteria and germs can form in this way Cook or use thawed foods as soon as possible Dispose of the defrosting liquid If you only want to defrost part of a pack remove the portion you need...

Page 71: ...emperature Health hazard Eating ice cubes which have been pre pared using impure or standing water can be harmful to health Incorrect handling can lead to risks of causing food poisoning Use only fres...

Page 72: ...note that the symbol will light up af ter 150 days and start flashing after 180 days to remind you to clean the water tank 5 Af ter cleaning the water tank you can turn off the symbol by pressing and...

Page 73: ...sing of ice will stop after about 1 minute In this case wait a moment until the motor has returned to operating tem perature If you need a larger quantity of ice cubes take them directly from the ice...

Page 74: ...d the vessel as closely as possible to the opening for the ice cold water out let 36 in order to avoid crushed ice from spraying out around the sides of the ves sel 3 Push the vessel against the dispe...

Page 75: ...top the flow of ice cubes Locking unlocking the ice maker Locking You can lock the ice maker if you intend not to use its functions for a prolonged period 29 31 1 If required press the LOCK UNLOCK but...

Page 76: ...her They are not dishwasher safe Never spray the appliance with a wa ter jet e g high pressure cleaner Make sure that no water gets into the electrical parts of the appliance Checking and cleaning doo...

Page 77: ...s plug to the socket or switch on the fuse again 3 Place the food back in the fridge 4 Switch on Quick freezing QUICK FRZ and Quick refrigerating QUICK REF at the same time see page EN 17 5 As soon as...

Page 78: ...ce the freezer has reached a tem perature of 18 C and switch off Quick refrigerating and Quick freezing 5 Set the desired fridge and freezer temper ature see page EN 15 6 To switch on the ice maker pr...

Page 79: ...horoughly Using the appliance again 1 Place the cover 39 on the ice cube con tainer 15 41 2 Push the ice cube container back into the freezer until it clicks into place If you experience any problems...

Page 80: ...emove the cover from the in terior light Do not try to replace the interior light or light at the ice cold water outlet yourself NOTICE Risk of damage Improper handling of the appliance can lead to da...

Page 81: ...stand upright for approx 2 hours after transport and before connecting Do not use sharp or pointed objects to unpack it Do not place objects on the bar com partment door Move the appliance using a whe...

Page 82: ...s 10 cm from other refrigerators 10 cm from washing machines dishwashers 10cm If underfloor heating is installed at the set up location place the refrigerator on an insula tion plate made from solid m...

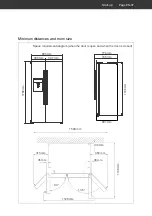
Page 83: ...e requirement diagram when the door is open and when the door is closed 1788 mm 895 mm 396 mm 487 mm 774 mm 745 mm 691 mm 1728 mm 30 mm 315 mm 350 mm 1126 mm 36 mm 135 90 1580 mm 36 mm 1139 mm Minimum...

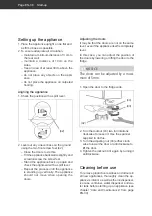
Page 84: ...penser ice cube container water dispenser and wa ter tank before starting up an appliance see chapter Care and maintenance from page EN 30 Setting up the appliance 1 Place the appliance upright on as...

Page 85: ...m this in cludes fuses circuit breakers and con tactors Do not kink or pinch the mains cable or lay it over sharp edges This can result in a break in the cable CAUTION Fire hazard Improper handling of...

Page 86: ...rises the compressor au tomatically switches on Appliance cools too quickly Temperature has been set too low Select a higher setting see Setting the tem perature on page EN 15 The appliance doesn t c...

Page 87: ...the corresponding fault code e g EE will be displayed until the fault has been fixed To fix the fault please contact our service department see page EN 42 Fault code Affected areas of the appliance S...

Page 88: ...ontact your mail order company s customer service centre if the delivery is incomplete the appliance is damaged during transport you have questions about your appliance a malfunction cannot be rectifi...

Page 89: ...extending the lifespan of defective devices through repair and reselling used working appliances in stead of disposing of them Please help us reduce waste and contact our customer service if your pro...

Page 90: ...d in the Technical specifications Technical specifications Item number 46716440 Name of appliance Side by side fridge freezer Model identifier HSBS17990WETEI Device measurements Height Width Depth 176...

Reviews: