background image

6

Installation of the hot tub/Audio system Aquatic

3 .2  Filling the hot tub with water

Fill the hot tub with a sufficient amount of water. The level of water in the hot tub 
cannot ever fall under the skimmer level. If you notice a water leak, stop the water 
until the defect is fixed. Hot tubs do not possess the technology for water-softening 
and hard water can be damaging to them. The damages caused by poor handling and 
upkeep are not covered by the guarantee.

a)   Fill the hot tub through a skimmer to prevent an over aeration of the circulation 

pumps.

b)  Do not fill the hot tub with water of temperature over 104 °F.
c)   Once the water reaches the desired level, put the cartridge filter inside the 

skimmer. Tilt the filter during the installation to prevent air bubbles. Only after 
removing the air from the filter, install the filter into place.

3 .3  Running the power supply of the hot tub

If the hot tub is connected by a moving supply cable, this cable cannot come in con-
tact with sharp objects or be exposed to external forces. Therefore we recommend 
putting the supply cable inside a protective case. Turn on a residual current device 
intended for a hot tub.

3 .4   Programming of the hot tub control unit using the control 

panel

Now you can start the programming of the hot tub. The process is described in the 
chapter “Control panel”. After you are finish the programming, cover the hot tub with 
a thermo cover and let the water temperature to stabilize. Check the water level 
inside the hot tub regularly.

4  Aquatic AV audio system

Aquatic AV audio system AQUATIC/MY MUSIC (relevant only for hot tubs equipped 
with the system) 

If you want to play music from an external device, it is necessary to pair the device 
with the hot tub first (phone, tablet, computer). Turn on the bluetooth system on your 
external device and search for the AQUATIC device. The connection is not restricted by 
a code and only one connection can be active at a time. You can play music immediately 
after the devices are successfully paired. You can control all the functions of the audio 
system on your connected external device.

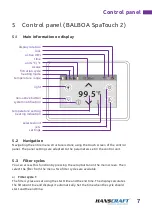
units °C / °F

heating mode

Summary of Contents for SPATOUCH 2

Page 1: ...USER MANUAL SPATOUCH 2 ...

Page 2: ...e 8 5 6 Blower 9 5 7 Lighting 9 5 8 Jets 10 5 9 Display rotation 10 5 10 Other settings 10 5 11 Lock 11 5 12 Hold on mode 12 5 13 Information 12 6 Trouble shooting 12 7 Upkeep of the hot tub 16 7 1 General information 16 7 2 Removal and cleaning of the filter cartridge 16 7 3 Maintaining the quality of the water in the hot tub 17 7 4 Replacing the water 18 7 5 Cleaning the outer shell of the hot t...

Page 3: ...ut power 20 W Preparation and electrical connection options AC three phase current 3 230 400 V 16 A 20 A Ensure that the hot tub is always connected to a circuit protected by a Residual Current protective Device with a rated tripping current of 0 03 A It is necessary to use a Type C or Type D circuit breaker with a rated current of 16 A motor circuit breaker downstream of the Residual Current prot...

Page 4: ...o the dimensions and the weight of the hot tub Consult your building supervisor The weight is specified in the technical description of the given hot tub The tubs are prepared by us for an electrical connection of 3 230 V 400 V alternating current Therefore use a circuit breaker 3 16 A C or D alternatively 3 20 A C or D and a Residual Current protective Device corresponding to this connection Furt...

Page 5: ...ing connection to electricity must be done according to norms valid in Czech Republic ČSN 33 2000 7 701 3 1 General information We strongly recommend you to hire professionally trained and qualified technicians for the process of installation If you decide to install the hot tub by yourself please abide by the following instructions a Carefully remove all the packaging material from the hot tub an...

Page 6: ...cable cannot come in con tact with sharp objects or be exposed to external forces Therefore we recommend putting the supply cable inside a protective case Turn on a residual current device intended for a hot tub 3 4 Programming of the hot tub control unit using the control panel Now you can start the programming of the hot tub The process is described in the chapter Control panel After you are fin...

Page 7: ...hen select the filter from the menu Two filter cycles are available a Filter cycle 1 The filter cycles are set using the start time and the end time The display calculates the filtration time and displays it automatically Set the time when the cycle should start and the end time 5 1 Main information on display temperature range filtration cycle ozone units C F light non active button system notifi...

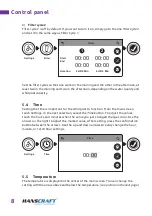
Page 8: ...tion From the main screen touch Settings In the next selection select the Time button To adjust the values touch the hours and minutes when the value you just changed changes color Use the arrows on the right to adjust the marked value After setting press the confirmation button between the arrows Use the up and down arrows to easily change the hour minute or 12 24 hour settings b Filter cycle 2 F...

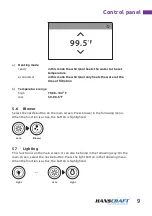
Page 9: ...F low 50 98 6 F 5 6 Blower Select the nozzle button on the main screen Press blower in the following menu When the function is active the button is highlighted 5 7 Lighting This function is on the main screen It can also be found in the following way On the main screen select the nozzle button Press the light button in the following menu When the function is active the button is highlighted Jets B...

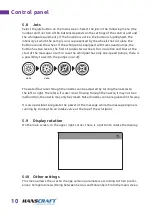
Page 10: ...ly one speed pumps there is a possibility to switch the pumps on or off The water flow rate through the nozzles can be adjusted by turning the nozzles to the left or right Therefore if water is not flowing through the nozzle it may not be a malfunction the nozzle may only be closed Not all nozzles can be regulated in this way It is also possible to regulate the power of the massage while the massa...

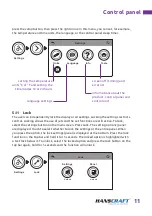
Page 11: ...ock The user can independently lock the display or all settings Locking the settings restricts control Locking allows the use of jets and the set functions are still active To lock select the settings button on the main screen Press Lock The setting options panel are displayed Touch to select whether to lock the settings or the entire panel When you press the option the lock settings panel is disp...

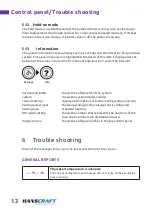
Page 12: ...in the settings section 2 under the title info Software ID SSID shows the software ID of the system system shows the system model number current settings displays information for button configuration service heating power input shows operating el the voltage that is configured heating type standard heating DIP switch setting shows the number that represents the positions of the fuse line S1 on the...

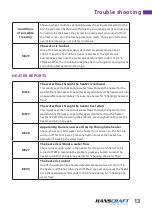
Page 13: ...to turn on The hot tub is turned off After resolving the problem press any button to reset the heater and turn it on again See below for Checking the water flow M030 The heater is too hot One of the temperature sensors detected a temperature of 118 04 F in the heater and the hot tub turned off Press any button to reset the heater once the temperature falls under 107 96 F See below for Checking the...

Page 14: ... degrees F or C are replaced by T degrees The control system is running in a test mode Call the repair service SENSOR RELATED REPORTS NON CLASSIFIABLE REPORTS M022 Memory failure control fail summary The programmed failure test has failed during the system start up M021 The setting were reset permanent memory error Contact your seller or repair services if this report is displayed more than once d...

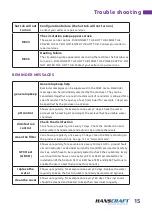
Page 15: ...r pH level with a testing kit and adjust the pH level by the suitable water chemicals disinfection control Check the disinfection Can show up regularly once every 7 days Check the disinfection and other water chemicals level and adjust it by suitable chemicals clean the filter Can show up regularly once every 30 days Clean the filter according to the producer instructions See pg 12 for Hold on mod...

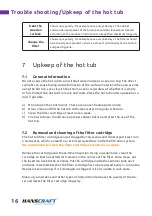
Page 16: ...ich can lead to a restricted water flow inside the filtration system We recommend to clean the filter cartridge at least once a week Remove the cartridge and the skimmer insertion Using a garden hose clean the cartridge so that no settled dirt remains in the corners of the filter Once clean put the insertion back to the skimmer Put the cartridge inside the skimmer tank next and close it Remember t...

Page 17: ...ith a dose of fast dissolving chlorine and thus perform a chlorine shock The pH level of the hot tub water has to be adjusted to 7 0 7 6 first and the chlorine level has to be checked Once a week or after adding a large amount of fresh water to the hot tub add a shock dose of chlorine 10 20 g m3 2 table spoons into the water Add the chlo rine only when there are no people in the hot tub After you ...

Page 18: ...r hot tub from impurities and fallen leaves Ideal chemical levels Free chlorine concentration active oxygen concentration 0 7 1 0 mg l 10 15 mg l pH level 7 0 7 6 Calcium 100 180 mg l Overall alkalinity 80 120 mg l 7 4 Replacing the water It is important to keep the hot tub water fresh and clean We recommend you to replace the water at least every 3 months unless the water quality drops sooner The...

Page 19: ... spoon of dish soap per 8 litres of water Attention Do not let the dish soap solution dry on the thermo cover before washing it off e Wash off the cleaning solution thoroughly f Return the cover back on the hot tub g Open the thermo cover regularly so that the chemical vapours can disperse Flip the thermo cover inner side u at least twice a year for 3 4 hours h If the thermo cover does not get reg...

Page 20: ...unlight do not use inappropriate cleaning deter gents for upkeep Prevent the hot tub surface coming in direct contact with chemicals as well as surface scratches cause by sharp objects Ensure the safety of children in the hot tub by a continuous adult supervision Only eligible persons over 18 years of age educated about the whole process can be operating the hot tub The same goes for handling the ...

Page 21: ...rchase date Delivery date Model name Serial number Seller information name phone number 11 Supplements Setting to 1 230 V When setting to 1 230 V it is necessary to observe the cross section of the supply wire namely CYKY 3 10 A circuit breaker and Residual Current protective Device 32 A according to the applicable standards of the country where the product is installed This setting is necessary t...

Page 22: ...22 Notes 12 Notes ...

Page 23: ...23 Notes ...

Page 24: ...Safety Regular Production Surveillance last update 14 7 2022 www HANSCR AFT eu HANSCRAFT s r o K Vodojemu 140 252 19 Chrášťany u Prahy CZECH REPUBLIC www tuv com ID 0000073072 ...

Reviews: