background image

SKUD 18 

Owners’ Guide


DISCLAIMER 


The SKUD 18 is a high performance sailboat.    Exercise caution ashore near overhead power 
cables and when lifting, launching and retrieving the boat, and stepping and lowering the mast.  
Avoid  sailing  into  shallow  areas,  avoid  underwater  obstacles  and  exercise  extreme  caution  in 
strong winds.  Enjoy your SKUD 18, but use at your own risk! 

 
This document provides guidelines only. All drawings, photographs, illustrations, performance 
data, dimensions, weights and other technical information specifications and particulars of the 
SKUD 18 are published in the belief that they are as accurate as reasonably possible. It is the 
responsibility of the Customer to ensure the accuracy of all such materials and information and 
Hansa Sailing Systems Pty Ltd accepts no liability in this respect. 
 

SKUD 18 WARRANTY 
1.1

 Hansa Sailing Systems Pty Ltd (The Company) warrants that the Goods will be free from 

defects in materials and workmanship for a period of twelve months from the date of delivery to 

the Customer (the “warranty period”). Provided the Customer makes a full inspection of the 

Goods immediately upon receipt and thereafter gives the Company written notice containing full 
particulars of any defects it discovers and the circumstances in which such defects occurred, 
the Company shall, at its sole option, either repair, replace or give credit for price of any such 
Goods which its examination confirms are defective in material or in workmanship within the 
warranty period provided that the Customer has adhered to the payment provisions herein and 
further provided that: 

a). 

The Customer returns the defective Goods to the Company or its authorised service depot 

(as directed by th e 
Company) and pays all transportation charges, duties and taxes associated with the repair, 
replacement and return of 
the Goods to the Customer, or: 

b). 

If, at the Company’s option, the Company arranges for a technician to visit the Customer’s 

location to repair or replace the defective Goods, the Customer pays all transportation charges 
for the technician and his equipment, including any applicable duties and taxes, accommodation 

and living expenses and normal charges for the technician’s time while travelling and for delays 
beyond the Company’s control (save 

that the Customer shall not be liable for any charge in 

respect of the technician’s time on site actually engaged in carrying out the repair or 

replacement of such defective Goods). 

1.2 

The repair or replacement of defective Goods during the warranty period in accordance with 

clause 1.1 shall not extend the period of the warranty of such Goods. 

1.3 

The provisions of clause 1.1 do not extend to any Goods which have been subjected to 

misuse, accident or improper installation, maintenance, application or operation nor do they 
extend to Goods which have been repaired or altered other than by the agents or employees of 
the Company unless previously authorised in writing by the Company. 

1.4 

The warranty contained in clause 1 is expressly accepted by the Customer in lieu of any and 

all other terms, warranties conditions or liabilities whether express or implied, in fact or in law, 
relating to the state, quality description, capacity, design, construction, operation, use or 
performance of the Goods or to the merchantability, repair, or fitness for a particular purpose of 
the Goods or otherwise. No agreement varying or extending the same will be binding upon the 
Company unless in writing signed by a director of the Company. 

1.5 

Unless a director of the Company shall otherwise expressly agree in writing, in no 

circumstances will the Company’s liability to the Customer for any breach of the warranty 

contained in clause 1 exceed the price paid for the products with respect to any claim made. 
 

2. LIMITATION OF LIABILITY 
2.1 

Save as expressly provided in clause 1 the Company shall have no liability whatsoever to 

the Customer for any indirect, special, consequential or incidental loss or damage of any kind 
suffered or incurred by the Customer howsoever caused or arising, whether from breach or non-
performance of any of its obligations under the Contract or from the supply, installation, 
performance, operations or use of the Goods, except liability for death or personal injury arising 

from the Company’s proven negligence.


Summary of Contents for SKUD 18

Page 1: ...uide December 2012 Hansa Sailing Systems Pty Ltd 9 4 Cumberland Avenue SOUTH NOWRA NSW 2541 AUSTRALIA Telephone 61 2 4403 0595 Facsimile 61 2 4403 0598 Email admin hansasailing com Website www hansasailing com ...

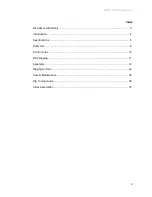
Page 2: ...ners Guide 2 Index Disclaimer Warranty 3 Introduction 4 Specifications 5 Parts List 6 Control Lines 10 Wire Rigging 11 Assembly 12 Rigging for Sail 22 Care Maintenance 35 Rig Tuning Guide 36 Class Association 37 ...

Page 3: ...he technician and his equipment including any applicable duties and taxes accommodation and living expenses and normal charges for the technician s time while travelling and for delays beyond the Company s control save that the Customer shall not be liable for any charge in respect of the technician s time on site actually engaged in carrying out the repair or replacement of such defective Goods 1...

Page 4: ...c spinnaker on a carbon composite pole Slab reefing mainsail and roller furling jib optional Optimised Planing Hull Flared topsides for exceptional stability Wide side decks provide extensive seating area Huge buoyancy chambers for security in extreme conditions Considerable positive buoyancy and will not sink if holed Self draining cockpit Twin rudders maintain exceptional directional control eve...

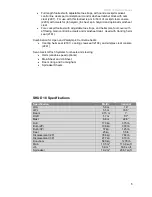
Page 5: ...Used with Canting helm seat 2181 Combination for Open and Paralympic Centreline Seats Canting helm seat 2181 canting crew seat 2194 and simplex cleat console 2291 Servo Assist Winch Systems for sheets and steering Helm variable speed optional Main Sheet and Jib Sheet Boom Vang and Cunningham Spinnaker Sheets SKUD 18 Specifications Specification Metric Imperial LOA 5 8 m 19 LWL 5 5 m 18 6 Beam 2 15...

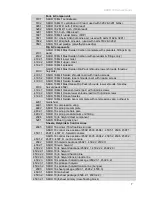
Page 6: ...geon kit complete 2 x 2391 1 2 x 2391 2 P S 2391 1 SKUD 18 top transom gudgeon 2391 2 SKUD 18 bottom transom gudgeon 2391 3 SKUD 18 gudgeon pin insert 2392 SKUD 18 keel lifter plate 2393 SKUD 18 cockpit track each 2m 2394 SKUD 18 mast post 2395 SKUD 18 mast post step set 2395 1 SKUD 18 mast post channel 2395 2 SKUD 18 mast post flat plate 2397 SKUD 18 bow fitting Mk11 model 2397 1 SKUD 18 bow fitt...

Page 7: ... screws 4194 2 SKUD 18 MkII Hansa lower shrouds pair with rigging screws 4194 3 SKUD 18 MkII Hansa forestay 4291 SKUD 18 MkII Selden boom complete with compression vang outhaul mainsheet 4491 SKUD 18 compression vang 4482 SKUD 18 spinn pole complete 4482 1 SKUD 18 spinn pole bare pole 4482 2 SKUD 18 spinn pole aluminium end fitting 4586 SKUD 18 jib halyard cleat component 5281 SKUD 18 Boat rig ten...

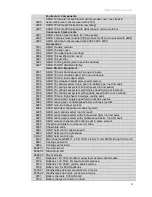
Page 8: ...shing 4597 1 SKUD 18 cunningham tackle line forward console 4597 2 SKUD 18 cunningham tackle line centre console 4597 3 SKUD 18 mainsheet turning block bridle 4597 4 SKUD 18 topping lift line Sails 4603 SKUD 18 sail numbers 4604 SKUD 18 national letters 4691 SKUD 18 sail suit 4691 1 main 4691 2 jib 4691 3 gennaker 4691 1 SKUD 18 main 4691 2 SKUD 18 jib 4691 3 SKUD 18 gennaker 4694 SKUD 18 mainsail...

Page 9: ...ed helm not incl seat 6188 SKUD 18 canting seat system with variable speed helm not incl seat 6189 SKUD 18 main jib sheets incl single canting seat 6281 SKUD canting seat single speed helm dual axis joystick 6282 SKUD canting seat variable speed helm dual axis joystick 6283 SKUD main jib sheet system 6284 SKUD spinnaker haliard power assist system 6285 SKUD seat canting system not incl seat 6286 S...

Page 10: ...Primary 4595 3 3mm Spectra Purple 4 50m Outhaul Secondary 4595 4 4mm Spectra Purple 3 00m Compression Vang GNAV Primary 4594 3 4mm Spectra Black 1 60m Compression Vang GNAV Secondary 4594 4 3mm Spectra Black 1 30m Compression Vang GNAV Tertiary 4594 5 4mm Spectra Black 2 75m Jib Halyard Hauling Line 4592 2 2 4mm Spectra Green 0 45m Jib Halyard Tension Tackle Line 4592 2 3 4mm Spectra Green 2 50m C...

Page 11: ... 18 Owners Guide 11 SKUD 18 Stainless Steel Wire Rigging Description Part No Type Shrouds pair 4193 1 3mm 9x9 SS Wire 4915mm Inners pair 4193 2 3mm 9x9 SS Wire 1915mm Forestay 4193 3 3mm 9x9 SS Wire 5455mm ...

Page 12: ...port immediately to Hansa Sailing or its Distributor The boat is supplied with a bung in the transom for draining the hull a breather in the bow port side and two hatch covers that provide access to the stern compartment from the aft deck Make sure all are securely in place before launching the boat Gennaker Pole Launcher Before fitting the cowling it is recommended that the gennaker pole launchin...

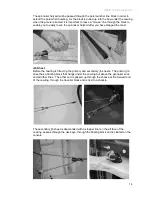
Page 13: ...f line to attach the tack With the pole fully extended and all slack taken out of the line tie the inboard end of the tack line off to the shackle at the front of the aluminium rack in the centre of the boat This limits the pole extension Pass the end of the pole launcher line with the block attached inboard through the bow turning block then through the grommet on the inboard end of the pole and ...

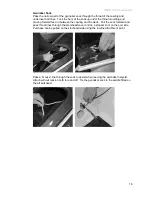
Page 14: ...ter you have stepped the mast Jib Sheet Before the cowling is fitted rig the primary and secondary jib sheets The primary jib sheet has a floating block that hangs under the cowling but above the gennaker sock and all other lines The other end is passed up through the sheave at the forward end of the cowling through the traveller block and is tied to a shackle The secondary jib sheet is dead ended...

Page 15: ...d to the rack Keel Bulb Position the bulb below the centreboard case ensuring that the cavity is uppermost and free of dirt and debris Smear a small amount of grease or petroleum jelly on the bottom 50mm of the centreboard faces and carefully lower through the centreboard case into the bulb cavity taking care to align the heavy bulb with the board Push the board home Fit the supplied bulb pin with...

Page 16: ...eed in between the cowling and the deck Pull the sock forward and pass throat lines through the stemhead cover and tie a stopper knot on the port side Purchase can be pulled on the starboard side using the towline attachment point Pass a mouse line through the sock to assist when reeving the spinnaker halyard Attach without tension both fore and aft Tie the gennaker sock to the saddle fitted on th...

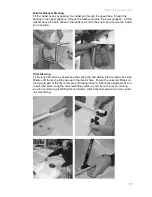
Page 17: ...er pin in position Tiller Steering Fit the long tiller arms by depressing the spring clip and sliding into the rudder box tube Rotate until the spring clip pops up in the locator hole Ensure the universal fittings on the forward part of the tiller arms are both facing inboard Attach the adjustable tie rod to both tiller arms using the universal fittings slide in and clip on the cover making sure t...

Page 18: ...art of the tiller arms are both facing inboard Attach the adjustable tie rod to both tiller arms using the universal fittings slide in and clip on the cover making sure the central universal fitting faces forward Attach the double block to the central universal fitting Reeve steering lines as required Adjusting the Tie Rod Disconnect the universal fitting and rotate the end section to make longer ...

Page 19: ...ite mast is supplied with halyards reeved and spreader base fitted After unpacking slide the top section into the lower section being careful not to twist the halyards Fit the spreader arms and adjusters using the supplied bolts nyloc nuts Note that the adjusters are coded red and green for port and starboard ...

Page 20: ...clamp Repeat for the other side Use the slide adjusters on the spreader tips and turn the barrel adjusters until wire to wire measurement is approximately 770mm and distance from aft face of mast to the transverse of the shrouds is approximately 190mm The gennaker halyard can be reeved internally or externally For an internal system the halyard is passed into the mast through the halyard slot belo...

Page 21: ...ectly through the deck eye in the cowling The main halyard is a 2 1 system dead ended at the masthead fitting and reeved inside the mast and exiting on the starboard side near the foot Test Rigging Before launching the boat for the first time stand the mast and run all halyards and control lines to make sure all components have been installed correctly and all functions are operational ...

Page 22: ...tay Attach the shrouds to the outer chainplates drilled with a single hole using the pin and snail clip Place some cushioning on the floor of the cockpit to prevent damage when raising the mast to vertical by pushing against the step Lift mast and place in mast step One person remains holding the mast forward while another attaches the rig tensioner to the aft hole of the stemhead fitting or to th...

Page 23: ...ase load on to forestay Remove rig tensioner Attach the inner shrouds using the t ball fittings and attach to the forward hole on the chainplates drilled with two holes Adjust shroud tension to suit the sailing conditions Main Halyard The main halyard exits the mast on the starboard side where the cleat is positioned and is led through the cowling to a turning block at the base of the mast post ...

Page 24: ... Tie a stopper knot in the end of the main halyard once reeved Jib Halyard The jib halyard exits the mast on the port side is led through the cowling deck to a turning block at the base of the mast post from where the sail is hauled aloft Once hoisted the jib halyard tension is controlled by a separate hauling line attached to a cleat that is fitted to the halyard above the deck ...

Page 25: ... the mast post Use the mouse line to reeve the halyard end through the gennaker pole launcher block and back aft above the sock and pole but below the jib sheets between the cowling and the cleat console platter and through the spinnaker halyard deadeye and cleat The halyard is then passed through the gennaker halyard tension block attached to a length of bungee cord forward to the turning block m...

Page 26: ... the ratchet to operate correctly across the cockpit and through the starboard ratchet block then aft through the gunwale turning block Lead the sheet forward to the bow passing around the forestay above the gennaker pole and bring aft to meet the other end of the sheet near the port chainplate The gennaker is most commonly setup for a port hoist Taking the hoist end of the halyard and ensuring it...

Page 27: ...trieval patch Tie both ends of the gennaker sheet to the clew of the gennaker using bowlines Haul on the halyard leading from the console to hoist the gennaker and launch the pole then cleat off To lower and retrieve the gennaker and retract the pole release the cleat then haul on the halyard from the forward turning block until the gennaker is stowed in the sock and the pole has retracted Schemat...

Page 28: ...he keel raised but extreme caution is advised when lowering on to the cradle Attach the short lifting slings to the aft holes on the inner chainplates and the long slings to the fittings on the upper gudgeons Attach to the crane hook and raise the boat taking care to avoid contact between the mast or spreaders and the crane jib The aft slings may be adjusted in length to provide a slightly bow dow...

Page 29: ...lifting slings carefully lower the centreboard with the manual winch then remove the keel lifter Insert the lock down pin Fit the snail clip to secure the keel lock down pin Fit keel wedge if supplied and tap down behind the trailing edge until firm ...

Page 30: ...g part of the halyard Starting at the head and working your way down to the tack clip the jib luff on to the forestay using the press studs Shackle the tack eye on to the aft hole in the stemhead fitting Wrap the jib luff pocket around the forestay and zip closed to hide the wire strop and eye Zip the luff pocket right down to hide the tack fittings Shackle the primary jibsheet to the clewboard ...

Page 31: ...the cowling deck Use the purchase to adjust the jib halyard tension and cleat on the console To lower disconnect the cleat from the halyard Boom GNAV compression vang Attach the gooseneck and secure the pin with a ring or snail clip Same for the compression vang post Use the cleat on top of the boom to set topping lift Attach compression vang line to vang tackle hook block ...

Page 32: ...it sheeting pass the mainsheet through the boom through the centre hanging block and tie a stopper knot this end of the mainsheet can alternatively be passed down to a block and mainsheet cleat mounted on the console for forward sheeting or double ended sheeting Pass the other end through the outboard hanging block forward through the floating traveller block and then through the next block fitted...

Page 33: ...Attach the halyard shackle to the head eyelet and hoist from the turning block at the mast post base When fully hoisted cleat off on starboard side of the mast Attach the outhaul line that feeds through the port side hanging block on the inboard end of the boom to the outhaul tackle Ensuring the compression vang is also attached to its tackle wrap the mainsail luff pocket around the mast ...

Page 34: ...d attach the cunningham hook blocks to the tabs on each side of the mainsail luff pocket Pass the clew strap under the boom and clip on to the lower webbing loop ensuring mainsheet is still free to travel Attach the outhaul clip to the webbing loop on the clew ...

Page 35: ...SKUD 18 Owners Guide 35 Care Maintenance Being Developed ...

Page 36: ...SKUD 18 Owners Guide 36 Rig Tuning Guide Being Developed ...

Page 37: ... in countries where no NACA is established members can join the IACA directly One free annual membership of the NACA IACA is offered to each new SKUD owner Where the owner is a company or organisation that membership can be delegated to an individual Visit www skud org for more information International Hansa Class Association Inc 2 7 Bungaleen Court DANDENONG SOUTH VIC 3175 AUSTRALIA Telephone 61...

Reviews: