background image

22

Engli

sh

2.2.4

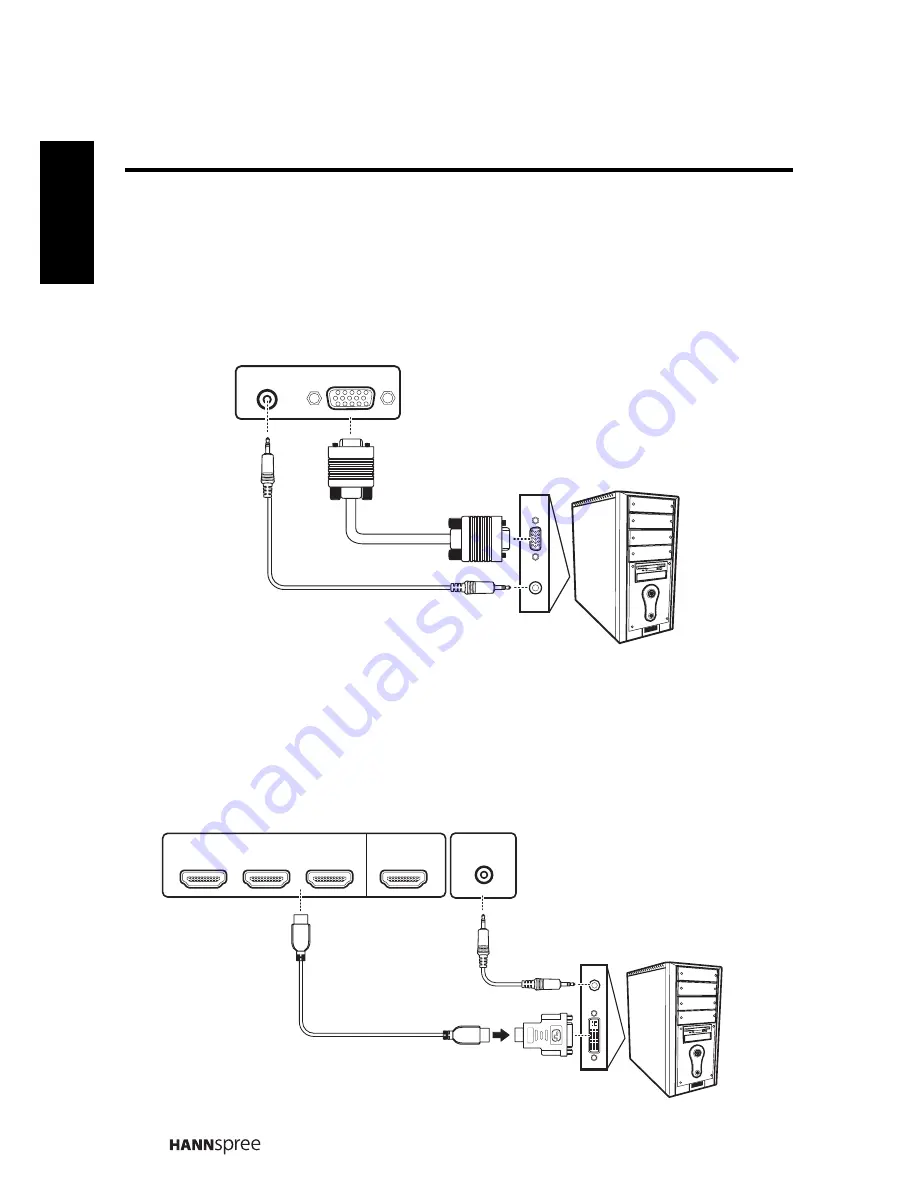
Connecting a PC using VGA

Connect the TV to your PC to use it as the monitor using the VGA port as shown.

1

Connect the VGA port of the TV to the VGA output of the PC.

2

Connect the line out port of the PC to the PC Audio In port of your TV to 

listen to audio from the PC.

2.2.5

Connecting a PC using DVI

Connect the TV to your PC to use it as the monitor using the DVI port as shown.

1

Connect the HDMI port of the TV to the DVI output of the PC.

2

Connect the line out port of the PC to the PC Audio In port of your TV to 

listen to audio from the PC.

AUDIO IN

VGA

 VGA Cable

 Audio Cable

 PC

(Optional)

(Optional)

2

HDMI IN

1

HDMI 4

3

AUDIO IN

H

D

M

I

 PC

 Audio Cable

HDMI to DVI Cable

(Optional)

(Optional)

Summary of Contents for ST321MNB

Page 1: ...bildschirm T l viseur cran Cristaux Liquides TV de Pantalla de Cristal L quido TV LCD TV Ecr de Cristais L quidos LCD tv Telewizor ciek okrystaliczny LCD TV LCD TV LCD TV LCD TV Folyad kkrist lyos TV...

Page 2: ...ction 18 2 1 2 Connecting an Antenna or Cable TV 18 2 2 Connecting External Devices 19 2 2 1 Connecting External Earphones 19 2 2 2 Connecting to AV Devices 20 2 2 3 Connecting a VCR STB DVD Player Us...

Page 3: ...ngs 27 3 1 OSD Setting Menus 28 3 2 Adjusting Picture Settings 28 3 3 Adjusting Audio Settings 29 3 4 Adjusting Clock and Timer Settings 30 3 5 Adjusting Channel Settings 31 3 6 Adjusting PC Setting O...

Page 4: ...or use within certain voltage limits Hannspree cannot accept responsibility for any failure to satisfy the requirements resulting from a non recommended modification of the device Description of Warni...

Page 5: ...dripping or splashing and no objects filled with liquids such as vases shall be placed on the apparatus CAUTION These servicing instructions are for use by qualified service personnel only To reduce...

Page 6: ...act an authorized service technician 5 If any fluid is sprayed or dropped into the TV contact an authorized service technician 6 The screen of the TV is made of glass Avoid hitting or scraping it If t...

Page 7: ...instruction manual is designed to assist you in setting up and using the TV The information in this manual has been carefully checked for accuracy however no guarantee is given to the correctness of t...

Page 8: ...horization of Hannspree or of other third parties The Hannspree logos presented herein are trademarks of Hannspree All other product names trademarks or logos mentioned herein are used for identificat...

Page 9: ...mer Service immediately if anything is missing or damaged TV User s manual Quick start guide Warranty card Power cord Remote control and batteries TV cleaning cloth According to WEEE regulation this T...

Page 10: ...o speakers provide full rich sound and a convenient audio output port lets you connect to an external audio system or earphones 1 3 Features Note The supporting devices mentioned in this manual may va...

Page 11: ...the OSD menu Program select Press to decrease the program number or move downward to the next item on the OSD menu Volume adjust VOL Press to increase the volume or move to the right on the OSD menu V...

Page 12: ...ilt in amplifier HDMI 4 Input Connect a HDMI equipment or a HDMI DVI adapter cable to devices such as a DVD player or set top box Cable Antenna Connect to an antenna or cable TV Component Inputs Video...

Page 13: ...a HDMI equipment or a HDMI DVI adapter cable to devices such as a DVD player or set top box HDMI 3 Input Connect a HDMI equipment or a HDMI DVI adapter cable to devices such as a DVD player or set to...

Page 14: ...ing Time and Parental Rating Menu MENU Press to turn the on screen display OSD menu on off OK OK Press to confirm a selection Arrows Press up down left or right to scroll through the on screen display...

Page 15: ...Press to adjust the screen size programmable in the teletext mode only Subtitle With an ATV source if the teletext mode is activated and the teletext has a subtitle page press to display the page Wit...

Page 16: ...tes Cancel the timer by selecting the Sleep Off option Aspect ratio Press to adjust the width to height ratio of the image with aspect ratio AUTO Full 4 3 Zoom or Subtitle Note For best results use th...

Page 17: ...Control Batteries 1 Open the battery compartment cover at the back of the remote control A 2 Insert the batteries paying attention to the polarity markings inside the battery compartment B 3 Replace t...

Page 18: ...om the old batteries Danger of explosion if battery is incorrectly replaced Replace only with the same or equivalent type recommended by the equipment manufacturer Discard used batteries according to...

Page 19: ...f the power cord into a power outlet 2 1 2 Connecting an Antenna or Cable TV Connect one end of the VHF UHF Antenna or CATV cable to TV DTV jack on the rear of the TV Note Images are for illustration...

Page 20: ...te ports on the rear of the TV 2 2 1 Connecting External Earphones Note External speakers or headphones are not included with the TV The internal TV speakers will not output sound when headphones are...

Page 21: ...udio ports can be selected when connecting AV devices The Video and S Video ports in group D share the same R L Audio ports in the same group HDMI 4 or or or or 3 1 2 A B C HDMI IN AUDIO VIDEO PR PB R...

Page 22: ...io Connect the TV to a VCR STB DVD player using three different types of video audio inputs VIDEO Y PB AUDIO L R PR STB DVD Video Cable Audio Cable Optional Optional R AUDIO L VIDEO VCR STB DVD Video...

Page 23: ...TV to listen to audio from the PC 2 2 5 Connecting a PC using DVI Connect the TV to your PC to use it as the monitor using the DVI port as shown 1 Connect the HDMI port of the TV to the DVI output of...

Page 24: ...to the following illustration to connect a HDMI device to the TV 2 2 7 Connecting USB Service port for DTV F W update only Note When the HDMI cable is connected connecting the audio cable is not neces...

Page 25: ...lable on your player Note The S Video connector and AV connectors cannot be connected at the same time or the wrong signals might be generated The cables are color coded black red white and yellow Con...

Page 26: ...u need to activate the channel search first 1 Press MENU on the control panel or remote control then select to enter the Channel menu 2 Select Auto Scan 3 Press on the remote control to select Start a...

Page 27: ...channel 4 Press MENU to exit 2 3 7 Editing the Channel List 1 Press MENU on the control panel or remote control then select to enter the Channel menu 2 Select Channel Edit and press OK to enter the su...

Page 28: ...m Function TV Control Panel Remote Control OSD Menu MENU MENU Up PS Arrow Down PT Arrow Increase VOL Arrow Decrease VOL Arrow Select INPUT VOL OK Return MENU VOL MENU Picture Audio Clock Timer Channel...

Page 29: ...trol or INPUT VOL on the control panel to mark an item 7 Press MENU to exit 8 The Picture menu can be used to adjust the Picture Mode Brightness Contrast Sharpness Color Tint Digital NR X Contrast Bac...

Page 30: ...only Digital MTS DTV only Audio Description DTV only and Recall settings Equalizer is available for adjustment only if you select User in Audio Mode The Audio Mode can be set to Dynamic Standard Soft...

Page 31: ...ntrol or INPUT VOL on the control panel to mark an item 7 Press MENU to exit 8 The Clock and Timer menu can be used to adjust the Sleep Timer Time Mode Date and Local Offset settings Date and Local Of...

Page 32: ...dit Favorite Lists and Parental Control settings or functions see Performing an Automatic Channel Search on page 25 Editing the Favorite List on page 26 and Editing the Channel List on page 26 The Cou...

Page 33: ...e control panel to change the scales or press OK on the remote control or INPUT VOL on the control panel to perform an item 7 Press MENU to exit the PC Setting menu 8 The PC Setting menu can be used t...

Page 34: ...Red key on your remote control The SCART1 and SCART2 are only available for adjustments when the input source is set to SCART1 or SCART2 The available OSD languages are English Deutsch Fran ais Itali...

Page 35: ...ot receive some TV channels using cable TV Try the Auto SCAN function in the Channel OSD menu Want to reset TV settings Use the Recall function in the Setup OSD menu Cannot operate menus If OSD items...

Page 36: ...V VESA 1280x720 60Hz 44 955 59 94 74 25 V V VESA 1280x960 60Hz 60 60 108 V V SXGA 1280x1024 60Hz 63 981 60 02 108 V V WXGA 1440x900 60Hz 55 935 59 887 106 5 V V VESA 1920x1080 60Hz 67 500 60 00 148 5...

Page 37: ...x 2 AV x 1 Component Video RCA In x 1 Component Audio In x 1 HDMI x 4 VGA x 1 VGA Audio In x 1 CI x 1 supports 5V S Video x 1 Output Function Earphone Out Speaker 10W 10W SCART Out Feature Full HD HD...

Page 38: ...ing the 4 mount holes on the back and center of the TV Installing the LCD TV requires special skill that should only be performed by qualified service personnel Customers should not attempt to do the...

Page 39: ...38 English 8 Using the Cable Organizer Route the cables through the cable clamp as shown f...

Reviews: