background image

User’s Manual


12


INSTALLATION INSTRUCTIONS 


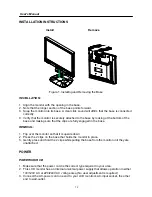
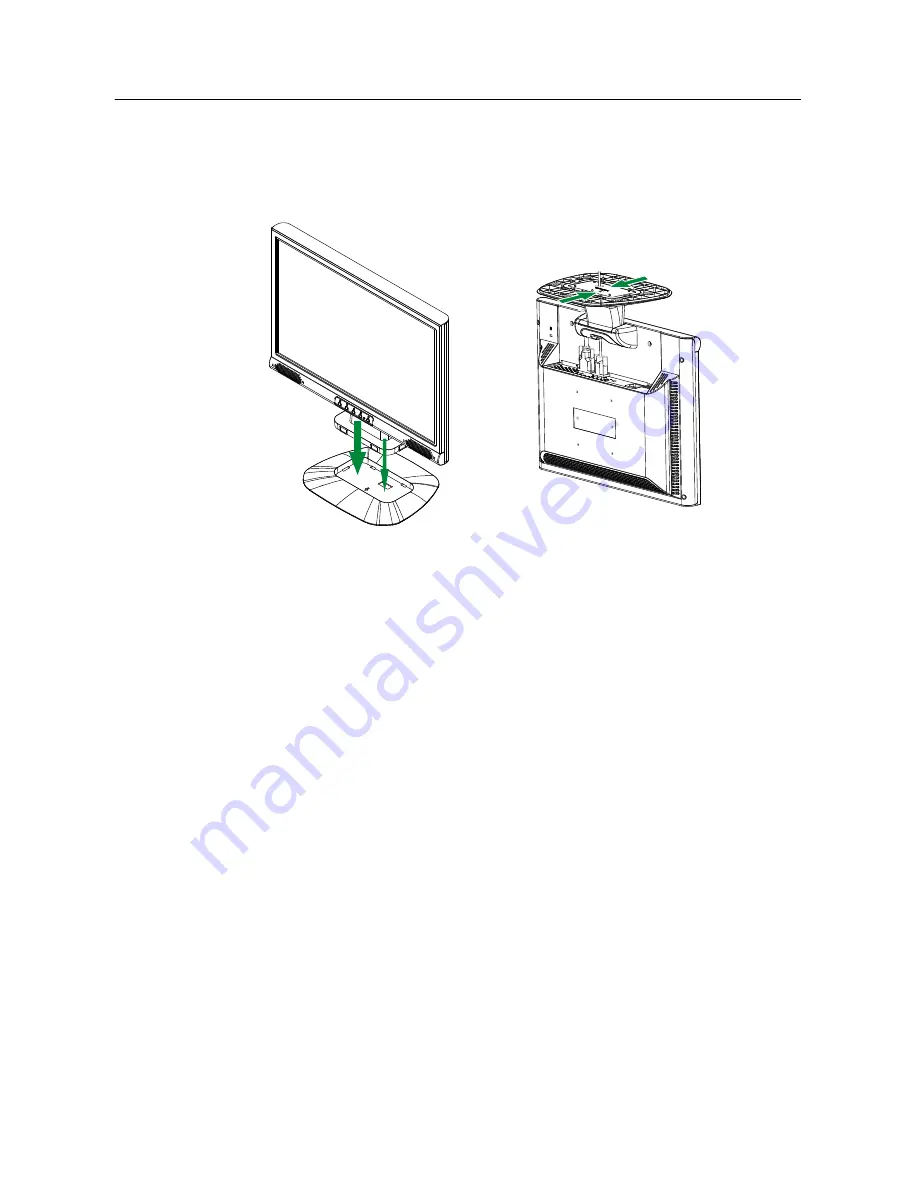
Install    

Remove 


Figure.1. Installing and Removing the Base 


INSTALLATION: 
 

1.  Align the monitor with the opening in the base. 

2.  Note that the longer section of the base points forward. 

3.  Snap the monitor into its base. A clear click sound will affirm that the base is connected 

correctly. 

4.  Verify that the monitor is securely attached to the base by looking at the bottom of the 

base and making sure that the clips are fully engaged in the base. 


REMOVAL: 
 

1.  Flip over the monitor so that it is upside down. 

2.  Press the 2 clips on the base that holds the monitor in place. 

3.  Gently press and hold the 2 clips while pulling the base from the monitor unit they are 

unattached. 


POWER 


POWER SOURCE: 


1.  Make sure that the power cord is the correct type required in your area. 

2.  This LCD monitor has an Internal universal power supply that allows operation in either         

100/120V AC or 220/240V AC voltage area (No user adjustment is required.) 

3.  Connect the AC-power cord one end to your LCD monitor’s AC-input socket, the other 

end to wall-outlet .   

Summary of Contents for JW199D

Page 1: ...19 inch Wide Screen TFT LCD Monitor JW199D USER S MANUAL...

Page 2: ...ning the equipment off and on the user is encouraged to try to correct the interference by one or more of the following measures Reorient or relocate the receiving antenna Increase the separation betw...

Page 3: ...e Since it is not so far possible to satisfactorily recycle the majority of electronics equipment most of these potentially damaging substances sooner or later enter nature There are also other charac...

Page 4: ...he product must be prepared for recycling and the manufacturer is obliged to have an environmental policy which must be adhered to in each country where the company implements its operational policy T...

Page 5: ...flame retardants containing bromine or chloride and the PCBs are suspected of giving rise to severe health effects including reproductive damage in fish eating birds and mammals due to the bio accumul...

Page 6: ...equirement states that neither CFCs nor HCFCs may be used during the manufacture and assembly of the product CFCs freons are sometimes used for washing printed circuit boards CFCs break down ozone and...

Page 7: ...d recycling of industrial technology devices at the end of life These devices contain recyclable materials which can be re decomposed and re integrated into brand new marvels On the contrary other mat...

Page 8: ...HE PACKAGE 11 INSTALLATION INSTRUCTIONS 12 POWER 12 MAKING CONNECTIONS 13 ADJUSTING THE VIEWING ANGLE 14 OPERATING INSTRUCTIONS 15 GENERAL INSTRUCTIONS 15 FRONT PANEL CONTROL 16 HOW TO ADJUST A SETTIN...

Page 9: ...f the cabinet are provided for ventilation To ensure reliable operation of the monitor and to protect it from overheating be sure these openings are not blocked or covered Do not place the monitor on...

Page 10: ...me Due to the nature of the LCD screen an afterimage of the previous screen may remain after switching the image when the same image is displayed for hours In this case the screen is recovered slowly...

Page 11: ...ded Resolutions 1440 X 900 60Hz EPA ENERGY STAR Ergonomic Design Space Saving Compact Case Design CHECKING THE CONTENTS OF THE PACKAGE The product package should include the following items LCD Monito...

Page 12: ...sure that the clips are fully engaged in the base REMOVAL 1 Flip over the monitor so that it is upside down 2 Press the 2 clips on the base that holds the monitor in place 3 Gently press and hold the...

Page 13: ...the DVI D cable Dual input mode optional to the back of the monitor and connect the other end to the computer s DVI D port 3 Connect the audio cable between the monitor s audio input and the PC s audi...

Page 14: ...d the stand so you do not topple the monitor when you change the monitor s angle You are able to adjust the monitor s angle from 5 to 20 Figure 3 Monitor Angle NOTES Do not touch the LCD screen when y...

Page 15: ...settings the picture can be adjusted to your personal preferences The power cord should be connected Connect the Signal cable from the monitor to the VGA card Press the power button to turn on the mon...

Page 16: ...near heat sources such as radiators or air dusts or in a place subject to direct sunlight or excessive dust or mechanical vibration or shock Save the original shipping box and packing materials as th...

Page 17: ...nd then enter the option OSD Setting Select the OSD Setting option on the Main Menu and then enter the option Other Setting Select the Other Setting option on the Main Menu and then enter the option I...

Page 18: ...er the R option and adjust the level 2 To adjust the green enter the G option and adjust the level 3 To adjust the blue enter the B option and adjust the level Exit Exit the OSD menu function O OS SD...

Page 19: ...I Select the DDC CI option to switch the function On or Off dual input mode optional Volume Select the Volume option to change the volume level Enter the option and adjust the level Sharpness Select t...

Page 20: ...This monitor meets the Green monitor standards as set by the Video Electronics Standards Association VESA and or the United States Environmental Protection Agency EPA and The Swedish Confederation Em...

Page 21: ...o Card should be snugly seated in its slot Make sure monitor s video cable is properly connected to the computer Inspect monitor s video cable and make sure none of the pins are bent Make sure compute...

Page 22: ...to display mode given in the following table FACTORY PRESET TIMING TABLE VGA 720 x 400 70Hz VGA 640 x 480 60Hz MAC 640 x 480 67Hz VESA 640 x 480 75Hz VESA 800 x 600 56Hz VESA 800 x 600 60Hz VESA 800 x...

Page 23: ...hannel Input Terminal D Sub DVI D Dual Input Model Maximum Screen Size Hor 428mm Ver 278mm Power Source 100 240VAC 50 3Hz 60 3Hz Environmental Considerations Operating Temp 0 to 50 C Storage Temp 20 t...

Reviews: