Hanger ACP Synchrony User Manual Download Page 8

- 4 - 


SYNCHRONY™ PROGRAM EQUIPMENT USER MANUAL 


© COPYRIGHT 2015, ACCELERATED CARE PLUS CORP., ALL RIGHTS RESERVED 

CONFIDENTIAL AND PROPRIETARY 

OPERATION OF SYNCHRONY™ 


To Turn ON Synchrony™  


1.


The Synchrony™ cart should be plugged in when not in use so that the OMNIsEMG™ sensors remain 
charged. Ensure that the charging station is turned on and the sensors are plugged in properly and charging. 
Fully charged sensors should be available at the start of the day. Replace the sensors on the charger cradle 
after each use so that they remain fully charged. 

2.


Turn on the computer by pressing the green (GO) button on the front of the computer module located in the top 
tray storage compartment.  

3.


Turn on the monitor and printer (as needed). 

4.


Enter password. 

5.


The Main Menu screen will appear automatically after a series of start-up screens load. 


To Turn OFF Synchrony™  


1.


Left click the Shutdown button  

   located in the lower right corner of the Main Menu screen.  

2.


A message appears asking for confirmation. Left click the mouse button again to confirm exiting the 
program and turning off the computer.  

3.


Remove the power strip plug from the wall outlet if the cart is being transported.  Otherwise, leave the cart 
plugged in, to charge the OMNIsEMG™ sensors.


NOTE: 

  Do not remove power cord from the wall outlet before Synchrony™ is powered “OFF” using the 

procedure above.  Synchrony™ may remain "on" for extended periods, including overnight, without harming it 
or reducing the unit's longevity. 
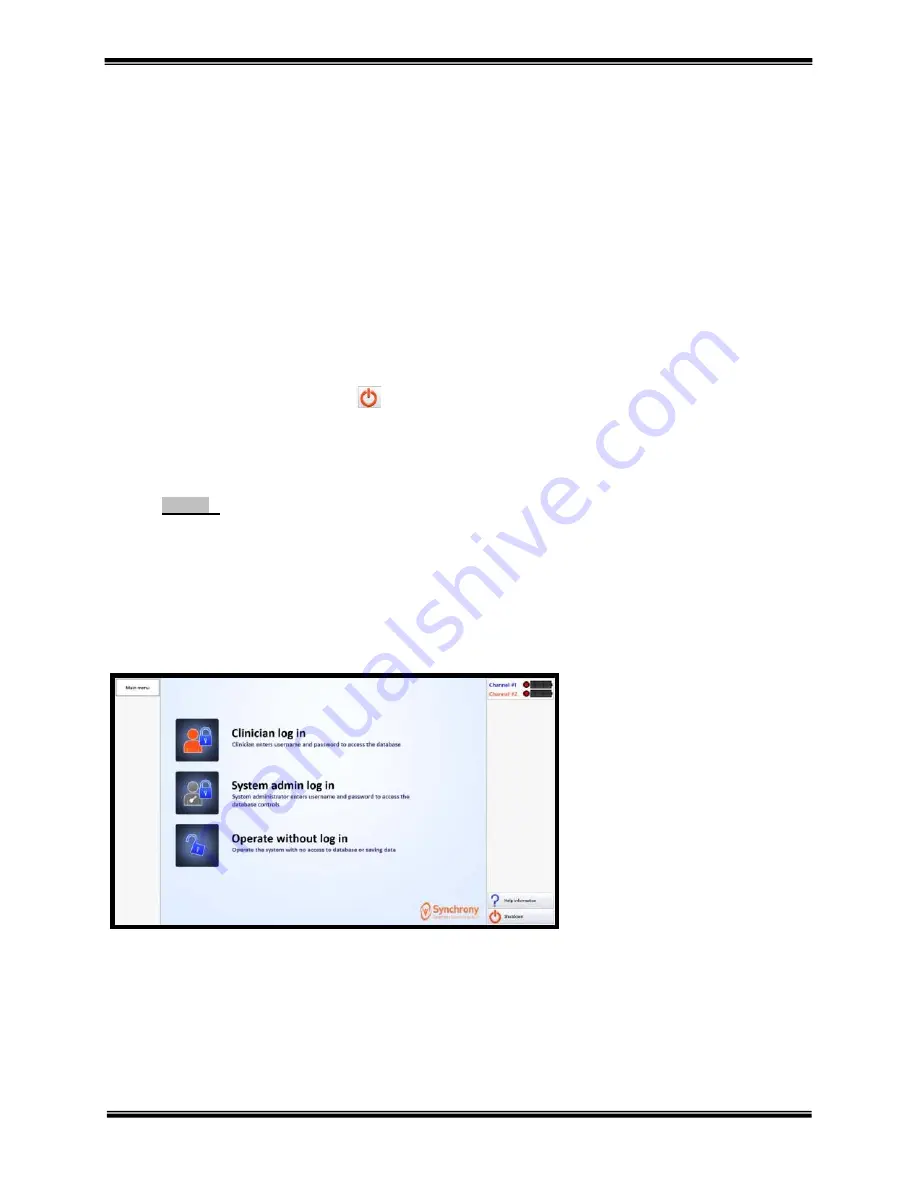


Main Menu 


From the Synchrony™


Main Menu, the following areas are available: 


Clinician log in

 - Clinicians who 

have been granted  access by the 
designated System Administrator 
can have access, manage patients, 
and initiate treatment sessions 
 

System admin log in

 - allows the 

System Administrator to add and 
manage clinician accounts 
 

Operate without log in

 - allows 

the user to treat a patient without 
saving treatment data for that 
patient 
 

Help information

 - informational 

items pertaining to the function of 
Synchrony

Summary of Contents for ACP Synchrony

Page 1: ...orporated by reference in its entirety This manual may not be used for any other purpose Any additional copies of the manual shall be ordered from ACP No changes or modifications shall be made to the manual without prior review and written authorization from ACP No authorization is given to market sell disclose or exploit this manual except as for purposes of using the equipment as contemplated by...

Page 2: ...PULSE NEUROPROBE OMNISTIM OMNISOUND OMNIBAND OMNITEST OMNICYCLE OMNIVR SYNCHRONY and OMNIsEMG products represent the most recent worldwide advances available for therapeutic application of electro medical devices and other rehabilitation technology ACP is internationally recognized for its contribution to research in the development of medical applications for therapeutic rehabilitation The compan...

Page 3: ...NY 4 Main Menu 4 Adding a New Patient 5 Patient Swallowing Information 6 Adding and Managing a Clinician Account 6 Managing existing Patient Accounts 7 Deleting a patient from the database 8 Choose trial type 8 Performing an Assessment 8 Performing an Exercise 11 Printing and Reports 16 Patient Dashboard 16 Electrode Setup Connecting the sEMG Sensors 18 INFECTION CONTROL EQUIPMENT AND PRINCIPLES O...

Page 4: ... COPYRIGHT 2015 ACCELERATED CARE PLUS CORP ALL RIGHTS RESERVED CONFIDENTIAL AND PROPRIETARY ...

Page 5: ...e among different types of muscle activity Differentiate effects of posture or other variables on muscle activity Learn new behaviors Learn unfamiliar behaviors Learn behaviors that are difficult to conceptualize or identify under normal circumstances Contraindications Treatment should be paused or terminated should the clinician observe any of the following patient behaviors Chest pain Severe sho...

Page 6: ...y of use with regards to prevention of accidents and environment are an extension of the users instructions The device uses a lithium ion battery Battery replacement and disposal should only be performed by the ACP Service Center or an authorized repair facility Precautions Synchrony is a professional rehabilitation tool intended for patients of all ages who have been diagnosed with dysphagia or a...

Page 7: ...n perfect condition to the postal or delivery services However any damage or loss incurred during transportation or delivery is the postal or Delivery Company s responsibility If damage or loss to the product and or container is obvious or suspected appropriate notation must be made on the signed freight bill at the time of delivery All damage claims should be promptly filed with the delivering ca...

Page 8: ... located in the lower right corner of the Main Menu screen 2 A message appears asking for confirmation Left click the mouse button again to confirm exiting the program and turning off the computer 3 Remove the power strip plug from the wall outlet if the cart is being transported Otherwise leave the cart plugged in to charge the OMNIsEMG sensors NOTE Do not remove power cord from the wall outlet b...

Page 9: ...ient data Left click the Add new patient on the Select patient category screen Left click the Clinician log in on the main menu Enter your Clinician ID and Password Patient ID medical record required field Indicate patient Gender required field Year of birth required field Primary diagnosis recommended Cognitive score optional Using PENS Y N recommended Non oral feeding Y N recommended Diet level ...

Page 10: ...nician Account Only the System Administrator may create and manage user accounts clinicians From the Main menu select the System admin log in option Enter the Admin ID and Password The user ID and password must contain at least 4 characters Select the Manage clinician s option Using PENS Yes or no response Non oral feeding Yes or no response Diet level allows tracking of diet level progression in ...

Page 11: ...These changes include changing the Patient ID Gender and Year of Birth Enter a Clinician ID username for the clinician This will be used by the clinician to log in The Clinician ID and password must contain at least 4 characters Enter a Clinician password for the clinician Enter the password again to confirm From the System admin start screen select the Manage patient s option Left click the patie...

Page 12: ...s menu Performing an Assessment A patient assessment is typically performed in order to validate sensor performance and the patient s abilities It is used to measure and quantify specific swallow activity e g typical swallow swallow duration effortful swallow pre motor time etc or oral motor activity NOTE Any button with a L M or R in a box format indicates that the foot switch can be used in plac...

Page 13: ...nal capture by confirming the sensor indicator light is green and that there is an active trace visible on the screen To start recoding the Assessment session either left click Start recording or depress the M middle foot pedal Drop down boxes and comment box After selecting Pharyngeal assessment be prepared to enter the electrode placement bolus type and volume from the drop down boxes at the top...

Page 14: ...essment of Exercise application can be performed Cancel and record new delete the current assessment and record a new one Add event marker provides the ability to identify an event on the OMNIsEMG trace activity e g typical swallow Add period marker provides the ability to identify a segment of time on the OMNIsEMG trace activity e g resting baseline Add print zone define a specific segment on the...

Page 15: ...add a Resting baseline Click the Resting baseline box or depress the R right foot pedal once to start the resting baseline capture Click the Resting baseline box or depress the R right foot pedal to stop capturing the resting baseline To capture a Peak Click the Add peak marker box or depress the L left foot pedal and a blue shadowed peak marker will appear around the captured peak The second step...

Page 16: ...baseline and the Peak events Each item can be edited or deleted using the tools adjacent to each captured item Graph display Provides a view of the OMNIsEMG trace display of the captured items that can be edited or deleted as needed Tool options include Continue to exercise advances to the exercise visualization options screen New exercise type returns to the Trial type screen Cancel and restart D...

Page 17: ...n buttons The target will be displayed on the visualization as a default This can be turned off by left clicking the button to the left of the minus sign Target low swallow amplitude goal low end using the averages of the peak voltage measured during the pre exercise assessment The default is 40 but can be adjusted using the and sign buttons The target will be displayed on the visualization as a d...

Page 18: ...dentifies how the repetitions should be counted Manual repetition counting requiring physical click upon each swallow automatic when OMNIsEMG activity crosses the low target Additional Exercise Parameters Trace Additional Exercise Parameters Bar graph Additional Exercise Parameters Work Rest Cycle Show last peak this setting provides the user with a visual indicator of the maximum amplitude on the...

Page 19: ...ly hop When set to Stop the patient has time to prepare before contracting When set to not Stop it requires greater timing and coordination by the patient Exercise summary reports At the completion of an exercise the exercise summary dashboard is displayed providing multiple views of the completed exercise in a tabbed format The default display is the Summary report providing an at a glance view o...

Page 20: ... available for all assessment and exercise reports Print provides a hard copy printed version of the report This report is printed via the included printer Save this feature allows a copy of the report to be saved electronically to a USB flash drive Save and start session changes made to a patient s information can be made and saved prior to starting a new session Save and close changes made to a ...

Page 21: ...res provides an at a glance view of the patients functional outcome measures of selected swallowing metrics NOMS FOIS or MASA Non oral feeding status and Diet level Treatment progression views of swallow exercise metrics including bolus type and volume and exercise type repetitions Session history a display of all the patients saved session data ...

Page 22: ...he sensor and then remove the electrode patch from the plastic liner card Attach the lead wire to the electrode snap by squeezing the clip and releasing onto the post Prepare the patient s skin by thoroughly cleaning the area of application using the included Prep Pad Allow the skin to fully dry before applying the electrode Clip the OMNIsEMG sensor to the patients clothing in a location that mini...

Page 23: ...be cleaned disinfected per facility infection control policy ACP recommends the following guidelines Cleaning and Low Level Disinfection This is a recommended daily housekeeping practice to keep the equipment clean and free of contaminants which could contribute to transmission of infection The following practices are recommended for use when treating intact skin without the presence of physiologi...

Page 24: ...film is discarded after each patient treatment The procedure for use is as follows 1 Wash hands 2 Apply Intermediate Level Disinfection prior to barrier application 3 Select tear or cut with clean scissors a length of barrier film to fit over the operator surfaces 4 Prepare any items which may become in contact with the therapist during treatment such as ultrasound gel pens assessment tools cart h...

Page 25: ...ncy ISM band 2 4GHz standard IEEE802 15 4 Input Impedance 10G Ohms CMMR 110db 50 60Hz Resolution 16bit Acquisition frequency Up to 4KHz Sensitivity 1 V OMNIsEMG Receiver Dongle Dimensions 152mm x 82mm x 22mm Weight 240g OMNIsEMG Ambient conditions for operation 20 ºC to 45 ºC 50 to 80 Rh non condensing Ambient conditions for storage or transportation 0 ºC to 40 ºC 50 to 80 Rh non condensing Altitu...

Page 26: ...ue light goes out the sensor is charged Make sure the sensors are configured and ready for use Run the sensor across the magnetic section of the charging tray that has the outline of the dongle This will activate the sensor It will show active and ready with a white flashing light Sensor electrode noise The site has not been cleaned and skin debrided properly to eliminate artifact in the signal Re...

Page 27: ...nty Exclusion Any and all warranty coverage will be void if any of the following have occurred 1 The product contains repairs or replacement parts not furnished by ACP 2 The product is damaged resulting from misuse or negligence 3 The product has been tampered with and or altered including serial number alteration 4 The product was used with accessories and or supplies including electrodes not app...

Page 28: ...r the shipping charges and related costs to return the unit to the customer provided repair is deemed to be under warranty ACP is not responsible for any loss or damage to the Equipment prior to receipt at the ACP Service Center Equipment returned for warranty service must be shipped complete with all accessories except for manuals in its original packing or equivalent so as not to be damaged whil...

Page 29: ...eality augmented biofeedback rehabilitation unit called the OMNIsEMG which has been specifically designed to accommodate patients with difficulty swallowing as a result of oral or pharyngeal muscle dysfunction ITEM ITEM NO DESCRIPTION 33344 Printer Laser Samsung Wifi 39593 Mouse Wireless M325 59441 Keyboard Wireless K400 18669 Charging Station OMNIsEMG 64187 Sensor OMNIsEMG 93477 Dongle OMNIsEMG 2...

Page 30: ...NCHRONY AND OMNIsEMG ACCESSORIES cont ITEM ITEM NO DESCRIPTION 74921 Electrodes Face Neck PENS w snap 10packs box 34184 Electrodes Pharyngeal sEMG 1 Use 15 box 61879 Electrodes Oro Facial sEMG 1 Use 15 box 69854 Pad Electrode Skin Prep Pad w Pumice 100 box 34774 Lead Wire PENS 4ft 3mm pinch style 61977 Lead Wire sEMG 12in 3mm pinch style ...

Page 31: ......

Reviews: