background image

35

Hangar 9 Phoenix 7 ARF Assembly Manual

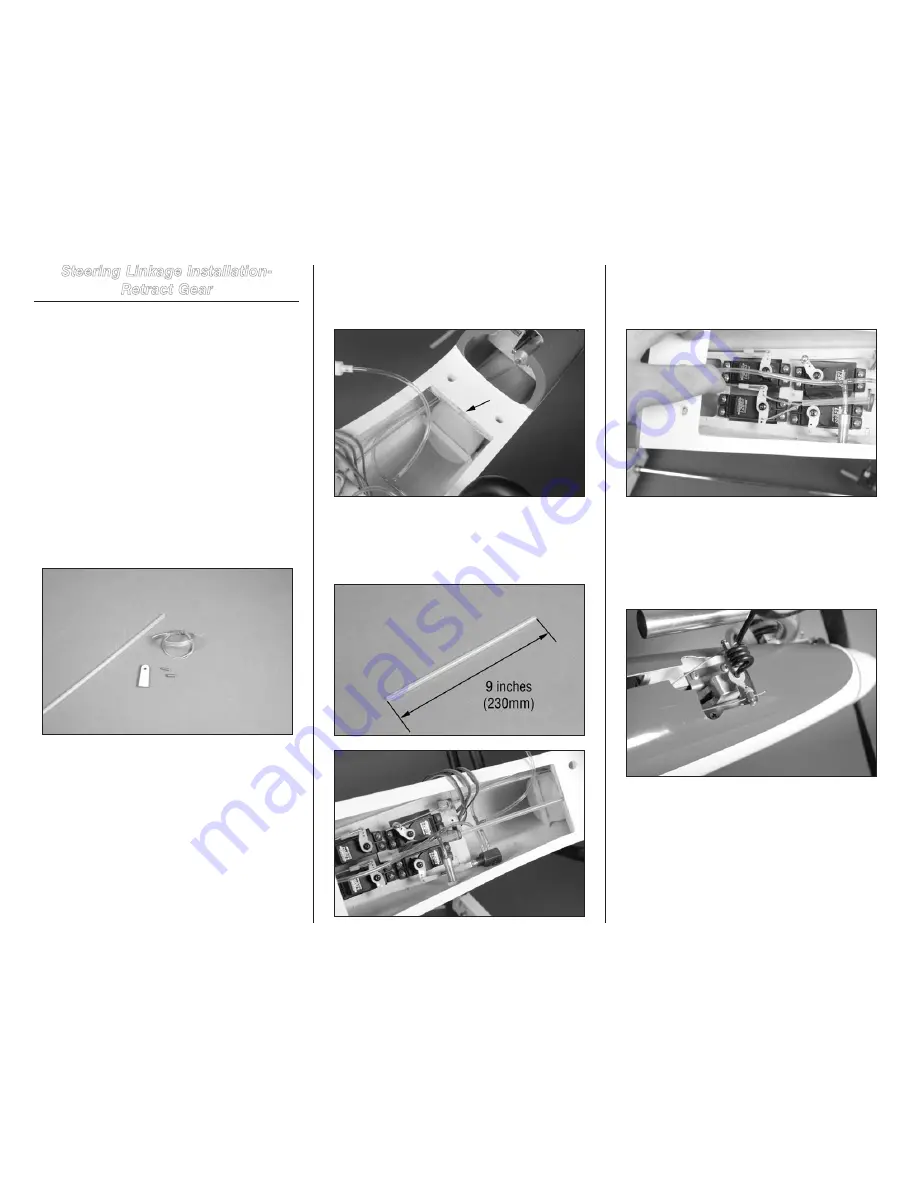
Steering Linkage Installation- 

Retract Gear

Required Parts

Fuselage 

Copper crimp (2)

Plywood pushrod support
38-inch (964mm) braided cable
Pushrod tube, 36-inch (914mm)

Required Tools and Adhesives

Medium CA 

Crimping tool

Side cutter

Optional Tools and Adhesives

Drill
Long drill bit: 11/64-inch (4.5mm)


1. Locate the items necessary to install the steering 

cables for the nose gear. You will also need to have the 

fuselage at this time.


2. (Optional) Use a long 1/8-inch (3mm) drill bit to drill a 

hole through the front wing bolt plate for the pushrod tube. 

This will align the pushrod tube with the steering, but is 

optional as it requires a long drill bit.


3. Cut the pushrod tube to a length of 9 inches (230mm). 

Slide the pushrod tube in the fuselage. The plywood pushrod 

support is then placed on the tube near the rudder servo as 

shown. If you have not drilled the hole in the front wing bolt 

plate, the guide tube will rest on the top of the plate. 


4. Cut the braided cable into two 16-inch (482mm) 

pieces. Slide the cables into the pushrod tube. Use two 

copper crimps to secure the cables to the steering servo arm 

using a crimping tool.


5. Slide the cable through the holes on the pushrod 

connectors at the steering arm. After checking that the 

cables are oriented so the nose wheel moves in the correct 

direction, use a 3mm x 5mm machine screw to secure the 

cables in the connectors. A #1 Phillips screwdriver will be 

required to tighten the screw. Trim the excess cable using 

side cutters.


6. Use medium CA to glue the pushrod tube where it 

crosses the front wing bolt plate. Glue the plywood standoff 

to the servo tray, and the pushrod tube to the standoff using 

medium CA.

Summary of Contents for Phoenix 7 ARF

Page 1: ...Phoenix 7 ARF Assembly Manual ...

Page 2: ...ollow all the instructions and warnings in the manual prior to assembly setup or use in order to operate correctly and avoid damage or serious injury Table of Contents Intro 2 Product Support 2 Specifications 2 Included Parts Listing 3 Contents of Kit and Parts Layout 4 Safety Precautions and Warnings 4 Important Information Regarding Warranty 5 Using the Manual 5 Aircraft Specifications and Requi...

Page 3: ...gear steering Hex wrench 1 5mm 1 19mm x 13mm x 40mm hardwood block 2 Nose wheel spacers Nylon parts Nylon clevis 5 Elevator 2 Rudder 1 Aileron 2 Silicone clevis keeper 6 Elevator 2 Rudder 1 Throttle 1 Aileron 2 90 degree snap link 4 Elevator 1 Rudder 1 Aileron 2 1 4 20 x 2 inch nylon wing bolt 4 Wing to fuselage Wheels Struts 2 5 inch 64mm H9 Pro lite wheel 2 Main gear 2 inch 51mm H9 Pro lite whee...

Page 4: ...nts Should any compatibility questions exist please refer to the product instructions the component instructions or contact Horizon Hobby Inc Flight Fly only in open areas to ensure safety It is recommended flying be done at AMA Academy of Model Aeronautics approved flying sites Propeller Keep loose items that can get entangled in the propeller away from the prop including loose clothing or other ...

Page 5: ... Glow Evolution 60NX with Muffler EVOE0600 Evolution Propeller 11 x 7 EVO11070 Exhaust Diverter DUB697 Optional Optional Tuned Pipe Installation If you are installing the optional tuned pipe the following items will be required Header Long EVO 40 46 MAC2591 Muffled Tuned Pipe 8 5cc 45 60 MAC1250 Hush Clamp 40 DAV1060 Pressure fitting 8 32 MAC9021 Super Plug HAN3011 Transmitter Requirements The Pho...

Page 6: ...ill bit 11 64 inch 4 5mm Additional Required Adhesives Medium CA PAAPT02 Thin CA PAAPT08 Threadlock PAAPT42 30 Minute Epoxy 8 oz PAAPT39 Before Starting Assembly Before beginning the assembly of your model remove each part from its bag for inspection Closely inspect the fuselage wing panels rudder and stabilizer for damage If you find any damaged or missing parts contact the place of purchase If y...

Page 7: ...etracts you will need to pull the retract air line through the wing at this time as well Cut a 14 inch 350mm piece of airline and tape it to the servo lead so it can be pulled through the wing at this time Once through guide the end of the air line out through the opening for the landing gear mount 5 Use the string to pull the extension through the wing and out of the hole located in the top cente...

Page 8: ... line Try not to use the sub trim function when installing the servo horn 11 Attach the 31 2 inch 89mm pushrod wire to the servo horn using a nylon pushrod keeper You may need to use pliers to snap the keeper on the wire Slide a silicone clevis keeper on a clevis Thread the clevis on the pushrod wire With the servo centered connect the clevis to the center hole of the control horn Make sure the ai...

Page 9: ...each of the holes to harden the surrounding wood This will help prevent the screws from vibrating loose 5 Repeat Steps 2 through 4 to prepare the remaining landing gear mount for the landing gear block 6 Use a 3mm x 5mm setscrew to secure the main landing gear wire in the landing gear block Make sure to use threadlock on the setscrew to prevent it from vibrating loose Use the included 1 5mm hex wr...

Page 10: ...nd left main landing gear Place the gear in the wing and check that the coil faces the trailing edge of the wing and that the wheel faces to the center of the wing Use four 6 x 3 4 inch sheet metal screws to attach landing gear in the wing Install the left and right main gear at this time Main Gear Installation Retracts Required Parts Wing panel Retracts with hardware 6 x 3 4 inch sheet metal scre...

Page 11: ...or saw to trim the plate to the edges of the notch in the leading edge Use medium grit sandpaper to smooth the edges where the plate was cut 5 Use a covering iron or trim seal tool to iron the covering into the notch to finish the opening for the nose wheel in the leading edge of the wing 6 Use a hobby knife with a 11 blade to remove the covering from the wheel well Use a covering iron to seal the...

Page 12: ...air lines to a T fitting Cut a short 2 inch 52mm section of air line to attach to the T fitting Attach a quick disconnect to the opposite end of the short 2 inch 52mm piece of air line 12 Use a drill and 3 16 inch 5mm drill bit to enlarge the hole in the wheel Hint Using a drill press for drilling these holes is recommended so they are drilled straight through the wheel 13 Slide the axle through t...

Page 13: ...hown in the photo The coild will be perpendicular to the air cylinder Use a 5 64 inch hex wrench to tighten the setscrews so they leave a mark on the retract strut 18 Remove the strut from the retract mechanism Use a flat file to file a flat on the strut for the setscrews Place the strut back in the retract and tighten the setscrews 19 Measure 45 8 inch 117mm from the edge of the trunion block as ...

Page 14: ...the airline 23 Slide the wheel assembly on the strut Check that the wheel is pointing straight ahead and parallel to the fuselage centerline Tighten the setscrews on the axle mount to leave marks on the wire strut 27 File a flat on the wire strut for the setscrews on the axle mount to secure to 28 Place the wheel assembly back on the strut The distance between the wing and center of teh axle will ...

Page 15: ...lage 3 Use sandpaper to scuff the area of the fuselage for the stabilizer You don t need to sand through to the fiberglass only enough to roughen the surface for the epoxy to adhere to 4 Remove the tape and use a paper towel and rubbing alcohol to remove any dust or debris from the area sanded 5 Repeat Steps 2 through 4 to prepare the opposite side of the fuselage 6 Use sandpaper to lightly sand t...

Page 16: ... at this time as well 12 Slide the stabilizer tube into the stabilizer Brush a thin coat of epoxy on the exposed wood of the stabilizer where it fits against the fuselage 13 Brush a thin layer of epoxy on the fuselage where the stabilizer fits Slide the stabilizer in position and tight against the fuselage Use a paper towel and rubbing alcohol to remove any excess epoxy 14 Brush a thin layer of ep...

Page 17: ...he items necessary to install the rudder and elevator servo and associated linkages You will also need to have the fuselage for this section of the manual 2 Prepare the rudder and elevator servos by using a pin vise with a 5 64 inch 2mm drill bit to enlarge the hole in the arm that is 9 16 inch 14mm from the center of the servo horn Use side cutters to remove the unused arm from the elevator servo...

Page 18: ... of the servo arm as shown The rudder servo could contact the side of the fuselage if not positioned correctly This will align the servo correctly for the next step 8 Use a pencil to mark the locations for the servo mounting screws on the servo tray 9 Remove the servo and use a pin vise and 1 16 inch 1 5mm drill bit to drill the holes for the servo mounting screws Place 2 3 drops of thin CA in eac...

Page 19: ...dentally in flight 12 Repeat Steps 4 through 6 to mount the elevator servo in the fuselage The position of the elevator servo should be as close to the side of the fuselage as possible without the bottom of the servo case hitting the fuselage underneath the servo 13 Slide the clear pushrod guides into the fuselage from the openings for the elevator pushrod Guide the tube toward the elevator servo ...

Page 20: ...s of the clevis to prevent it from opening accidentally in flight Install both clevises and make sure both elevator halves are centered when the servo is centered Engine Installation Required Parts Fuselage Engine 8 washer 8 8 32 blind nut 4 Nylon engine mount 2 Brass pushrod connector Transmitter Receiver Servo with hardware 3mm x 5mm machine screw 8 32 x 3 4 inch machine screw 4 Pushrod connecto...

Page 21: ...or the landing gear The spinner centerline is used as a guide as there is not a definite location for this marking 5 Use a felt tipped pen to transfer the outline for the engine cutout on the fuselage The cutout has been left intentionally small to accommodate a variety of engines and to account for any alignment issues that may occur Note If you feel you are using a smaller than normal engine tra...

Page 22: ...ngine mount rails Hint If your clamps are getting in the way just wick a small amount of thin CA between the rails and engine mount lugs to glue the rails in place and remove the clamps 10 Use a drill and 7 32 inch 5 5mm drill bit to drill the holes in the engine mount rails Hint Using a drill press for drilling these holes is recommended so they are drilled straight through the mount 11 Locate th...

Page 23: ...e for the throttle pushrod The locations of the pushrod tube will be based on your particular engine Make sure you will clear the landing gear rails before drilling 16 Slide the pushrod tube into the hole in the fuselage and through the standoff on the servo tray Leave 1 8 inch 3mm of the pushrod tube forward of the firewall Use medium CA to glue the tube to the firewall and standoff 17 Once the p...

Page 24: ...lage Use the screws provided with the servo and a 1 Phillips screwdriver to secure the position of the throttle servo 22 To keep the pushrod from flexing us ea soldering iron and solder to stiffen the area of the wire between the clevis and where it enters the pushrod tube The first 3 inches 76mm of the wire behind the clevis will need to be stiffened 23 Slide a silicone keeper over the clevis on ...

Page 25: ...mm x 13mm x 40mm hardwood block 2 6 x 3 4 inch sheet metal screw 4 Required Tools and Adhesives 30 minute epoxy Mixing stick Epoxy brush Mixing cup Drill bit 3 32 inch 2 5mm Drill Thin CA Phillips screwdriver 2 Hex wrench 1 5mm Flat file Pencil Clamp 2 1 Locate the items necessary to install the fixed nose gear for your model You will also need the fuselage for this installation 2 Use 30 minute ep...

Page 26: ...collar will tighten onto the flat near the top of the gear There will be 3 32 inch 2mm of wire above the wheel collar as shown Make sure to use threadlock on the setscrew to prevent it from vibrating loose Once the top collar is installed tighten the 3mm x 3mm setscrew to secure the steering arm Check that the gear can move freely in the block If not reposition the steering arm lower to remove any...

Page 27: ...4 inch Rotary tool Cut off wheel Felt tipped pen Hobby knife with 11 blade Flat file Drill bit 3 32 inch 2 5mm 3 16 inch 4 5mm 1 Locate the items necessary to install the fixed nose gear for your model You will also need the retract mechanisms as well as the associated hardware for those retracts You will also need the fuselage for this installation 2 Use 30 minute epoxy to glue the two 1 2 x 3 4 ...

Page 28: ...se grips to prevent it from being pulled from your hand while drilling Use a hobby knife with a 11 blade to deburr the hole 8 Insert a brass pushrod connector in the hole of the steering arm Use the nylon backplate to secure the connector Install both connectors at this time 9 Slide the steering arm on the nose gear wire with the connector facing to the coil spring on the wire 10 Insert the nose g...

Page 29: ...m during the operation of the nose gear retract 13 Secure the nose gear assembly into the fuselage using four 6 x 3 4 inch sheet metal screws Tighten the screws using a 2 Phillips screwdriver 14 Use a drill and 3 16 inch 5mm drill bit to enlarge the hole in the wheel Hint Using a drill press for drilling these holes is recommended so they are drilled straight through the wheel 15 Slide the axle th...

Page 30: ...ews on the nose gear wire for the adapter Use the setscrews included with your retracts and threadlock to secure the adapter to the nose gear wire 20 Check the length of the nose gear as shown in the photo The center of the wheel will be 49 16 inch 115mm as shown in the second photo 21 Trim the template for the nose gear from page 43 of the manual Use scissors and a hobby knife to trim the templat...

Page 31: ...eader for this section of the manual 2 Inspect the fuel tank to determine the top of the tank The stopper is offset toward the bottom of the tank Wrap a piece of low tack tape around the tank leaving a tab at the bottom so you can use it as a handle for positioning the tank Caution When installing the fuel tank do not force it forward in the fuselage farther than it will easily slide Forcing the f...

Page 32: ...ss to a dremel with a angle head then a standard length drill bit will work The long bit is needed due to having to drill from the bottom of the fuselage 1 Locate the items necessary to install the steering cables for the nose gear You will also need to have the fuselage at this time 2 Optional Use a long 1 8 inch 3mm drill bit to drill a hole through the front wing bolt plate for the pushrod tube...

Page 33: ...e Thin CA Drill bit 1 16 inch 1 5mm 5 64 inch 2mm Phillips screwdriver 1 Flexible adhesive PFM or Zap A Dap A Goo 1 Position the retract servo in the fuselage as close to the fuselage side as possible Use a pencil to mark the locations for the servo mounting screws Use a 1 16 inch drill bit and a pin vise to drill the holes for the screws Place 2 3 drops of thin CA in each hole to harden the surro...

Page 34: ...n the arm using a 5 64 inch 2mm drill bit and pin vise Connect the linkage to the horn using a nylon pushrod keeper Use a flexible adhesive to secure the valve to the side of the fuselage Hint Position the valve in the fuselage so the actuator is centered in its range of throw You will use the radio system to set the endpoints to correctly operate the valve once the adhesive has fully cured 9 Use ...

Page 35: ...the pushrod tube in the fuselage The plywood pushrod support is then placed on the tube near the rudder servo as shown If you have not drilled the hole in the front wing bolt plate the guide tube will rest on the top of the plate 4 Cut the braided cable into two 16 inch 482mm pieces Slide the cables into the pushrod tube Use two copper crimps to secure the cables to the steering servo arm using a ...

Page 36: ...ge Drill a small hole in the fuselage using a 1 16 inch 1 5mm drill bit and pin vise for the wire to pass through 4 Mount a JR Deluxe Charge Jack not inlcuded to the side of the fusealge This will allow you you to bind the receiver and check the receiver battery voltage without removing the wing from the aircraft 5 Make the connections between the servos and receiver at this time Also plug the cor...

Page 37: ... Adhesives Flat blade screwdriver Felt tipped pen 1 Locate the wing bolts to attach the wing to the fuselage You will also need the wing and fuselage at this time 2 optional for tuned pipe installation Use a felt tipped pen to mark the location for the tuned pipe mount The mark will be 25 8 inch 66mm forward of the rear edge of the wing and offset 1 inch 25mm from the centerline of the wing This i...

Page 38: ...flight before balancing Adjust the motor battery as necessary so the model is level or slightly nose down This is the correct balance point for your model You should find the CG to be very close with the battery installed as shown in this manual Mark the location of the battery on the battery tray using a felt tipped pen so it can be returned to this position if it is removed from your model After...

Page 39: ...horns and clevises to make sure they are secure and in good condition Range Test Your Radio Before each flying session and especially with a new model it is important to perform a range check It is helpful to have another person available to assist during the range check If you are using a Spektrum transmitter please refer to your transmitter s manual for detailed instructions on the range check p...

Page 40: ...uct on which liability is asserted As Horizon has no control over use setup final assembly modification or misuse no liability shall be assumed nor accepted for any resulting damage or injury By the act of use setup or assembly the user accepts all resulting liability If you as the Purchaser or user are not prepared to accept the liability associated with the use of this Product you are advised to...

Page 41: ... warranty United Kingdom Electronics and engines requiring inspection or repair should be shipped to the following address Horizon Hobby Limited Units 1 4 Ployters Rd Staple Tye Harlow Essex CM18 7NS United Kingdom Please call 44 0 1279 641 097 or e mail us at sales horizonhobby co uk with any questions or concerns regarding this product or warranty Germany Electronics and engines requiring inspec...

Page 42: ...en and where required by rule helmets must be properly worn and fastened They must be OSHA DOT ANSI SNELL or NOCSAE approved or comply with comparable standards RADIO CONTROL 1 All model flying shall be conducted in a manner to avoid over flight of unprotected people 2 I will have completed a successful radio equipment ground range check before the first flight of a new or repaired model aircraft ...

Page 43: ...43 Hangar 9 Phoenix 7 ARF Assembly Manual Bridge gap on fuselage Wing Joint Wing Joint Centerline Centerline ...

Page 44: ...44 Hangar 9 Phoenix 7 ARF Assembly Manual This page was intentionally left blank as the back for the nose gear retract template ...

Page 45: ...45 Hangar 9 Phoenix 7 ARF Assembly Manual This page was intentionally left blank as the back for the rear section of the engine template ...

Page 46: ... t e t o d o t t e d l i n e Note This template is intended to provide the location to start cutting the opening in the fusealge for the engine installation It has been left undersized to fit a variety of different engines and to allow for differences in template alignment ...

Page 47: ...47 Hangar 9 Phoenix 7 ARF Assembly Manual Engine Cutout Cut on dotted line when not using a remote needle Spinner C L A l i g n r e a r t e m p l a t e t o d o t t e d l i n e ...

Page 48: ...16284 Printed 05 2010 2010 Horizon Hobby Inc horizonhobby com Hangar9 com ...

Reviews: