background image

MOD. FT04 rev.01                                  

HELP V (use and maintenance) Ed. 3 - updated: 12/2018 


11 

– 


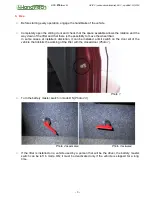
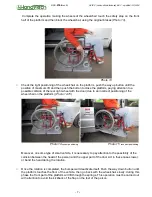
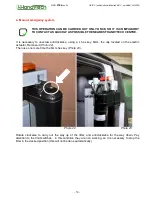
To manually rotate the platform, it is necessary to unblock the electric motor that leads this last one; 
use a 17mm pipe key and insert it in the M10 bolt only after taking out the black cover of the nut which 
fixes the electric motor to the lower plate of the lifter (

Photo 24,25)


                                            Photo 24                                                                           Photo 25 

 
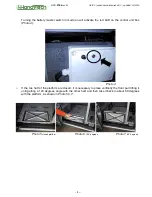
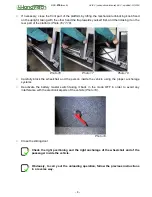
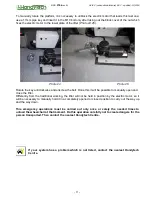
Rotate the key anticlockwise and unscrew the bolt. Done this it will be possible to manually open and 
close the lifter. 
Differently from the traditional working, the lifter will not be held in position by the electric motor, so it 
will be necessary to manually hold it in a completely opened or closed position to carry out the way up 
and the way down.  
 

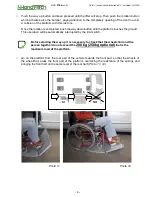
This  emergency  operations  must  be  carried  out  only  once  or  solely  the  needed  times  to 
unload the wheelchair at that moment. Do this operation carefully not to create dangers for the 
person transported. Then contact the nearest Handytech Centre. 


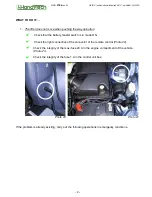
If  your  system  has  a  problem  which  is  not  listed,  contact  the  nearest  Handytech 
Centre. 


Summary of Contents for HELP V

Page 1: ......

Page 2: ...ual is composed by 6 chapters chapter 3 4 and 5 are dedicated to the use 1 General information Pag 2 2 Safety Pag 2 3 Use Pag 3 4 What to do if Pag 9 5 Emergency system Pag 10 6 Maintenance Pag 12 Pow...

Page 3: ...ar dealer repair centre mechanic etc and also to all those who use it In these cases disconnect the whole system If it is necessary to effectuate maintenance operations and repairs to the vehicle we a...

Page 4: ...move the wheelchair In some cases at installer s discretion it can be installed a limit switch on the door sill of the vehicle that inhibits the working of the lifter with the closed door Photo 1 Pho...

Page 5: ...he control unit box Photo 4 Photo 4 If the two half of the platform are closed it is necessary to place vertically the front part lifting it until getting a 120 degrees angle with the other half and t...

Page 6: ...the two half of the platform closed because it can create a collision with the door on some type of vehicles Photo 8 Photo 8 Take the remote control from the hook and once checked that near the lifter...

Page 7: ...the platform touches the ground This operation will be automatically interrupted by the limit switch Before starting the way up it is necessary to check that the wheelchair and the person together do...

Page 8: ...positioning of the wheelchair on the platform Photo 14 15 Photo 14 correct positioning Photo 15 incorrect positioning Moreover on some type of small vehicle it is necessary to pay attention to the pos...

Page 9: ...6 Photo 17 Photo 18 Carefully block the wheelchair and the person inside the vehicle using the proper anchorage systems Deactivate the battery master switch taking it back in the mode OFF in order to...

Page 10: ...ter switch is in mode ON Check the right connection of the connector of the remote control Photo 20 Check the integrity of the maxi fuse 20 A in the engine compartment of the vehicle Photo 21 Check th...

Page 11: ...to unscrew anticlockwise using a L hex key 6mm the cap located on the electric actuator Remove it Photo 22 Then use one more time the 6mm hex key Photo 23 Photo 22 Photo 23 Rotate clockwise to carry o...

Page 12: ...his it will be possible to manually open and close the lifter Differently from the traditional working the lifter will not be held in position by the electric motor so it will be necessary to manually...

Page 13: ...paying attention to backlashes or noises during the movements Check the right working of the unhook handle of the front half of the platform Controlli da effettuarsi a 12 24 mesi e annualmente Repeat...

Page 14: ...MOD FT04 rev 01 HELP V use and maintenance Ed 3 updated 12 2018 13 PER STAMPA LAY OUT RETRO SX DX SX DX 12 1 2 11 10 3 4 9 8 5 6 7...

Reviews: