


33
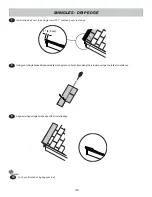
Continue installing rows of
shingles by staggering at front.
Install second row of shingles flush at top of first row's rain slots. Ensure flush to drip edge at front side,
stagger each row.
Continue installing rows of shingles to the back of the shed. At the back edge of the shed make sure there is a
maximum of 5" or less to the rain slot, as shown below. If shingles overlap at back roof edge cut to roof edge with a
utility knife.
1"
(2,5 cm)
5"
(12,7 cm)
5"
(12,7 cm)
or less.
Flush with rain slots.
Notch
Notch
Using your shingle hooked blade carefully cut shingles along chalk line.
3
5
4
6
SHINGLES
continued...
• If more than 5" to rain slot you must install another row of shingles.
Flush with rain slots.
Top of rain slot.
Cut Off.
Cut
FRONT OF SHED
BACK OF SHED
FRONT OF SHED
DOOR