


You have fi nished installing your door weatherstrips.
BEGIN
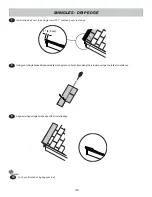
With left door closed, center a weatherstrip
OO
vertically on the left door in the door opening
(Fig. A
).
OO
will offset the left door 1" OUT past the door trim 1"
(Fig. B).
1
PARTS REQUIRED:
x12
2" (5,1 cm)
DOOR WEATHERSTRIP
FINISH
5
On right door center
OO
vertically in door opening
(Fig. A)
.
OO
will offset the right
door 1" in from the door trim
(Fig. C
).
3
Secure
OO
using six 2" screws through outside trim into
OO
(Fig. C
).
4
OO
2" (5,1 cm)
Screw
1"
(2,5 cm)
OFFSET
1"
(2,5 cm)
OFFSET
Secure
OO
using six 2" screws through outside trim into
OO
(Fig. B)
2
Fig. A
Fig. C
Fig. B
Center OO
in door
opening.
Screws
2" (5,1 cm)
x12
11" (28 cm)
Approximately
27
OO
x2
1-1/4 x 2-1/2 x 69" (3,2 x 7,6 x 175,3 cm)