


31
• Use acrylic latex caulk that is paintable. Caulk at all horizontal and vertical seams, between the trim and walls, and all
around the door trim.
• Use a high quality exterior acrylic latex paint. When painting your building, there are a few key areas that can be easily
overlooked that must be painted:
• Bottom edge of all siding and trim
• Inside of doors and all 4 edges
Note:
Prime all un-primed exterior wood before painting.
(Follow directions provided by manufacturer.)
PAINT & CAULK
- NOT INCLUDED -
DRIP EDGE
- NOT INCLUDED -
ROOF FELT
- NOT INCLUDED -
• Install felt flush to all roof edges overlapping 3". Use minimal amount of roofing nails to hold in place.
3" OVERLAP
Flush
Flush
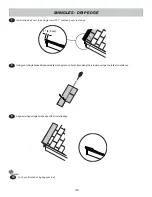
You must install drip edge to validate warranty.
(Follow directions provided by manufacturer.)
• Install drip edge on the front side first
(Fig. A
, then install felt.
• Install drip edge on sides of roof over top of felt
(Fig. A)
.
• Install drip edge on back of roof after shingles are installed
(Fig. B)
.
• Do not use nails on side of drip edge that hangs over side of building.
• Only nail top of drip edge as shown.
Roof Felt
Drip Edge
Fig. A
FRONT
OF
SHED
SIDE
OF
SHED
Drip Edge
flush to trim.
Fig. B