background image

48  |  Pro‑Stitcher Lite for the HQ Simply Sixteen 

www.ProStitcher.com

Pro‑Stitcher Lite

®

 Warranty Registration

Mail or Fax completed Warranty Registration Card within 30 days of purchase. If you have questions, 
email [email protected] or call Customer Relations at 1‑855‑777‑5257. 

Online warranty registration is also available at 

https://handiquilter.com/machine‑registration/

.

MAIL:  Handi Quilter, Inc. 


FAX:   801‑294‑3011 


Warranty Registration Dept. 


501 N 400 W 


North Salt Lake, Utah 84054

Pro‑Stitcher Lite Warranty Registration Card

The Pro‑Stitcher Lite warranty consists of five‑year electronic/electrical, five‑year mechanical, two‑year 
tablet PC and lifetime software updates (see detailed warranty information in Pro‑Stitcher Lite User 
Manual). Check with your local Pro‑Stitcher Representative for details on service or making warranty 
claims.

Customer Name: 

Company/Business Name (if applicable):

Address:

City, State, Zip:

Daytime Phone:

Evening Phone:

Fax:

Email:

Pro‑Stitcher Lite Serial Number:

Order Number (5 digits):

Purchase Date:

Date Product Received:

Location of Purchase (Shop or Show name, City & State):

 
Signature:

Date:

Cu

t a

lo

ng do

tte

d lin

e a

nd m

ai

l o

r fax t

hi

s r

eg

ist

ra

tio

n inf

or

m

at

io

n w

ithin 30 d

ays o

f p

ur

ch

as

e.

Summary of Contents for IN50005

Page 1: ...ING SYSTEM C79 M23 Y18 K0 INSTALLATION INSTRUCTIONS IN50005 on the HQ Loft Frame or the HQ Little Foot Frame FOR BEFORE YOU BEGIN 3D INTERACTIVE INSTRUCTIONS F O R T H I S P R O D U C T C A N B E F O...

Page 2: ...ook https www facebook com ProStitcher Instagram prostitcherquilting 2021 Pro Stitcher Inc All rights reserved The information contained in this document is subject to change without notice If you fin...

Page 3: ......

Page 4: ...stallation on the HQ Loft Frame 18 HQ Little Foot Frame 4 Wheel Track Installation Instructions 21 Installation on the HQ Little Foot Frame 23 Installing the Flexirack Mount 23 Align the Tracks to the...

Page 5: ...in this manual Never operate this system if it has a damaged cord or plug if it is not working properly if it has been dropped or damaged or dropped into water Return the system to the nearest authori...

Page 6: ...To increase the life of your system 4 Do not store this system in areas exposed to direct sunlight or high humidity Never use or store the system near a heater an iron a halogen lamp or other hot thin...

Page 7: ...is utiliser cette machine quilter si le cordon ou la fiche est endommag si elle ne fonctionne pas correctement si on l a fait tomber ou endommag ou si elle est tomb e dans l eau Renvoyez la machine qu...

Page 8: ...ranger cette machine dans des endroits expos s la lumi re directe du soleil ou une forte humidit Ne jamais utiliser ni ranger la machine proximit d un radiateur d un fer repasser d une lampe halog ne...

Page 9: ...p by step tutorials to help you learn how to use Pro Stitcher Lite News about hardware upgrades and new machines Links to educational information webinars retreats and more Want to be in the know Sign...

Page 10: ...n sketch B if a properly grounded outlet is not available The temporary adapter should be used only until a properly grounded outlet can be installed by a qualified electrician The green colored rigid...

Page 11: ...on Instructions This guide 1 B Blue X axis Flexirack QM10065 10 1 C X axis Flexirack clamps and screws QM10010 Clamps QM10015 Screws 4 D 3 32 inch drill bit QM10113 1 E Pro Stitcher Lite Tray Assembly...

Page 12: ...5 8 SLF ZN 2 I Power cord G3 Locking USA QM20304 1 J Tablet power cable Power cable from machine to tablet QM20147 1 K USB Cable Communication cable from tablet to machine QM20148 1 L Pro Stitcher Lit...

Page 13: ...on from transition box to machine QM20151 1 V PS Lite Transition Box Assembly Transition Box PSL w wire tie QM50004 1 Item Quantity Photo Parts for the HQ Little Foot Frame ONLY X Flexirack Mount Kit...

Page 14: ...Pro Stitcher Lite for the HQ Simply Sixteen Installation Instructions 13 Parts needed for HQ Loft Frame ONLY Z 8 Foot Loft Frame Table Top Kit PS QF01501 PSL 1...

Page 15: ...Assembly These instructions are for installing the Pro Stitcher Lite Tray Assembly These instructions are for both the HQ Loft Frame and the HQ Little Foot Frame 1 Locate the Pro Stitcher Lite tray as...

Page 16: ...be longer 5 Fasten the tray with the five remaining new screws and washers into the outside screw holes where you originally removed the old screws Install the Y Rack 1 Carefully lay the quilting mac...

Page 17: ...o so now Use the assembly instructions provided with the frame to assemble the frame Table Top Kit Assembly HQ Loft Frame Only If you don t already have a table top on your frame you will also need to...

Page 18: ...upports 2 Remove the protective cover from the tape on the three crossbar supports on the right side of the frame 3 Remove the clear backing from the smooth bottom side of both table tops The textured...

Page 19: ...it to relax so it will be easier to lay it onto the table top IMPORTANT Looking at the bottom side of the tray carriage assembly ensure the black discs are in the engaged position The black discs are...

Page 20: ...distance between the blue Flexirack and the track support With this dimension you can create a spacer to aid you in keeping the blue Flexirack straight the entire length of the table 3 Use the carria...

Page 21: ...k use two of the small metal clamps see Parts List item C to hold the ends firmly in place The clamps have a hole through the center and a bent lip on one end The lip should be on the side opposite th...

Page 22: ...Front Track Support Front Adapter Rail Track Screws M4x4 SKB ZN 1 1 1 1 10 QF05300 11 QF05300 08 QF05300 06 QF05300 10 QM10277 Track Assemby Four Wheel Rear Includes Rear Track Support Rear Adapter Ra...

Page 23: ...s provided in the original frame kit These track supports will not be needed for the four wheel carriage and may be discarded The six flange head screws will be reused DO NOT DISCARD THEM 2 Install th...

Page 24: ...y will not be reused 2 Place the Flexirack mount see Parts List item X over the track and align the screw inserts Place the new socketed flat head screws through the mount through the track support an...

Page 25: ...t across the rear of the frame and fully tighten the back track screws 3 Roll the carriage to one end and ensure the tracks are aligned the correct distance apart and fully tighten the front screws 4...

Page 26: ...relax so it will be easier to lay it onto the table top IMPORTANT Looking at the bottom side of the tray carriage assembly ensure the black gears are in the engaged position The black gears are engage...

Page 27: ...Once you align the blue rack with the center of the black gear you may find it helpful to measure the distance between the blue rack and the track support With this dimension you can cut a spacer to a...

Page 28: ...m the Flexirack to length using a knife or wire cutters Ensure that the blue Flexirack is close to the end of the table top so the clamps will secure it to the mount predrilled and tapped inserts IMPO...

Page 29: ...rack Some horizontal adjustments may be necessary If so loosen the two screws that mount the Y axis bracket to the base plates and push the bracket in the necessary direction hold it in place and then...

Page 30: ...ther into the machine encoder 3 Plug one end of the carriage encoder X cable into the connector at the back of the machine marked X and the other end into the carriage encoder 4 Plug the small special...

Page 31: ...al adapter see Parts List item R to the front of the machine where you removed the front handlebar using the three screws you removed in step 1 above Place the screws through the adapter through the h...

Page 32: ...nob on the back of the tablet mount and raise the top of the mount 2 Tilt the tablet out slightly at the top and snap it down into the lower mount tabs then tilt back 3 Lower the top of the mount down...

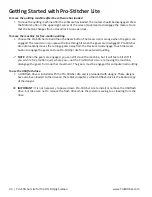
Page 33: ...er Lite Choose the File Tab Then choose the Shut Down button Choose Shut Down from the drop down menu This shuts down both the Pro Stitcher Lite software and the tablet Press the machine power switch...

Page 34: ...the Pro Stitcher pop up appears and looking at the battery icon in the lower right corner of the tablet screen If the battery is charged at 50 or less connect the tablet to a power source either by tu...

Page 35: ...oves the carriage gears away from the Flexirack to disengage Touch the Gears button to engage the gears and use Pro Stitcher Lite for computerized quilting NOTE When the gears are engaged you can stil...

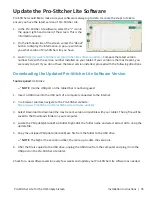
Page 36: ...the following directions Downloading the Updated Pro Stitcher Lite Software Version Tools required USB drive NOTE Use the USB port on the tablet that is not being used 1 Insert a USB drive into the US...

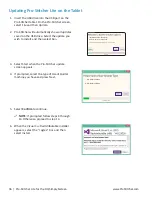
Page 37: ...USB drive Select the update you wish to install and then select Run Installed Version Version Restore Version Version 3 Select Start when the Pro Stitcher update screen appears 4 If prompted select t...

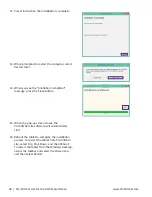
Page 38: ...4 6 1 Framework files required for Pro Stitcher Lite IMPORTANT If the NET installer indicates that you have more current version close the message box and continue to follow the on screen instructions...

Page 39: ...Intallation Completed message press the Close button 15 When the pop up screen closes the Pro Stitcher Lite software will automatically start 16 Reboot the tablet to complete the installation process...

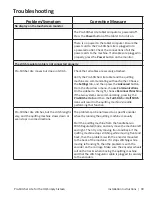
Page 40: ...wn menu choose Communications On the sidebar to the right choose Reconnect Machine If the two systems are communicating pressing the Pro Stitcher tab and then the Full Stitch or Half Stitch icons will...

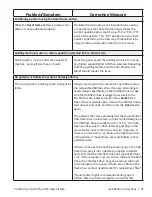
Page 41: ...f the black gear is not pressing upward enough on the blue rack to fully engage the gears it may be necessary to install shim washers between the quilting machine base plates and the Y axis bracket to...

Page 42: ...s hard drive and on the removable USB flash drive If you are attempting to access designs specifically on the USB flash drive make sure the USB flash drive is plugged in securely to the Pro Stitcher L...

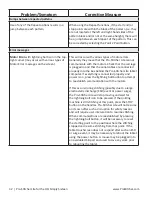
Page 43: ...perly into the box behind the Pro Stitcher Lite tablet computer If everything is connected properly and power is on press the lightning bolt button to attempt to reestablish communication with the mot...

Page 44: ...bolt button at the top right hand corner of the screen it is best to cancel the current design stitch out save the pattern and reboot the computer Use the New Start Point function if necessary to resu...

Page 45: ...from the date of purchase If any defect is reported within this period manufacturer will provide free replacement parts customer pays for labor and shipping Excludes the tablet PC Warranty issued sho...

Page 46: ...osure 2 abuse misuse negligence operator error or 3 use of parts components or accessories not authorized by HQ In no event shall HQ be liable to the purchaser of the Product or to third parties for s...

Page 47: ...ved shipping container The original box and packaging materials should be kept for storing or shipping Shipping Cost Shipping is the responsibility of the customer Product Service and Maintenance Peri...

Page 48: ...Pro Stitcher Lite for the HQ Simply Sixteen Installation Instructions 47 This page intentionally left blank...

Page 49: ...Warranty Registration Card The Pro Stitcher Lite warranty consists of five year electronic electrical five year mechanical two year tablet PC and lifetime software updates see detailed warranty inform...

Page 50: ......

Page 51: ...ce Area Save Selected Workspace Area Shutdown Update Edit Tab Clear All Copy Duplicate History Paste Redo Undo Area Tab Clear Open Area Multi Point Area Select Two Corner Area Frame Space Modify Tab A...

Page 52: ......

Page 53: ...ELEASED NOVEMBER 2021 Handi Quilter Inc 501 N 400 W North Salt Lake UT 84054 1 877 MY QUILT 697 8458 www HandiQuilter com The family of innovative quilting products from Handi Quilter DOWNLOAD THE FRE...

Reviews: