background image

6 - 5

Demo Screens

To present a demo, you must set your File - Preferences to Enable Demo 
Screens
.  

Once the demo screens are enabled, scan the demo bar codes on the following 
pages.  To disable the demo screens, click on the checkbox to remove the 
checkmark.

Summary of Contents for IMAGETEAM 4400

Page 1: ... User s Guide User s Guide User s Guide User s Guide User s Guide User s Guide User s Guide IMAGETEAM 4400 4700 2D Series Hand Held Imager ...

Page 2: ...ment and receiver Connect the equipment into an outlet on a circuit different from that to which the receiver is connected Consult the dealer or an experienced radio or television technician for help Caution Any changes or modifications made to this device that are not expressly approved by Welch Allyn Data Collection Inc may void the user s authority to operate the equipment Note To maintain comp...

Page 3: ...Containment System is covered by the following patent 5 838 495 Disclaimer Welch Allyn Data Collection Inc reserves the right to make changes in specifications and other information contained in this document without prior notice and the reader should in all cases consult Welch Allyn Data Collection Inc to determine whether any such changes have been made The information in this publication does n...

Page 4: ......

Page 5: ...troduction 2 1 Reset Factory Settings 2 2 Status Check 2 2 All Symbologies 2 3 Revision Selections 2 3 Terminal Interface 2 4 Supported Terminals Chart 2 5 Keyboard Country 2 6 Keyboard Style 2 7 Keyboard Modifiers 2 8 Keyboard Function Relationships 2 9 Connecting the Scanner to a Serial Port 2 10 Communication Settings 2 11 Parity 2 11 Baud Rate 2 12 Word Length Data Bits 2 13 Word Length Stop B...

Page 6: ...24 Power Up Beeper 2 24 Output Sequence Beeper 2 24 Beep On Decode 2 25 Beeper Default 2 25 Intercharacter Interfunction and Intermessage Delays 2 26 Intercharacter Delay 2 26 Interfunction Delay 2 27 Intermessage Delay 2 28 Prefix Suffix Overview 2 29 Adding a Prefix or Suffix 2 30 Add a Carriage Return Suffix to All Symbologies 2 31 Add a Code I D Prefix to All Symbologies 2 31 Add an AIM I D Pr...

Page 7: ... Sequence Editor 2 44 Multiple Symbols 2 45 No Read 2 45 Print Weight 2 46 Chapter 3 Symbologies Introduction 3 1 Codabar 3 2 Start Stop Characters 3 2 Message Length 3 2 Check Character 3 3 Code 39 3 4 Start Stop Characters 3 4 Message Length 3 4 Full ASCII 3 5 Check Character 3 6 Interleaved 2 of 5 3 7 Message Length 3 7 Check Digit 3 8 Iata 2 of 5 3 9 Message Length 3 9 Code 93 3 10 Message Len...

Page 8: ... 3 19 RSS 14 Expanded 3 20 Message Length 3 20 Codablock 3 21 Message Length 3 21 PDF417 3 22 Message Length 3 22 Micro PDF417 3 23 Message Length 3 23 Code 49 3 24 Message Length 3 24 Composite Codes 3 25 Message Length 3 25 U S Postal Service POSTNET Code 3 26 Planet Code 3 26 British Post Office 4 State Code 3 26 Canadian 4 State Code 3 26 Dutch Postal Code 3 26 Australian 4 State Code 3 27 Jap...

Page 9: ... 2 Creating OCR Templates 4 3 Creating an OCR Template 4 3 Stringing Together Multiple Formats Creating Or Statements 4 5 Creating a User Defined Variable 4 6 Adding an OCR Check Character 4 6 OCR Template Codes 4 7 Chapter 5 Default Charts Communication RS 232 Selections 5 1 Imager Selections 5 1 Prefix Suffix Selections 5 2 Data Formatter Selections 5 2 Output Sequence Selections 5 2 Linear Symb...

Page 10: ...elections 6 17 Communication Settings 6 18 Imager Selections 6 19 Output Selections 6 20 Prefix Suffix Selections 6 20 Data Formatter Selections 6 21 Output Sequence Selections 6 21 Linear Symbology Selections 6 21 Stacked Symbology Selections 6 25 Postal Symbology Selections 6 25 2D Matrix Symbology Selections 6 26 Chapter 7 Visual Menu Visual Menu Introduction 7 1 Installing Visual Menu from the...

Page 11: ...eshooting Repairs 10 1 Maintenance 10 1 Replacing the Interface Cable 10 2 Troubleshooting 10 4 Application Support 10 5 Chapter 11 Customer Support Obtaining Factory Service 11 1 Limited Warranty 11 3 Sample Symbols Programming Chart ...

Page 12: ...viii ...

Page 13: ...ad images to a PC for signature capture software applications and PC based decoding The ability to read single line OCR A and OCR B fonts About this Manual This user s guide provides installation instructions for the hand held Imager The chapters contain the following information Chapter 1 Unpacking and installing the Imager Chapter 2 Programming selections Chapter 3 Symbology programming selectio...

Page 14: ...ntainer for later storage or shipping Check for damage during shipment Report damage immediately to the carrier who delivered the carton Holder Universal Power Supply and Power Cable User s Guide IMAGETEAM 4400 Hand Held Imager Quick View Visual Menu Demonstration Diskettes Universal Power Supply and Power Cable Demonstration Diskettes User s Guide IMAGETEAM 4700 Hand Held Fixed Mount Imager ...

Page 15: ...1 3 IT4400 Imager Identification Model 4400XX XX Manufactured July 1999 Serial P 12 34567 S W 34567001 4400 Enlarged View of Label Hand Held IT4400 Imager Bottom View ...

Page 16: ...1 4 IT4700 Imager Identification Enlarged View of Label Hand Held IT4700 Imager Bottom View ...

Page 17: ...accordance with the specification Safety of Laser Products EN 60825 1 1994 Issue 2 June 1997 and found to satisfy the requirements of Class 1 Class 1 optical systems are considered safe under reasonably foreseeable conditions of operation The Aiming Laser has been tested in accordance with the specification Safety of Laser Products EN 60825 1 1994 Issue 2 June 1997 and found to satisfy the require...

Page 18: ... the back of the terminal computer 3 Connect the appropri ate interface cable to the scanner and to the terminal computer The scan ner will beep twice 4 Turn the terminal com puter power back on 5 Verify the scanner operation by scanning a bar code from the back cover of this manual The scanner will beep once The scanner is now connected and ready to communicate with your terminal PC You must prog...

Page 19: ...arther away from a code Note The symbols can be in any orientation for the Imager to read The view finder is smaller when the Imager is closer to the code and larger when it is farther from the code Symbologies with smaller bars or elements mil size should be read closer to the unit Symbologies with larger bars or elements mil size should be read farther from the unit see Depth of Field Charts on ...

Page 20: ...Near Distance Far Distance QR 10 mil 0 025 cm 2 0 inches 5 1 cm 4 0 inches 10 2 cm Data Matrix 10 mil 0 025 cm 2 0 inches 5 1 cm 3 5 inches 8 9 cm Linear 5 mil 0 013 cm 2 75 inches 7 0 cm 3 75 inches 9 5 cm OCR 12 pt 12 cpi 2 inches 5 1 cm 5 inches 12 7 cm Code Size Near Distance Far Distance Linear 7 5 mil 0 019 cm 3 0 inches 7 6 cm 5 0 inches 12 7 cm Linear 10 mil 0 025 cm 2 5 inches 6 4 cm 4 75...

Page 21: ...ager This programming section contains the following menuing selections General Selections Terminal Interface Selections Keyboard Selections Communication Settings Imager Selections Output Selections Prefix Suffix Selections Data Formatter Selections Output Sequence Selections ...

Page 22: ...bol Default charts begin on page 5 1 Depending on your model scan one of the following bar codes to set the imager to the original factory settings clearing any programming changes you may have made Status Check Read the Show Software Revision symbol to transmit the software revision level to the host terminal The software revision will be printed out as REV_SW ProjectRevision 1 xx REV_WA 31204734...

Page 23: ...ion Selections Both the following programming codes would not normally be needed unless you have a problem with the unit An Application Support Representative may request the boot code or power PC revision information in order to trouble shoot a problem All Symbologies On All Symbologies Off Boot Code Revision Power PC Revision ...

Page 24: ...te the Terminal ID number for your PC Scan the Terminal ID bar code below then scan the numeric bar code s on the inside back cover of this manual to program the scanner for your terminal ID Scan Save to save your selection For example an IBM PS 2 terminal has a Terminal ID of 002 You would scan the Terminal ID bar code then 0 0 2 from the inside back cover then Save If you make an error while sca...

Page 25: ...le for the IT4700 Contact the factory if this capability is needed for the IT4700 IBM PC X 001 IBM PS 2 25 30 77DX2 002 IBM AT PS 2 30 286 50 55SX 60 70 003 70 061 70 121 80 IBM AT Compatibles Keyboard Emulation Non wedge 003 IBM Thinkpad 360 CSE 34 750 Portable PC 097 IBM Thinkpad 365 755 CV Portable PC 003 IBM AT Thinkpad 106 Midwest Micro Elite TS 30 PS Portable PC 003 Mitak 4022 Portable PC 00...

Page 26: ...code to program the keyboard for your country As a general rule the following characters are not supported by the scanner for countries other than the United States Country Code Scan Country Code Scan Belgium 1 Italy 5 Denmark 8 Norway 9 Finland 2 Spain 10 France 3 Switzerland 6 Germany Austria 4 USA Default 0 Great Britain 7 Keyboard Country Save ...

Page 27: ...ock is used if you change the Caps Lock key on and off The software tracks and reflects if you have Caps Lock on or off AT and PS 2 only This selection can only be used with systems that have an LED which notes the Caps Lock status Emulate External Keyboard should be scanned if you do not have an external keyboard IBM AT or equivalent but should not be used for laptops To connect the scanner to a ...

Page 28: ... the terminal drops characters do not use Turbo Mode Default Off Numeric Keypad Mode Sends numeric characters as if entered from a numeric keypad Default Off Automatic Direct Connect Use this selection if you are using a laptop whose keyboard is disabled when you plug in the scanner This selection can also be used if you have an IBM AT style terminal and the system is dropping characters Default O...

Page 29: ... that can be used with the scanner Function Code HEX ASCII Value Full ASCII CTRL NUL 00 2 SOH 01 A STX 02 B ETX 03 C EOT 04 D ENQ 05 E ACK 06 F BEL 07 G BS 08 H HT 09 I LF 0A J VT 0B K FF 0C L CR 0D M SO 0E N SI 0F O DLE 10 P DC1 11 Q DC2 12 R DC3 13 S DC4 14 T NAK 15 U SYN 16 V ETB 17 W CAN 18 X EM 19 Y SUB 1A Z ESC 1B FS 1C GS 1D RS 1E 6 US 1F ...

Page 30: ...eep twice 9 Connect the interface cable to the terminal computer 10 Turn the terminal computer power back on 11 Verify the scanner operation by scanning a bar code from the back cover of this manual The scanner will beep once The scanner is now connected and ready to communicate with your terminal PC Turn to Communication Settings on page 2 11 to program the communication parameters for a serial i...

Page 31: ...y provides a means of checking character bit patterns for validity The Imager can be configured to operate under Mark Space Odd Even or No None parity options The host terminal must be set up for the same parity as the Imager to ensure reliable communication Space Mark None Odd Even ...

Page 32: ... second to 115 200 bits per second see next page Programming baud rate causes the data to be sent at the specified rate The host terminal must be set to the same baud rate as the Imager to ensure reliable communication 300 600 1200 2400 9600 4800 19200 38400 ...

Page 33: ...cation requires only ASCII Hex characters 0 through 7F decimal text digits and punctuation select 7 data bits For applications requiring use of the full ASCII set select 8 data bits per character Word Length Stop Bits Word Length can be set to one or two stop bits 57600 115200 7 Data Bits 8 Data Bits 1 Stop Bit 2 Stop Bits ...

Page 34: ...ntrol of data transmission from the Imager using software commands from the host device When this feature is turned off no data flow control is used When Data Flow Control is turned on the host device suspends transmission by sending the XOFF character DC3 hex 13 to the Imager To resume transmission the host sends the XON character DC1 hex 11 Data transmission continues where it left off when XOFF...

Page 35: ...l to Hex to ASCII Conversion Chart on page 2 34 find the hex characters you want to use to turn the trigger on and off Locate the decimal values for those characters and scan the 2 digits for each one from the Programming Chart in the back of this manual When Serial Triggering is On the default Trigger On decimal character is 18 hex 12 DC2 and the default Trigger Off decimal character is 20 hex 14...

Page 36: ...pulled going into a doze low power state after each read attempt The Imager powers down ten seconds after the image capture is complete Normal Power draws a normal LED current attempting to read as long as the trigger is pulled The Imager doesn t go into a doze state after each read attempt but may power down after two minutes if Power Hold Mode is turned Off Power Hold Mode Power Hold On keeps th...

Page 37: ...fficient High the default is the brightest setting LED Flashing If LED Flashing is turned off the average current draw is increased and the aiming light won t illuminate while the scanner reads a bar code If LED Flashing is turned off the average current draw is increased and the view finder won t illuminate during the reading phase Off Low High Off On ...

Page 38: ...he aiming light will appear but the LEDs won t turn on until the delay time is over Aimer Timeout Use this selection to set a timeout in seconds of the Imager s aiming light when the device is not reading a bar code Default setting 60 seconds A one to three digit number and Save are required after reading this programming symbol Refer to the Programming Chart inside back cover 400 milliseconds Off...

Page 39: ...r to use the aimer Every Read Every Second Read or Every Third Read You may also program the scanner to use the aimer every x reads by entering a number from 0 to 999 to indicate x A one to three digit number and Save are required after reading this programming symbol Refer to the Programming Chart inside back cover Every Read Off Every x Reads Every Second Read Every Third Read ...

Page 40: ...when the Imager is in Scan Stand mode When a unit is in Scan Stand mode the LED shines at the symbol on the base of the stand which tells it to remain idle When a different code is presented the Imager is triggered to read the new code If the Imager has difficulty going back to reading the Scan Stand s fixed code for instance in a low lighting situation you may want to adjust the Scan Stand LED In...

Page 41: ...ing a reread delay protects against accidental rereads of the same bar code Longer delays are effective in minimizing accidental rereads at POS point of sale Use shorter delays in applications where repetitive bar code scanning is required Entries are in milliseconds up to 10 000 Default 500 Presentation Default Defaults all presentation mode settings Defaults Presentation Mode Off Presentation Re...

Page 42: ...to zoom in and read smaller matrix codes The zoom selection does not affect reading of linear bar codes The factory default setting is Off High Density scanners are programmed with the zoom turned on when shipped from the factory If you scan the LR Factory Default Settings code on page 2 2 the zoom will be turned off Off On Off On ...

Page 43: ...t more difficult for the Imager to read large matrix symbols After the Zoom Placement code below is scanned you must scan a 1 digit code inside back cover to enter the zoom position you want The default for both vertical and horizontal placement is 4 which centers the crosshairs in the field of view Note The default setting for the HD Imager is a Zoom Vertical of 6 and for the HD10 the default set...

Page 44: ...eeper If you are using an Output Sequence see Output Sequence Overview on page 2 41 you may want to hear a beep after each bar code as it is read Scan Output Sequence Beeper On to enable this feature or Off to disable it Off High Medium Low On Off On Off ...

Page 45: ...leave this setting On If you don t want it to beep on each read but do want it to beep for other events set this selection to Off Beeper Default Defaults all beeper settings Defaults Beeper Volume High Power Up Beeper On Output Sequence Beeper On Beep On Read On On Off Beeper Default ...

Page 46: ...les of 5 placed between the transmission of each character of scanned data You can program up to 99 steps of 5 ms each Scan the Intercharacter Delay bar code below then scan the number of steps and the SAVE bar code from the inside back cover Note If you make an error while scanning the digits before scanning Save scan Discard on the back cover and scan the correct digits and Save again To remove ...

Page 47: ...n the number of steps and the SAVE bar code from the inside back cover Note If you make an error while scanning the digits before scanning Save scan Discard on the back cover and scan the correct digits and Save again To remove this delay scan the Interfunction Delay bar code then set the number of steps to 00 Scan the SAVE bar code from the inside back cover Interfunction Delays Prefix Scanned Da...

Page 48: ... of steps and the SAVE bar code from the inside back cover Note If you make an error while scanning the digits before scanning Save scan Discard on the back cover and scan the correct digits and Save again To remove this delay scan the Intermessage Delay bar code then set the number of steps to 00 Scan the SAVE bar code from the inside back cover 2nd Scan Transmission 1st Scan Transmission Interme...

Page 49: ...ng illustration shows the breakdown of a message string Points to Keep In Mind It is not necessary to build a message string The selections in this chapter are only used if you wish to alter the default settings Default prefix None Default suffix None A prefix or suffix may be added or cleared from one symbology or all symbologies You can add any prefix or suffix from the Decimal to Hex to ASCII C...

Page 50: ... a CR carriage return Suffix for UPC only 1 Scan Add Suffix 2 Determine the 2 digit hex value from the Symbology Chart on page 2 33 for UPC 3 Scan 6 3 from the Programming Chart inside back cover 4 Determine the hex value from the Decimal to Hex to ASCII Conversion Chart on page 2 34 for the CR carriage return 5 Scan 0 D from the Programming Chart inside back cover 6 Scan Save or scan Discard to e...

Page 51: ... that identifies each symbology This action first clears all current prefixes then programs a Code I D prefix for all symbologies Add an AIM I D Prefix to All Symbologies This selection allows you to turn on or off transmission of an AIM I D before the decoded symbology See the Symbology Chart on page 2 33 for the single character code that identifies each symbology This action first clears all cu...

Page 52: ...two digit numbers and Save are required after reading this programming symbol Refer to the Programming Chart inside back cover Exit Selections Add Prefix Clear All Prefixes Clear One Prefix Add Suffix Clear All Suffixes Clear One Suffix Save Discard ...

Page 53: ...ralian 4 State A X 41 Interleaved 2 of 5 e l 65 Aztec Code z z 7A Japanese Postal J X 4A BC412 g X 67 Kix Dutch Postal K X 4B BPO 4 State B X 42 Maxicode x U 78 Canadian 4 State C X 43 Micro PDF417 R L 52 Codabar a F 61 No Read 9C Codablock F q O 71 OCR o Y 6F Code 39 b A 62 PDF417 r L 72 Code 49 l T 6C Planet Code L X 4C Code 93 93i i G 69 Postnet P X 50 Code 128 j C 6A QR Code s Q 73 Code Z u X ...

Page 54: ... K 107 6B k 12 0C FF 44 2C 76 4C L 108 6C l 13 0D CR 45 2D 77 4D M 109 6D m 14 0E SO 46 2E 78 4E N 110 6E n 15 0F SI 47 2F 79 4F O 111 6F o 16 10 DLE 48 30 0 80 50 P 112 70 p 17 11 DC1 49 31 1 81 51 Q 113 71 q 18 12 DC2 50 32 2 82 52 R 114 72 r 19 13 DC3 51 33 3 83 53 S 115 73 s 20 14 DC4 52 34 4 84 54 T 116 74 t 21 15 NAK 53 35 5 85 55 U 117 75 u 22 16 SYN 54 36 6 86 56 V 118 76 v 23 17 ETB 55 37...

Page 55: ... data format See Alternate Data Formats on page 2 40 If you are programming the primary format scan 0 If you are programming an alternate format scan 1 2 or 3 depending on the alternate format you are programming 3 Terminal Type Refer to the Supported Terminals Chart on page 2 5 and locate the Termi nal ID number for your PC Scan three numeric bar codes on the inside back cover to program the scan...

Page 56: ...ion Chart on page 2 34 F3 Send up to but not including ss character Search and Send starting from current cursor position leaving cursor pointing to ss character followed by xx key or function code Syntax F3ssxx ss and xx both stand for the hex values for ASCII codes see Decimal to Hex to ASCII Conversion Chart on page 2 34 F4 Send xx character nn times Insert leaving cursor in current cursor posi...

Page 57: ...is terminated The cursor is not moved by the FB command Syntax FBnnxxyy zz where nn is a count of the number suppress characters in the list and xxyy zz is the list of characters to be suppressed xx stands for the hex value for an ASCII code see Decimal to Hex to ASCII Conversion Chart on page 2 34 FC Disable suppress filter and clear all suppressed characters Syntax FC E4 Replaces up to 15 charac...

Page 58: ...s Exit Selections One or more two digit numbers and Save are required after reading this programming symbol Refer to the Programming Chart inside back cover Enter Data Format Default Data Format none Clear One Data Format Clear All Data Formats Save Current Data Format Changes Discard Current Data Format Changes ...

Page 59: ...xes Require Data Format When Data Formatter is required all input data must conform to an edited format or the scanner does not transmit the input data to the host device Show Data Formats Read the Show Data Formats bar code to transmit the existing data formats One format per line is printed out On Off Required Show Data Formats ...

Page 60: ...ou must input whether you are programming the primary format or an alternate format numbered 1 2 or 3 An alternate format is initiated by scanning one of the 3 alternate format bar codes below The scanner will scan the next bar code formatting the data with the selected alternate format then revert immediately to the primary format Alternate Data Format 1 Alternate Data Format 2 Alternate Data For...

Page 61: ...Add an Output Sequence 1 Scan the Enter Sequence symbol see Output Sequence Editor on page 2 44 2 Code I D On the Symbology Chart on page 2 33 find the symbology to which you want to apply the output sequence format Locate the Hex value for that symbology and scan the 2 digit hex value from the Programming Chart inside back cover 3 Length Specify what length up to 9999 characters of data output wi...

Page 62: ... line is shown below SEQBLKsequence editor start command 62 code identifier for Code 39 9999 code length that must match for Code 39 9999 all lengths 41 start character match for Code 39 41h A FF termination string for first code 6A code identifier for Code 128 9999 code length that must match for Code 128 9999 all lengths 42 start character match for Code 128 42h B FF termination string for secon...

Page 63: ...t s On Not Required the scanner will attempt to get the output data to conform to an edited sequence but if it cannot the scanner transmits all output data to the host device as is When the output sequence is Off the bar code data is output to the host as the scanner decodes it Note This selection is unavailable when the Multiple Symbols Selection is turned on Required On Not Required Off ...

Page 64: ...is read please see Output Sequence Beeper on page 2 24 One or more two digit numbers and Save are required after reading this programming symbol Refer to the Programming Chart inside back cover Enter Sequence Default Sequence Save Current Output Sequence Changes Discard Current Output Sequence Changes ...

Page 65: ...h read When this programming selection is turned off the Imager will only read the symbol closest to the aiming beam No Read With No Read turned on the Imager notifies you if a code cannot be read In the Quick View Scan Data Window see Scan Data Window on page 6 4 an NR appears when a code cannot be read If No Read is turned off the NR will not appear If you want a different notation than NR for e...

Page 66: ...hen a print weight of 6 may improve the reading performance For consistently light printing a print weight of 2 may help A value from 0 to 8 may be used to adjust the print weight The default print weight is 4 A one digit number from 0 to 8 is required after reading this programming symbol Refer to the Programming Chart inside back cover Set Print Weight Default ...

Page 67: ...his section to program the hand held Imager This programming section contains the following menuing selections Linear Symbology Selections Stacked Symbology Selections Postal Symbology Selections 2D Matrix Symbology Selections Diagnostics ...

Page 68: ...anner will issue an error beep You may wish to set the same value for minimum and maximum length to force the scanner to read fixed length bar code data This helps reduce the chances of a misread EXAMPLE Decode only those bar codes with a count of 9 20 characters Min length 09 Max length 20 EXAMPLE Decode only those bar codes with a count of 15 characters Min length 15 Max length 15 A one to two d...

Page 69: ...t Don t Transmit the unit will only read Codabar bar codes printed with a check character but will not transmit the check character with the scanned data When Check Character is set to Validate And Transmit the scanner will only read Codabar bar codes printed with a check character and will transmit this character at the end of the scanned data Validate But Don t Transmit No Check Character Valida...

Page 70: ...ngth the scanner will issue an error beep You may wish to set the same value for minimum and maximum length to force the scanner to read fixed length bar code data This helps reduce the chances of a misread EXAMPLE Decode only those bar codes with a count of 9 20 characters Min length 09 Max length 20 EXAMPLE Decode only those bar codes with a count of 15 characters Min length 15 Max length 15 A o...

Page 71: ... pairs P through Y decode as 0 through 9 NUL U DLE P SP SPACE 0 0 V P P W p P SOH A DC1 Q A 1 1 A A Q Q a A q Q STX B DC2 R B 2 2 B B R R b B r R ETX C DC3 S C 3 3 C C S S c C s S EOT D DC4 T D 4 4 D D T T d D t T ENQ E NAK U E 5 5 E E U U e E u U ACK F SYN V F 6 6 F F V V f F v V BEL G ETB W G 7 7 G G W W g G w W BS H CAN X H 8 8 H H X X h H x X HT I EM Y I 9 9 I I Y Y i I y Y LF J SUB Z J Z J J ...

Page 72: ... only read Code 39 bar codes printed with a check character but will not transmit the check character with the scanned data When Check Character is set to Validate And Transmit the scanner will only read Code 39 bar codes printed with a check character and will transmit this character at the end of the scanned data will transmit this character at the end of the scanned data Validate But Don t Tran...

Page 73: ...sh to set the same value for minimum and maximum length to force the scanner to read fixed length bar code data This helps reduce the chances of a misread EXAMPLE Decode only those bar codes with a count of 9 20 characters Min length 09 Max length 20 EXAMPLE Decode only those bar codes with a count of 15 characters Min length 15 Max length 15 A one to two digit number and Save are required after r...

Page 74: ...of 5 bar codes printed with a check digit but will not transmit the check digit with the scanned data When Check Digit is set to Validate And Transmit the scanner will only read Interleaved 2 of 5 bar codes printed with a check digit and will transmit this digit at the end of the scanned data Validate But Don t Transmit No Check Digit Validate And Transmit ...

Page 75: ...he same value for minimum and maximum length to force the scanner to read fixed length bar code data This helps reduce the chances of a misread EXAMPLE Decode only those bar codes with a count of 9 20 characters Min length 09 Max length 20 EXAMPLE Decode only those bar codes with a count of 15 characters Min length 15 Max length 15 A one to two digit number and Save are required after reading this...

Page 76: ...me value for minimum and maximum length to force the scanner to read fixed length bar code data This helps reduce the chances of a misread EXAMPLE Decode only those bar codes with a count of 9 20 characters Min length 09 Max length 20 EXAMPLE Decode only those bar codes with a count of 15 characters Min length 15 Max length 15 A one to two digit number and Save are required after reading this prog...

Page 77: ...ame value for minimum and maximum length to force the scanner to read fixed length bar code data This helps reduce the chances of a misread EXAMPLE Decode only those bar codes with a count of 9 20 characters Min length 09 Max length 20 EXAMPLE Decode only those bar codes with a count of 15 characters Min length 15 Max length 15 A one to two digit number and Save are required after reading this pro...

Page 78: ...3 12 Linear Symbologies ISBT Scan the On code below if you wish to decode ISBT bar codes ISBT codes are a combination of multiple linear symbols used to mark blood bags On Off ...

Page 79: ...N 8 Default All EAN JAN 8 Settings EAN JAN 8 Check Digit This selection allows you to specify whether the check digit should be transmitted at the end of the scanned data or not On Off Transmit Check Digit Don t Transmit Check Digit ...

Page 80: ...13 Default all EAN JAN 13 Settings EAN JAN 13 Check Digit This selection allows you to specify whether the check digit should be transmitted at the end of the scanned data or not On Off Transmit Check Digit Don t Transmit Check Digit ...

Page 81: ...3 15 Linear Symbologies EAN Addenda You can add 2 or 5 digits to the end of all scanned EAN data EAN 8 and EAN 13 2 Digit Addenda Off 5 Digit Addenda On 5 Digit Addenda Off 2 Digit Addenda On ...

Page 82: ... the check digit should be transmitted at the end of the scanned data or not Number System The numeric system digit of a UPC symbol is normally transmitted but the unit can be programmed so it will not transmit it On Off Transmit Check Digit Don t Transmit Check Digit Don t Transmit Number System Transmit Number System ...

Page 83: ...r system use the UPC E1 selection Check Digit This selection allows you to specify whether the check digit should be transmitted at the end of the scanned data or not Number System The numeric system digit of a UPC symbol is normally transmitted but the unit can be programmed so it will not transmit it On Off Transmit Check Digit Don t Transmit Check Digit Don t Transmit Number System Transmit Num...

Page 84: ...ad with the 0 number system For these codes use the UPC E0 selection If you need to read codes which lead with the 1 number system use the UPC E1 selection UPC Addenda You can add 2 or 5 digits to the end of all scanned UPC data UPC A UPC E0 and UPC E1 Expand Don t Expand On Off 2 Digit Addenda On 2 Digit Addenda Off 5 Digit Addenda On 5 Digit Addenda Off ...

Page 85: ...ced Space Symbology RSS is a family of linear bar codes which meets restricted space requirements while still providing full product identification RSS 14 Limited Default All RSS 14 Limited Settings RSS 14 Limited RSS 14 On RSS 14 Off RSS 14 Limited On RSS 14 Limited Off ...

Page 86: ...e value for minimum and maximum length to force the scanner to read fixed length bar code data This helps reduce the chances of a misread EXAMPLE Decode only those bar codes with a count of 9 20 characters Min length 09 Max length 20 EXAMPLE Decode only those bar codes with a count of 15 characters Min length 15 Max length 15 A one to two digit number and Save are required after reading this progr...

Page 87: ... same value for minimum and maximum length to force the scanner to read fixed length bar code data This helps reduce the chances of a misread EXAMPLE Decode only those bar codes with a count of 9 20 characters Min length 09 Max length 20 EXAMPLE Decode only those bar codes with a count of 15 characters Min length 15 Max length 15 A one to two digit number and Save are required after reading this p...

Page 88: ...e value for minimum and maximum length to force the scanner to read fixed length bar code data This helps reduce the chances of a misread EXAMPLE Decode only those bar codes with a count of 9 20 characters Min length 09 Max length 20 EXAMPLE Decode only those bar codes with a count of 15 characters Min length 15 Max length 15 A one to two digit number and Save are required after reading this progr...

Page 89: ...t the same value for minimum and maximum length to force the scanner to read fixed length bar code data This helps reduce the chances of a misread EXAMPLE Decode only those bar codes with a count of 9 20 characters Min length 09 Max length 20 EXAMPLE Decode only those bar codes with a count of 15 characters Min length 15 Max length 15 A one to two digit number and Save are required after reading t...

Page 90: ...me value for minimum and maximum length to force the scanner to read fixed length bar code data This helps reduce the chances of a misread EXAMPLE Decode only those bar codes with a count of 9 20 characters Min length 09 Max length 20 EXAMPLE Decode only those bar codes with a count of 15 characters Min length 15 Max length 15 A one to two digit number and Save are required after reading this prog...

Page 91: ...d reading length the scanner will issue an error beep You may wish to set the same value for minimum and maximum length to force the scanner to read fixed length bar code data This helps reduce the chances of a misread EXAMPLE Decode only those bar codes with a count of 9 20 characters Min length 09 Max length 20 EXAMPLE Decode only those bar codes with a count of 15 characters Min length 15 Max l...

Page 92: ...3 26 Postal Symbologies U S Postal Service POSTNET Code Planet Code British Post Office 4 State Code Canadian 4 State Code Dutch Postal Code Off On Off On Off On Off On Off On ...

Page 93: ...alian 4 State Code Note Australian 4 State Code symbology is not available in the standard IMAGETEAM 4400 4700 products and may only be ordered by licensed users as a custom 6 digit part number Japanese Postal Service Off On Off On ...

Page 94: ...ame value for minimum and maximum length to force the scanner to read fixed length bar code data This helps reduce the chances of a misread EXAMPLE Decode only those bar codes with a count of 9 20 characters Min length 09 Max length 20 EXAMPLE Decode only those bar codes with a count of 15 characters Min length 15 Max length 15 A one to two digit number and Save are required after reading this pro...

Page 95: ... the same value for minimum and maximum length to force the scanner to read fixed length bar code data This helps reduce the chances of a misread EXAMPLE Decode only those bar codes with a count of 9 20 characters Min length 09 Max length 20 EXAMPLE Decode only those bar codes with a count of 15 characters Min length 15 Max length 15 A one to two digit number and Save are required after reading th...

Page 96: ... same value for minimum and maximum length to force the scanner to read fixed length bar code data This helps reduce the chances of a misread EXAMPLE Decode only those bar codes with a count of 9 20 characters Min length 09 Max length 20 EXAMPLE Decode only those bar codes with a count of 15 characters Min length 15 Max length 15 A one to two digit number and Save are required after reading this p...

Page 97: ...on of primary importance such as package destination The secondary portion contains less important data such as package weight If your application requires only the primary data from MaxiCodes turn Structured Carrier Message Only on Turn this feature on if you are trying to read a damaged Maxicode The scanner may be able to extract just the structured carrier message if the center portion of the c...

Page 98: ...the same value for minimum and maximum length to force the scanner to read fixed length bar code data This helps reduce the chances of a misread EXAMPLE Decode only those bar codes with a count of 9 20 characters Min length 09 Max length 20 EXAMPLE Decode only those bar codes with a count of 15 characters Min length 15 Max length 15 A one to two digit number and Save are required after reading thi...

Page 99: ... a proprietary symbology licensed to its users by Veritec Inc This symbology is not available in standard IMAGETEAM 4400 4700 products and may only be ordered by licensed users as a custom 6 digit part number Default All VeriCode Settings VeriCode Off On ...

Page 100: ...of the Size menu symbols and the size from 10 to 48 even numbers only The size you set will be the only one turned on If you need more sizes turned on up to 3 scan another Size menu symbol and the required size s Default 0 or Off all sizes turned on A one to two digit number and Save are required after reading this programming symbol Refer to the Programming Chart inside back cover Size B Size A S...

Page 101: ...t then the data from the scanned code The following list shows the information that appears for each type of symbology Note The higher the percentage of unused error correction UEC the easier it should be to read each code Aztec Code x layers xx data xx chks in GF xxx EUC xxx Layers Aztec properties Data Number of data words Chks Number of check words UEC Unused Error Correction PDF 417 x rows x c...

Page 102: ... cols xx data xx chks EUC xxx Rows Number of rows Cols Number of columns Data Number of data words Chks Number of check words UEC Unused Error Correction QR Code Model x Version x ECL x Mask x EUC xxx Model Code capacity specification Version Code structure definition ECL Error Correction Level Mask Mask pattern specification UEC Unused Error Correction ...

Page 103: ...CR B 0123456789ABCDEFGHIJKLMNOPQRSTUVWXYZ U S Currency Serial Number Money You can either select an OCR default or create your own custom template for the type of OCR format you intend to read See OCR on page 4 2 for programming codes that will enable your scanner to read OCR A OCR B or U S Currency fonts See Creating OCR Templates on page 4 3 if you want to create a custom template or character s...

Page 104: ...created an OCR template character combinations that fit the template can be scanned see Creating an OCR Template on page 4 3 OCR B On allows you to scan characters in the OCR B font The default setting allows you to scan any 8 digit combination If you have created an OCR template character combinations that fit the template can be scanned see Creating an OCR Template on page 4 3 U S Currency On al...

Page 105: ...te for a single format you can string together several formats and you can create a template for a user defined variable These choices are described in detail below Creating an OCR Template A single template allows you to program the scanner to read any combination of characters in the order you specify Template Characters a represents any alphanumeric character digit or letter c represents a chec...

Page 106: ... 8 digits for example 37680981 3 Character Match Sequences On the Decimal to Hex to ASCII Conversion Chart on page 2 34 find the Hex value that represents the character s you want to match Use the Pro gramming Chart inside back cover to scan the numbers that represent these characters Example B You need to read 3 digits 3 specific characters ABC 3 digits The template ddd414243ddd To create this te...

Page 107: ...R Template changes Stringing Together Multiple Formats Creating Or Statements You may want to program the scanner to accept many OCR formats To do this you would string together each format with a t This tells the scanner to read optical characters that match any one of the formats in the template Example D You need to read any combination of 8 digits or a combination of 4 digits 2 uppercase lette...

Page 108: ... Template page 4 8 This will let you read either A or B or C in any position where you place the g For example you could create the following template ddddddggg This template would then let you read data that began with 6 digits and had an A B or C trailing So you would be able to read 654321ABC or 654321BAC or 654321CCC Adding an OCR Check Character You may want to program the scanner to read OCR...

Page 109: ... 8 This template will let you read any combination of 6 digits with a correct check character after If the check character is invalid the scanner will issue an error beep For example the following string could be scanned 0123455 and the output would be 012345 OCR Template Codes One or more two digit numbers and Save are required after reading this programming symbol Refer to the Programming Chart ...

Page 110: ...4 8 Exit Selections Save OCR Template Discard OCR Template ...

Page 111: ... Off page 2 8 Auto Direct Connect Off page 2 8 Communication RS 232 Selections Parity None page 2 11 Baud Rate 38400 page 2 12 Word Length Data Bits 8 page 2 13 Word Length Stop Bits 1 page 2 13 Hardware Flow Control Off page 2 14 Software Flow Control Off page 2 14 Serial Triggering On 18 Off 20 page 2 15 Imager Selections Power Saving Mode Normal Power page 2 16 Power Hold Mode Off page 2 16 LED...

Page 112: ...e 2 23 Beeper Volume High page 2 24 Power Up Beeper On page 2 24 Output Sequence Beeper On page 2 24 Beep On Decode On page 2 25 Intercharacter Delay 0 page 2 26 Interfunction Delay 0 page 2 27 Intermessage Delay 0 page 2 28 Prefix Suffix Selections Prefix None page 2 32 Suffix None page 2 32 Data Formatter Selections Data Format None page 2 38 Data Formatter On page 2 39 Require Data Format Not R...

Page 113: ...nsmit page 3 4 Message Length Min 0 Max 48 page 3 4 Full ASCII Off page 3 5 Check Character No Check Character page 3 6 Interleaved 2 of 5 On page 3 7 Message Length Min 4 Max 80 page 3 7 Check Digit No Check Character page 3 8 Iata 2 of 5 On page 3 9 Message Length Min 4 Max 80 page 3 9 Code 93 On page 3 10 Message Length Min 0 Max 80 page 3 10 Code 128 On page 3 11 Message Length Min 0 Max 80 pa...

Page 114: ...E1 On page 3 18 UPC 2 Digit Addenda Off page 3 18 UPC 5 Digit Addenda Off page 3 18 RSS 14 On page 3 19 RSS 14 Limited On page 3 19 RSS 14 Expanded On page 3 20 RSS 14 Expanded Message Length Min 1 Max 80 page 3 20 Codablock Off page 3 21 Message Length Min 0 Max 2048 page 3 21 PDF417 On page 3 22 Message Length Min 1 Max 2750 page 3 22 Micro PDF417 Off page 3 23 Message Length Min 1 Max 2750 page...

Page 115: ...7 Japanese Postal Service Off page 3 27 Planet Code Off page 3 27 2D Matrix Selections QR Code On page 3 28 Message Length Min 1 Max 3500 page 3 28 Data Matrix On page 3 29 Message Length Min 1 Max 1500 page 3 29 MaxiCode On page 3 30 Message Length Min 1 Max 150 page 3 30 SCM Only Off page 3 31 Aztec Code On page 3 32 Message Length Min 1 Max 3750 page 3 32 VeriCode On page 3 33 VeriCode Size 0 o...

Page 116: ...5 6 ...

Page 117: ...he Imager The Imager cannot get its power from the PC s com port For Microsoft Windows 95 or NT 4 0 2 Insert the Quick View diskette labelled 32 Bit Release into Drive A or B 3 From the Start Menu click on Run Type x setup in the command line box where x represents a drive letter typically A for the 3 5 floppy drive on most PCs Click on OK 4 Follow the instructions in the setup screens 5 To start ...

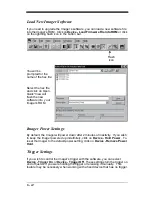
Page 118: ...file 8 Double click on the Quickview exe file Follow the screen prompts to install the Quick View program 9 To start Quick View from the Start Menu click on Programs Quick View Quick View Note If you wish you can create a shortcut to the Quick View executable on your desktop Temporary Quick Load Configuration For a quick download communication configuration scan the Quick Load bar code and the sca...

Page 119: ...s to com 1 as the communications port If you have plugged the Imager into another com port you must Cancel out of this message Click on File Preferences This popup appears Click on the radio button for the appropriate com port then click on OK Quick View should now be able to locate the Imager You may also need to pull the Imager s trigger to establish communications between the PC and the Imager ...

Page 120: ...ter the font in this window by using the Font button or clear all data in the window with the Clear button If you wish to see the mnemonic for any embedded control characters you should put a check in the checkbox forExpand Control Chars the default setting If you wish to see the ASCII control character rather than the mnemonic turn off this checkbox Note The ASCII control character which is displ...

Page 121: ...sent a demo you must set your File Preferences to Enable Demo Screens Once the demo screens are enabled scan the demo bar codes on the following pages To disable the demo screens click on the checkbox to remove the checkmark ...

Page 122: ...By using a high capacity code complete information about the parts ensures that the right parts are issued and billed to the proper location Welch Allyn offers both long range and high density models of the IMAGETEAM 4400 to provide the optimal hand held solution for a wide variety of manufacturing operations Scan each of the following bar codes to display sample screens for a manufacturing applic...

Page 123: ... personnel in hand sorting operations and for customers who want to take advantage of the savings associated with MaxiCode without incurring the cost of an over the belt scanning solution Scan each of the following bar codes to display sample screens for a shipping application Ship To Cheryl Isom Welch Allyn 4341 Jordan Road Box 187 Skaneateles Falls NY 13153 Benjamin F Lynn Musket Co 243 Liberty ...

Page 124: ...ned each time the patient arrives for treatment Both the health care professional and the patient benefit from the enhanced accuracy efficiency and security that photo identification provides Scan each of the following bar codes to display sample screens for this type of patient application Patient ID 890 66 4589 Mason Theresa F 5 Beach Front Drive Pensacola FL 49607 Patient ID 123 45 4569 Ely Ger...

Page 125: ...ar codes before moving on to the next package By taking advantage of the enhanced data capacity of PDF417 the user is able to encode all the required information in a single bar code label Using the Imager and a two dimensional symbology the user gets complete information in a single scan Scan this bar code to display a sample screen for this bill of lading application Order 99999 Welch Allyn 4619...

Page 126: ...nature box The Aztec bar code commands the scanner to capture the image of the signature box and its contents and send this image to the host system running Quick View PAUL S QUICK MART MAIN ST NEW YORK NEW YORK 315 123 4567 1122 3344 5678 THU MAR 04 1999 09 34B CREDIT CARD CARD NO 00234567899876543 EXP DATE 0100 CARD TYPE MC CREDIT TR TYPE SALE APP CODE 004910 REC NO C009 TOTAL 37 99 Sign ...

Page 127: ...arper the image and the larger the size of the resulting file Higher resolution images also take longer to process You must also select whether you wish to capture the image in Gray Scale or in Black White Note If you need to see exactly what the Imager sees for example if you are diagnosing a bar code you should set the image to Black White If you want the Imager to display illuminated aiming bra...

Page 128: ...u move the mouse over the image the cursor changes to a magnifying glass Left click to zoom in to the image right click to zoom out Saving an Image File If you wish to save the file as a bitmap click on File Save As Enter the location and file name you wish to use for this file Click on Save and a bitmap file will be saved ...

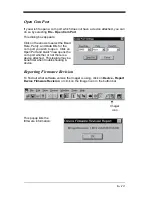
Page 129: ...ts for the com port you wish to open Click on Open Port and Quick View opens the com port whether or not there is a device attached This feature may be beneficial when troubleshooting a device Reporting Firmware Revision To find out what software version the Imager is using click on Device Report Device Firmware Revision or click on the Imager icon in the button bar This popup lists the firmware i...

Page 130: ...r Power Settings By default the Imager will power down after 2 minutes of inactivity If you wish to keep the Imager powered up indefinitely click on Device Hold Power To reset the Imager to the default power setting click on Device Remove Power Hold Trigger Settings If you wish to control the Imager s trigger with the software you can select Device Trigger On or Device Trigger Off These settings t...

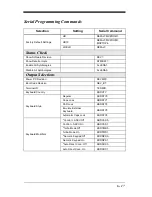
Page 131: ... 17 Information about performing queries is listed on page page 6 28 Serial Programming Commands The serial programming commands can be used in place of the programming bar codes listed in Section 2 Both the serial commands and the programming bar codes will program the Imager For complete descriptions and examples of each programming command refer to Section 2 To enter a serial command click in t...

Page 132: ...lays the software version being used by the Imager Build Command Bar Code is used to create an Aztec code from a command or set of commands entered in the Serial Window The size of the Aztec code can be altered using the File Preferences selection This bar code can then be printed out and used to program other Imagers Build Clone Bar Code is used to capture the settings from one Imager and input t...

Page 133: ...LLENA0 Output Selections Power PC Revision REVMPC Boot Code Revision REV_BT Terminal ID TERMID Keyboard Country KBDCTY Keyboard Style Regular KBDSTY0 Caps Lock KBDSTY1 Shift Lock KBDSTY2 Emulate External Keyboard KBDSTY5 Automatic Caps Lock KBDSTY6 Keyboard Modifiers Control ASCII Off KBDCAS0 Control ASCII On KBDCAS1 Turbo Mode Off KBDTMD0 Turbo Mode On KBDTMD1 Numeric Keypad Off KBDNPS0 Numeric K...

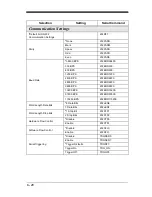
Page 134: ...32BDR4800 9600 BPS 232BDR9600 19200 BPS 232BDR19200 57600 BPS 232BDR57600 115200 BPS 232BDR115200 Word Length Data Bits 8 Data Bits 232LEN8 7 Data Bits 232LEN7 Word Length Stop Bits 1 Stop Bit 232STP1 2 Stop Bits 232STP2 Hardware Flow Control Disable 232CTS0 Enable 232CTS1 Software Flow Control Disable 232SFL0 Enable 232SFL1 Serial Triggering Disable TRGSER0 Enable TRGSER1 Trigger Defaults TRGDFT ...

Page 135: ...0 Off HSTLED1 Aimer Delay Off no delay HSTAIM0 200 milliseconds HSTAIM200 400 milliseconds HSTAIM400 Aimer Timeout Set Timeout HSTTIM Aimer Interval Every Read HSTINT1 Every 2nd Read HSTINT2 Every 3rd Read HSTINT3 Every x Read HSTINT Off HSTINT0 Scan Stand Off SSTMOD0 On SSTMOD1 Scan Stand LED Intensity 15 SSTFRQ Scan Stand Lights On SSTLON1 Off SSTLON0 Presentation Mode On PRSMOD1 Off PRSMOD0 Pre...

Page 136: ...ntercharacter Delay DLYCHR User Specified Intercharacter Delay Character DLY_XX Length DLYCRX Interfunction Delay DLYFNC Intermessage Delay DLYMSG Prefix Suffix Selections Add CR Suffix to All Symbologies SUFBK299CR Add Code I D Prefix to All Symbologies PREBK2995C80 Add AIM I D Prefix to All Symbologies PREBK2995C81 Prefix Add Prefix PREBK2 Clear One Prefix PRECL2 Clear All Prefixes PRECA2 Save C...

Page 137: ...rmats DFMBK3 Alternate Data Formats 1 VSAF_1 2 VSAF_2 3 VSAF_3 Output Sequence Selections Require Output Sequence Require SEQ_EN2 On Not Required SEQ_EN1 Off SEQ_EN0 Output Sequence Editor Default Sequence SEQDFT Enter Sequence SEQBLK Save Current Sequence Changes MNUSAV Discard Current Sequence Changes MNUABT Multiple Symbols Disable SEQ_EN0 Enable SEQ_EN1 No Read Disable SHWNRD0 Enable SHWNRD1 P...

Page 138: ...CII Disable C39ASC0 Enable C39ASC1 Code 39 Message Length Minimum C39MIN Maximum C39MAX Code 39 Check Char No Check Char C39CHK0 CKX0 Validate But Don t Transmit C39CHK1 CKX0 Validate and Transmit C39CHK1 CKX1 Interleaved 2 of 5 Default All Interleaved 2 of 5 Settings I25DFT Interleaved 2 of 5 On I25ENA1 Off I25ENA0 Interleaved 2 of 5 Message Length Minimum I25MIN Maximum I25MAX Interleaved 2 of 5...

Page 139: ...imum 128MAX Code 128 Include Disable 128FNC0 Code 128 ISBT Disable ISBENA0 Enable ISBENA1 EAN JAN 8 Default All EAN JAN 8 Settings EA8DFT EAN JAN 8 On EA8ENA1 Off EA8ENA0 EAN JAN 8 Check Digit Don t Transmit EA8CKX0 Transmit EA8CKX1 EAN JAN 13 Default All EAN JAN 13 Settings E13DFT EAN JAN 13 On E13ENA1 Off E13ENA0 EAN JAN 13 Check Digit Don t Transmit E13CKX0 Transmit E13CKX1 EAN JAN 2 Digit Adde...

Page 140: ...t UE0NSX1 UPC E0 Version E Expand Don t Expand UE0EXP0 Expand UE0EXP1 UPC E1 On UE1ENA1 Off UE1ENA0 UPC 2 Digit Addenda On UPCAD21 Off UPCAD20 UPC 5 Digit Addenda On UPCAD51 Off UPCAD50 RSS 14 Default All RSS 14 Settings RSSDFT RSS 14 On RSSENA1 Off RSSENA0 RSS 14 Limited Default All RSS 14 Limited Settings RSLDFT RSS 14 Limited On RSLENA1 Off RSLENA0 RSS 14 Limited Default All RSS 14 Expanded Set...

Page 141: ...ettings MPDDFT Micro PDF417 On MPDENA1 Off MPDENA0 Micro PDF417 Message Length Minimum MPDMIN Maximum MPDMAX Code 49 Default All Code 49 Settings C49DFT Code 49 On C49ENA1 Off C49ENA0 Code 49 Msg Length Minimum C49MIN Maximum C49MAX Composite Codes On COMENA1 Off COMENA0 Composite Msg Length Minimum COMMIN Maximum COMMAX Postal Symbology Selections POSTNET Code USPS On NETENA1 Off NETENA0 POSTNET ...

Page 142: ... QRCENA0 QR Code Message Length Minimum QRCMIN Maximum QRCMAX Data Matrix Settings Default All Data Matrix Settings IDMDFT Data Matrix On IDMENA1 Off IDMENA0 Data Matrix Msg Length Minimum IDMMIN Maximum IDMMAX MaxiCode Settings Default All MaxiCode Settings MAXDFT MaxiCode On MAXENA1 Off MAXENA0 MaxiCode Msg Length Minimum MAXMIN Maximum MAXMAX SCM Only Disable MAXSCM0 Enable MAXSCM1 Aztec Code S...

Page 143: ...actory Aztec Code Msg Length Minimum AZTMIN Maximum AZTMAX 1VeriCode Settings Default All VeriCode Settings VERDFT 1 VeriCode On VERENA1 Off VERENA0 1 VeriCode Size Size A VERSZA Size B VERSZB Size C VERSZC Size D VERSZD Size E VERSZE Test Menu Off TSTMNU0 On TSTMNU1 2D Scan Diagnostics Off 2DDIAG0 On 2DDIAG1 Selection Setting Serial Command ...

Page 144: ...ommands Example 1 What is the range of possible values for Codabar Coding Enable Enter cbrena Response CBRENA0 1 ACK This response indicates that Codabar Coding Enable CBRENA has a range of values from 0 to 1 off and on Example 2 What is the default value for Codabar Coding Enable Enter cbrena Response CBRENA1 ACK This response indicates that the default setting for Codabar Coding Enable CBRENA is...

Page 145: ...h MAX is 60 characters and the Default setting DFT has no value Button Bar The Quick View button bar and the button functions are shown below This icon only appears if you have Visual Menu software installed Visual Menu is available free of charge from the Welch Allyn website at http dcd welchallyn com techsprt download software htm Full HalfQuarter Resolution Capture an image Open file Save file ...

Page 146: ...6 30 ...

Page 147: ...ode s to any location Users in other locations can scan the bar code s to load in the customized parameters To communicate with a scanner Visual Menu requires that the PC have at least one available serial communication port and an RS 232 cable to connect the port to the device A power supply which plugs into the cable is also required Visual Menu Operations The Visual Menu program performs the fo...

Page 148: ...lyn com 11 Click on the Support button then click on the Software Download button 12 When prompted enter the user name pumpkin and the password pie 13 Locate the listing for Visual Menu Click on the yellow Download button 14 When prompted select Save File and save the files to the c win dows temp directory 15 Once you have finished downloading the file exit the web site 16 Using Explorer go to the...

Page 149: ...F15 BEL 07 CR Enter CR Enter New Line BS 08 Reserved Reserved F16 HT 09 Tab Tab F17 LF 0A Reserved Reserved F18 VT 0B Tab Tab Tab Field Forward FF 0C Delete Delete Delete CR 0D CR Enter CR Enter Field Exit New Line SO 0E Insert Insert Insert SI 0F Escape Escape F19 DLE 10 F11 Reserved Error Reset DC1 11 Home Home Home DC2 12 Print Print F20 DC3 13 Back Space Back Space Back Space DC4 14 Back Tab B...

Page 150: ...F15 Reserved BEL 07 New Line New Line BS 08 F16 Field Forward HT 09 F17 Field Forward LF 0A F18 Reserved VT 0B Tab Field Forward Field Forward FF 0C Delete Delete CR 0D Field Exit New Line SO 0E Insert Insert SI 0F Clear Erase DLE 10 Error Reset Error Reset DC1 11 Home Reserved DC2 12 Print Print DC3 13 Back Space Back Space DC4 14 Back Tab Back Field NAK 15 F19 Reserved SYN 16 F1 PF1 ETB 17 F2 PF...

Page 151: ... 08 N A N A N A HT 09 Tab Tab Tab LF 0A N A N A N A VT 0B Tab Tab Tab FF 0C N A N A Delete CR 0D New Line New Line New Line SO 0E N A N A Insert SI 0F Escape Escape Escape DLE 10 F11 F11 F11 DC1 11 Insert Insert Home DC2 12 F13 F13 Print DC3 13 Back Space Back Space Back Space DC4 14 Back Tab Back Tab Back Tab NAK 15 F12 F12 F12 SYN 16 F1 F1 F1 ETB 17 F2 F2 F2 CAN 18 F3 F3 F3 EM 19 F4 F4 F4 SUB 1A...

Page 152: ...8 4 ...

Page 153: ...nches 6 8 to 22 9 cm 1 7 to 2 4 inches 4 3 to 6 1 cm 2 0 to 4 0 inches 5 1 to 10 2 cm 1 5 to 4 6 inches 3 8 to 11 7 cm Field of View Long Range High Density High Density10 1 by 1 3 inches 2 54 by 3 3 cm to 3 7 by 5 2 inches 9 4 by 13 2 cm 0 6 by 0 8 inches 1 5 by 2 0 cm to 1 3 by 1 8 inches 3 3 by 4 6 cm 1 by 1 3 inches 2 5 by 3 3 cm to 2 25 by 3 inches 5 7 by 7 6 cm Resolution Long Range Long Ran...

Page 154: ...mA average 5 VDC 430 mA average 5 VDC 620 mA average 5 VDC Noise Immunity 100 mV peak to peak Temperature Ranges Operating 32 F to 122 F 0C to 50C Storage 40 F to 158 F 40C to 70C Humidity 95 RH non condensing at 50 C Mechanical Shock 10 drops from 5 feet 1 5 m to concrete ESD Sensitivity 15 kV to any external surface Agency Compliance FCC Class B Canadian Class B CE DOC Class B CDRH Class II CDRH...

Page 155: ...P2 Power Pig Tail P2 connects to the external power supply Inner Outer View B B 10 Pin Modular Plug P1 connects to the Imager Inner Outer P2 0 5 3 2 8 7 SH Red Black Green Blue Brown 1 NC No Connection 2 Ground Supply Ground 3 5VDC Power Connection 4 Ground Supply Ground 5 RXD Receive Data Serial Data to Imager 6 TXD Transmit Data Serial Data from Imager 7 5VDC Power Connection 8 RTS Request to Se...

Page 156: ...9 4 IT4400 Dimensions 6 06 in 15 38 cm 2 49 in 6 32 cm Top View Front View 5 62 in 14 28 cm 1 53 in 4 01 cm 1 07 in 2 72 cm 3 4 View Side View ...

Page 157: ...ensions 4 83 in 12 27 cm 2 49 in 6 32 cm Top View Front View Side View Bottom View 1 83 in 4 65 cm 1 63 in 4 14 cm 1 53 in 4 01 cm 1 076 in 2 73 cm 538 in 1 37 cm 630 in 1 60 cm M4 threaded insert 25 in 6 35 mm depth ...

Page 158: ...9 6 ...

Page 159: ...oft cloth or facial tissue dampened with water or a mild detergent water solution If a detergent solution is used rinse with a clean tissue dampened with water only The Imager s housing may also be cleaned the same way Inspecting Cords and Connectors Inspect the Imager s interface cable and connector for wear or other signs of damage A badly worn cable or damaged connector may interfere with Image...

Page 160: ...ement cable specify the cable part number of the original interface cable To Replace the IT4400 Interface Cable 1 Turn the power to the host system OFF 2 Disconnect the Imager s cable from the terminal or computer 3 Locate the small hole on the side of the Imager s handle near the base cable release 4 Straighten one end of a paper clip 5 Insert the end of the paper clip into the small hole and pre...

Page 161: ... the cable and the back end of the housing 4 Press the screwdriver tip down to depress the retention tab releas ing the connector 5 Pull the connector out of the Imager while maintaining pres sure on the screwdriver 6 Replace with the new cable Insert the connector into the opening at the base of the Imager Press firmly The connector is keyed to go in only one way and will click into place Cable R...

Page 162: ... LEDs on If the illumination LEDs in the Imager aren t illuminated check that 1 The cable is connected properly 2 The host system power is on if external power isn t used Is the Imager having trouble reading your symbols If the Imager isn t reading symbols well check that the symbols 1 Aren t smeared rough scratched or exhibiting voids 2 Aren t coated with frost or water droplets on the surface 3 ...

Page 163: ...iencing problems call your Distributor or Welch Allyn 315 685 2476 8 a m to 6 p m EST Fax 315 685 4960 Web Site dcd welchallyn com E Mail dcd_techsupt mail welchallyn com For more information on customer support or warranty see the next two sections ...

Page 164: ...10 6 ...

Page 165: ...the address telephone number listed below to obtain a Return Material Authorization number RMA Main Office Welch Allyn Inc Data Collection Division 4619 Jordan Road P O Box 187 Skaneateles Falls New York 13153 0187 Product Service Department Telephone 315 685 4278 or 685 4360 Fax 315 685 4156 For service in Europe please contact your Welch Allyn representative at address below or your local distri...

Page 166: ...pan Office Welch Allyn Ltd Bon Marusan 8F 3 5 1 Kanda Jinbocho Chiyoda ku Tokyo 101 Japan Telephone Int 81 3 5212 7392 Fax Int 81 3 3261 7372 For service in Latin America please contact your Welch Allyn representative at address below or your local distributor Latin America Office Welch Allyn Ltd 5150 North Tamiami Trail Suite 302 Naples FL 34103 2821 Telephone 941 263 7600 Fax 941 263 9689 Help D...

Page 167: ...ct it from static damage is solely that of the user The warranty is valid only if the unit or Imager has not been tampered with or serviced by any party unauthorized by Welch Allyn Inc as a repair facility THE WARRANTIES SET FORTH HEREIN ARE IN LIEU OF ANY AND ALL OTHER WARRANTIES EXPRESSED OR IMPLIED INCLUDING THE WARRANTIES OF MERCHANTABILITY AND FITNESS FOR A PARTICULAR PURPOSE THE BUYER ACKNOW...

Page 168: ...11 4 ...

Page 169: ... 24 Volume Serial Command 6 20 Boot Code Revision 2 3 Serial Command 6 17 C Cable Replacing 10 2 Cable Pinouts 9 3 Carriage Return Suffix Add to all Symbologies 2 31 Codabar Selections Serial Commands 6 21 Codablock Selections 4 2 Serial Commands 6 25 Code 128 Selections 3 11 Serial Commands 6 23 Code 39 Selections 3 4 Serial Commands 6 22 Code 49 Selections 3 24 Serial Commands 6 25 Code 93 Selec...

Page 170: ...ctory Default Settings HD 2 2 HD10 2 2 LR 2 2 Serial Command 6 17 Flow Control Hardware 2 14 Serial Command 6 18 Software 2 14 Serial Command 6 18 H Hardware Flow Control 2 14 Serial Command 6 18 Hex Chart 2 34 I Iata 2 of 5 Selections 3 9 Installation Keyboard Wedge 1 6 Serial Port 2 10 Intercharacter Delay 2 26 Serial Command 6 20 Interface Keys 8 1 Interfunction Delay 2 27 Serial Command 6 20 I...

Page 171: ... 43 Serial Command 6 21 Output Sequence Editor 2 44 4 7 Serial Command 6 21 Overview 1 1 P Parity 2 11 Serial Command 6 18 PDF 417 Selections 3 22 Serial Commands 6 25 Pinouts Cables 9 3 Postal Code Selections Serial Commands 6 25 Power Hold Mode 2 16 Serial Command 6 19 Power PC Revision 2 3 Serial Command 6 17 Power Saving Mode 2 16 Serial Command 6 19 Power Settings Using Quick View 6 14 Power ...

Page 172: ...al Commands 6 24 S Scan Data Window 6 4 Scan Stand Selections 2 20 Serial Command 6 19 SCM Selections Serial Commands 6 26 Serial Programming Commands 6 15 Add AIM I D Prefix to All Symbologies 6 20 Add Code I D Prefix to All Symbologies 6 20 Add CR Suffix to All Symbolo gies 6 20 Aimer Delay 6 19 Aimer Interval 6 19 Aimer Timeout 6 19 Alternate Data Formats 6 21 Aztec Code Selections 6 26 Baud Ra...

Page 173: ...Stand 6 19 Scan Stand LED Intensity 6 19 Scan Stand Lights 6 19 SCM Selections 6 26 Serial Triggering 6 18 Set Print Weight 6 21 Show Data Formats 6 17 6 21 Show Software Revision 6 17 Software Flow Control 6 18 Suffix 6 20 Terminal ID 6 17 UPC A Selections 6 23 UPC E0 Selections 6 24 UPC E1 Selections 6 24 User Specified Intercharacter Delay 6 20 VeriCode Selections 6 27 Word Length Data Bits 6 1...

Page 174: ...elections 3 17 Serial Commands 6 24 UPC E1 Selections 3 18 Serial Commands 6 24 User Specified Intercharacter Delay Serial Command 6 20 V VeriCode Selections 3 33 Serial Commands 6 27 Visual Menu 7 1 W Word Length Data Bits 2 13 Serial Command 6 18 Stop Bits 2 13 Serial Command 6 18 Z Zoom 2 22 Serial Command 6 20 Zoom Placement 2 23 Serial Command 6 20 ...

Page 175: ......

Page 176: ...Sample Symbols UPC A 0 123456 7890 Interleaved 2 of 5 Code 128 EAN 13 Code 39 Codabar 1234567890 Code 128 9 780330 290951 BC321 A13579B ...

Page 177: ...Sample Symbols PDF417 Postnet Code 49 Data Matrix QR Code Car Registration Zip Code 1234567890 Test Symbol Numbers OCR A Sample 55836540 OCR B Sample 55836540 ...

Page 178: ...Sample Symbols Aztec Aztec Mesa Code MaxiCode Micro PDF417 Package Label Test Message Test Message Test Message ...

Page 179: ...Programming Chart 0 2 6 1 7 5 4 3 ...

Page 180: ...Programming Chart 8 A E 9 F D C B Save Discard E ...

Page 181: ...Programming Chart OCR a e d l Save Discard c t ...

Page 182: ...4619 Jordan Road P O Box 187 Skaneateles Falls New York 13153 0187 44 4700 UG Rev H ...

Reviews: