background image

Patches & Favorites          

161

 PATCHES

Your Hammond 

SKX

 contains a large number of different types of sounds and a large number of ways to customize

and tailor those sounds.  In addition, many of the different types of sounds can be blended or mixed with each other to
produce many unique tone colors.  In the organ world, this mixing, blending and tailoring of sounds is called
Registration.  In the keyboard and synth world, a sound or group of sounds and effects is colloquially known as a

Patch

..  This term derives from old-style synthesizers which used 

patch

 cords (originally telephone switchboard-type

cords) to connect the various components to produce specific types of sounds.  Although modern technology has
rendered this technique unnecessary, the term “Patch” has remained.  Each time a Patch is selected it will register a
particular setting of the sounds and controls on the 

SKX

.

Ë


Selecting a Patch

TRY THIS:

1.

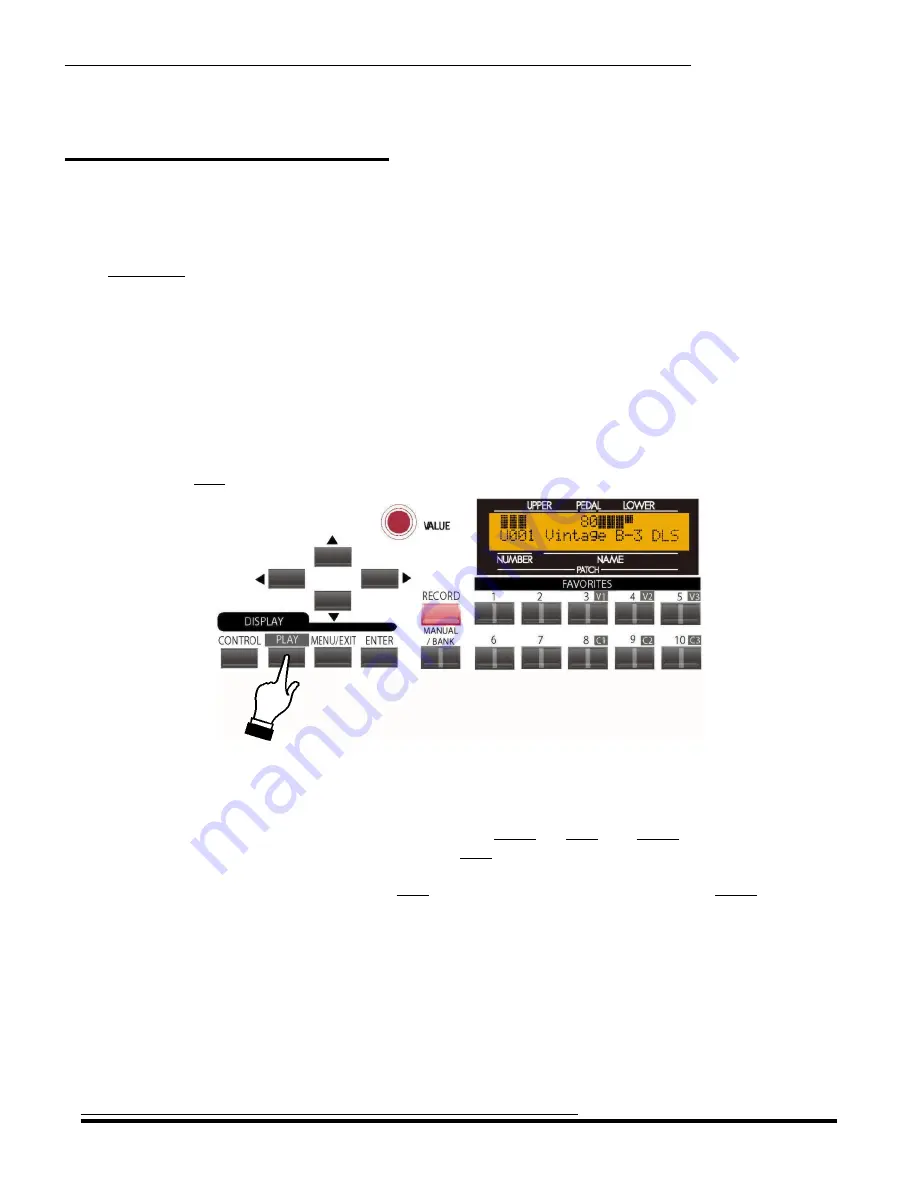
Make sure the Information Center Display is in PLAY Mode.  If it is not, touch the PLAY Touch Button

once

.  The Information Center Display should now look similar to this:

Notice that the bottom line displays a letter (“U” or “P”), a number and a name.  The following
paragraphs explain each portion of the bottom line of the display.

There are two categories of Patches on the SK - 

Preset

 and 

User

.  The 

Preset

 Patches are factory-

programmed and cannot be changed.  The 

User

 Patches are also factory-programmed; however, you can

make changes to them or even overwrite them entirely in order to create your own custom Patches.  In
the Information Center Display, 

User

 Patches are designated by the letter “U,” and 

Preset

 Patches are

designated by the letter “P.”  Each category contains 100 Patches for a total of 200.

The three-digit number following the letter “U” or “P” refers to the currently selected Patch Number. 
The Patch Name appears to the right of the Patch Number.

HA<O> SKX

 Owner’s  Playing  Guide

Summary of Contents for SKX

Page 1: ...REFERENCE GUIDE...

Page 2: ......

Page 3: ...unctions pertaining to Drawbars are grouped together all Percussion features are treated as a group and so on Also each feature is treated as an explanation unto itself and does not require you to hav...

Page 4: ......

Page 5: ...TABLE OF CONTENTS HA O SKX Owner s Playing Guide...

Page 6: ...d ENTER Touch Buttons 11 PLAY 11 MENU EXIT 11 ENTER 11 PAGE NAVIGATION Touch Buttons 11 Display Modes 12 PLAY Mode Graphic Display 12 PLAY Mode EXTRA VOICE Display 13 PLAY Mode Numeric Display 13 MENU...

Page 7: ...n 52 Pedal Velocity 53 DRAWBAR Edit Menu PEDAL Page 3 53 Pedal Mode Polyphony 53 DRAWBAR Edit Menu PEDAL Page 4 54 Drawbar Octave Pedals 54 Drawbar Zone Lower Limit Pedals 55 Drawbar Zone Upper Limit...

Page 8: ...2 Wide Chorus 100 C 3 Full Chorus 100 Adjusting the Vibrato and Chorus Modes using a Shortcut 101 Vibrato Rate 102 Tremulant Amount 103 Page 2 103 EMPH 103 Mix 104 PEDAL 104 Vibrato Chorus Depth 105 L...

Page 9: ...Making Voice Selections For Each Category 146 Allocating Extra Voices UPPER Manual 148 Allocating Extra Voices LOWER Manual 149 Using Drawbars and Extra Voices Together 150 Using Drawbars and Extra V...

Page 10: ...Frequency 198 Ring Modulation 199 SRC Source 199 FREQ Frequency 200 MIX 200 WAVE Waveform 201 RATE 202 DEP Depth 202 Phaser 203 RATE Phaser Rate 203 DEP Phaser Depth 204 RESO Phaser Resonance 204 MAN...

Page 11: ...equency Manual Adjustment 239 MIX Phaser Mix 239 HPF Phaser High Pass Filter 240 Flanger 241 RATE Flanger Rate 241 DEP Flanger Depth 242 RESO Flanger Resonance 242 DLAY Flanger Delay 243 MIX Flanger M...

Page 12: ...282 EXPR Screen 2 283 Expression Minimum Level 283 Expression Low Frequency Limit 283 EXPR Screen 3 284 Expression Gain 284 Expression Curve 285 Page 3 286 GLIDE Functions 286 RANG Glide Range 286 Gli...

Page 13: ...one Page 2 Manual Allocation Note Limits 321 External Zone Allocate 321 External Zone Lower Note Limit 322 External Zone Upper Note Limit 322 External Zone Bank Select MSB 323 External Zone Bank Selec...

Page 14: ...X 359 Clearing the entire Voice Library memory from the SKX 360 APPENDIX 363 EXTRA VOICE Instrument List 364 Preset Patch List 366 Patch Parameter List cont 368 Patch Parameter List cont 369 Patch Par...

Page 15: ...INTRODUCTION...

Page 16: ......

Page 17: ...Panel 3 Connect the other ends of each cable to the female 1 4 audio input connectors of your amplifier If your amplifier has onlya single 1 female 1 4 phono plug audio input you can connect one end...

Page 18: ...the speedseitherof a connected Leslie Speaker or of the internaldigitalLeslie Connectthe1 4 plugto the jack marked FOOT SW on the back of the SKX NOTE In order to insure proper operation of the CU 1 t...

Page 19: ...trol you can control the total or maximum volume of the entire instrument Turn this control to the right to increase the total volume and to the left to decrease the total volume NOTE If you have an E...

Page 20: ...Drawbars Touch Tabs Touch Tabs have red LED s or lights them that will light up indicating ON OFF ON NOTE The Touch Tabs in the EXTRA VOICE Section do not all turn off at least one LED in each of thes...

Page 21: ...o 1 Play MP3 format files 2 Play WAV format files 3 Save Setups 4 Load previously stored Setups from a USB Flash Drive into the SKX 5 Install software upgrades into the operating system 6 Load new Ext...

Page 22: ...mend one of the Hammond pedalboards anyMIDI compatible pedal clavier may be used however some initial setup may be required Please consult the MIDI section of this Reference Guide for more information...

Page 23: ...INFORMATION CENTER DISPLAY...

Page 24: ......

Page 25: ...laymode MENU EXIT ThisTouchButtonallowsyoutoplacetheInformationCenterDisplayintotheMENUdisplay mode allowing you to access the Advanced Feature Menu pages ENTER This Touch Button allows you to confirm...

Page 26: ...the instrument is first turned ON the Information Center Display should show a screen similar to this After approximately 5 seconds the Information Center Display will show a screen similar to this T...

Page 27: ...OICEDisplayscreen The Information Center Display will look similar to this This screen will show 1 Drawbar registrations for Upper Keyboard andLowerKeyboardrepresentednumerically i e bythe numerical s...

Page 28: ...ing the PAGE NAVIGATION and ENTER Touch Buttons will allow you to select the Advanced Feature you want to change DRAWBAR Allows you to modify the characteristics of the Drawbars EXVOICE Allows you to...

Page 29: ...window Using the PAGE NAVIGATION and ENTER Touch Buttons will allow you to select the Advanced Feature you want to change CUST TW Allows you to customize the sound of the Drawbars PERCUSS Allows you t...

Page 30: ...GATION and ENTER Touch Buttons will allow you to select the Advanced Feature you want to change OD EFF Allows you to change the characteristics of the Overdrive effect as well as other Effects for the...

Page 31: ...t the range that eachvoice categorywill sound within the keyboard s and to select how External Zones will function MIDI Allows you to set the overall MIDI parameters for the instrument and allows you...

Page 32: ...the PAGE NAVIGATION and ENTER Touch Buttons will allow you to select the Advanced Feature you want to change DEFAULT Allows you to restore the instrument to its default settings SYSTEM Allows you to s...

Page 33: ...en of the Menu Mode One 1 choice should now appear in the display window PIPE Allows you to change the characteristics of the Drawbar Pipe Voices NOTE The Drawbar Pipe Voices are controlled by the sam...

Page 34: ...ons As stated earlier the four Touch Buttons marked with arrows PAGE UP PAGE DOWN PAGELEFT and PAGE RIGHT allow you to find the Advanced Feature Menus and features within each Menu quickly The followi...

Page 35: ...Touch the PAGEUPTouch Button once The InformationCenterDisplayshould nowlook like this The B Menu will now display The word CUST TW should now be blinking 3 Nowtouch the PAGEUPTouch Button once The I...

Page 36: ...escreen touchthePAGEDOWNTouchButtononce TheInformationCenterDisplay should now look like this You have now gone from the C Menu back to the B Menu 2 Nowtouchthe PAGEDOWNTouch Button once The Informati...

Page 37: ...PLAY Mode screens touch the MENU EXIT Touch Button once The Information Center Display should now look like this This is the A Menu which will be the first one displayed The word DRAWBAR should now b...

Page 38: ...e Theword CONTROL should now be blinking Touching the ENTER Touch Button will now access the PATCH Edit Menu 5 Fromtheabovescreen touchthePAGERIGHTTouchButtonthreetimes Theword DRAWBAR should now be b...

Page 39: ...hich they display Thepatternisalsoidenticaltotheshiftpatternofa four on the floor manualtransmissionfoundinmanyautomobiles and trucks ToscrollbackwardthroughtheAdvancedFeatureMenupages simplyreverse t...

Page 40: ...THIS PAGE INTENTIONALLY LEFT BLANK TO PRESERVE PAGE FORMATTING...

Page 41: ...DRAWBARS PERCUSSION...

Page 42: ......

Page 43: ...y these Drawbars Each Drawbar consists of sine waves of different pitches The illustration below shows how each Drawbar relates to the keyboard when middle C is pressed Each Drawbar is marked with a n...

Page 44: ...THIS 1 Make sure all Drawbars are IN off 2 Hold down a C chord starting with E above middle C E G C notes with your right hand on the manual or the Upper Manual of the SK 2 3 Startingwiththefirstwhite...

Page 45: ...ch Drawbar you will hear the addition of the same note an octave higher in each case Black Drawbars The Black Drawbars on the Hammond Organ represent the dissonant discordant harmonics which are also...

Page 46: ...secondbrownDrawbaristhe sub octave ofthethirdharmonic BothoftheseDrawbarsareusedtoadddepthand richnesstomanycombinations Theyalsoincreasetherangeofthemanualbyoneoctavesinceasoloregistrationofthe 8foot...

Page 47: ...ed byorganists The second way and eventuallythe one that best expresses your own feeling for the music is to create your own tonal effects experimenting with and perfecting tones which you use to play...

Page 48: ...bia Theater 16 Wooden Open Flute 8 00 8460 000 00 3220 000 00 8600 000 80 8605 002 00 3831 000 00 0006 003 00 5020 000 00 7030 000 00 0700 030 80 8605 004 00 8840 000 Reed family triangle pattern Reed...

Page 49: ...8874 210 00 8686 310 00 7785 321 00 4434 210 85 8524 100 00 8877 760 00 0606 045 00 8887 480 01 8866 430 01 8855 331 00 7754 321 String family bow pattern String Tones Cello 8 Dulciana 8 Gamba 8 I Gem...

Page 50: ...rmonics five octaves apart gives a beautiful tone color for playing slower songs or ballads A JAZZ ORGAN TONE 88 8000 008 TherearemanyhundredsofDrawbarcombinationwhicharenotimitativeofanyinstrument bu...

Page 51: ...You may especially wish to supply a little more or a little less brilliance byvaryingtheamountofthehigher pitchedDrawharsused Donothesitatetoexperimentwithtonalcolors there are man y thousands of beau...

Page 52: ...see the Drawbar registration displayed numerically touch the PLAY Touch Button repeatedly until the numbers show on the top line of the display 3 PlaysomenotesontheUpperManual Youwillhearthenotesplay...

Page 53: ...nd of the manual You will now hear the notes play with Pedal tones added Please Read OntheSKX DrawbarparameterchangesforthePedaldepartment P willnotbeheardunlesstheMANUALBASS Touch Tab is ON or a MIDI...

Page 54: ...layedintheextremeupperleftcorneroftheInformationCenterDisplay You will also notice that the word DRAWBAR is blinking 2 Touch the ENTER Touch Button once Accessing the DRAWBAR Edit Menu using a Shortcu...

Page 55: ...milar to BType1 but with more leakage noise and flutter Mellow which produces a very pure sine wave tone quality Vx which reproduces the sound ofavintageBritishcomboorgan Farf whichreproducesthesoundo...

Page 56: ...generated sound is interrupted when a key is both pressed and released there is a Release KeyClick as well as an Attack Key Click TheKeyClickAdvancedFeaturesonyourSKXallowyoutoreplicatethischaracteris...

Page 57: ...e active pulled out in order to hear the Key Click effect From the previous screen touchthePAGERIGHTTouchButtononce The number underneaththe letters LPF should now be blinking Low Pass Filter LPF This...

Page 58: ...up the manual to the next to highest C 5C on the manual On a B 3 the lowest note produced by the Sub Fundamental Drawbar is the 2nd C 2C from the left end of the manual while the highest note that can...

Page 59: ...nced Feature allows you to adjust the level of the entire Drawbar section of the instrument Turn either the ORGANVOLUMEor the VALUERotaryControl to the right to increase the overall volume of the Draw...

Page 60: ...he Upper Manual Octave down From the previous screen touch the PAGE RIGHT Touch Button once The number underneath the letters LO should now be blinking Drawbar Zone Lower Limit Upper Manual This Advan...

Page 61: ...farther left NOTE The Upper Limit number can not be lower than the Lower Limit number DRAWBAR Edit Menu L U Page 4 LOWER Fromthepreviousscreen touchthePAGERIGHTTouchButtononce Page3oftheDRAWBAREditMen...

Page 62: ...ower limit farther left NOTE The Upper Limit number can not be lower than the Lower Limit number From the previous screen touch the PAGE RIGHT Touch Button once The number underneath the letters HI sh...

Page 63: ...to use the Shortcut shown below You are now in the DRAWBAR Edit Menu 3 NowtouchthePAGEUPTouchButtononce TheInformationCenterDisplayshouldnowlooksimilartothis You may now use the PAGE NAVIGATION Touch...

Page 64: ...hangetheoverallsoundofthePedalDrawbartones Thedatachartbelowshows the options you may select PEDAL DRAWBAR VOICING Options Description Function Norm The Pedal voicing of a vintage Hammond Organ Muted...

Page 65: ...t of click MAX CLK An instant attack and the maximum amount of click Turn the VALUE Rotary Control to select the Pedal Attack that you prefer DRAWBAR Edit Menu PEDAL Page 2 From the previous screen to...

Page 66: ...timethePedalnotewillcontinue to sound after the pedal is released You can select from 1 shortest to 5 longest Turn the VALUE Rotary Control to select the amount of Pedal Sustain that you prefer NOTE T...

Page 67: ...Page 3 From the previous screen touch the PAGE RIGHT Touch Button once Page 3 of the DRAWBAR PEDAL Edit Menu should now display The legend just underneath the word MODE should now be blinking Pedal M...

Page 68: ...e in which the Pedal Drawbars will play The data chart below shows the options you may select Octave Options Description Function 2 The sound is two octaves below the regular pitch 1 The sound is one...

Page 69: ...rs will play The data chart belowshows the options you may select for your particular SKX EXTRA VOICE ZONE Lower Limit Options Options 1C 6C Turn the VALUE Rotary Control to the right to increase the...

Page 70: ...barswillplay The data chart belowshows the options you may select for your particular SKX EXTRA VOICE ZONE Lower Limit Options Options 1C 6C Turn the VALUE Rotary Control to the right to increase the...

Page 71: ...keys the Percussion voice will not play again until you release all keys and again play detached notes ON The tone for this harmonic is the same as the sound derived from the 4 Drawbar Combining this...

Page 72: ...uch Button 1 From any of the PLAY Mode screens touch the MENU EXIT Touch Button once The Information Center Display should now look like this The word DRAWBAR should now be blinking 2 Touch the PAGE U...

Page 73: ...h and hold any of the four PERCUSSION Touch Tabs After approximately 1 second you will see the screen shown on the next page You are now in the PERCUSSION Edit Page You may now use the PAGE NAVIGATION...

Page 74: ...se the level Turn the VALUE Rotary Control to the left to decrease the level Percussion Edit Page 2 Percussion Decay Fromthepreviousscreen touchthePAGERIGHTTouchButtonuntilPage2ofthePercussionEditMenu...

Page 75: ...function on the X 66 Concorde and later model Hammond Organs Turn the VALUE Rotary Control to turn Percussion Touch ON or OFF Percussion Velocity Sensitivity From the previous screen touch the PAGE RI...

Page 76: ...inking OntheoriginalHammondOrganswithTouch ResponsePercussionControl suchastheB 3 C 3 RT 3andA 100 the Percussion sounds would taper off slightly at higher frequencies This Advanced Feature is designe...

Page 77: ...ALUE Rotary Control to turn Percussion Drawbar Cancel ON or OFF Percussion Drawbar Level From the previous screen touchthePAGERIGHTTouchButtononce Thelettersunderneaththeword LEVEL should now be blink...

Page 78: ...et each second 440 electrical impulses will begeneratedwhich whenconvertedinto sound with a speaker will sound the note A 440 After going through a number of other processes the electrical impulses fi...

Page 79: ...iorityorinferiorityoftypesofmaterialsforcertaincomponents etc Someof these differences do exist but as noted above they are more likely to be the result of factors not necessarily having anythingtodow...

Page 80: ...our own Custom Tone Wheels To access the CUSTOM TONE WHEEL Edit Menu do the following 1 Fromany of the PLAY Mode screens touch the MENU EXIT Touch Button once The Information Center Display should now...

Page 81: ...ter Display should now look like this YouarenowintheCUSTOMTONEWHEELEditMenu YoumaynowusethePAGENAVIGATIONTouch Buttons in conjunction with the VALUE Rotary Control to create Custom Tone Wheels These c...

Page 82: ...es a B 3 in good condition Contains moderate motor hum and leakage noise 80 s Clean Based upon a very clean sounding B 3 The motor hum or leakage noise has been removed the vibration caused by the wow...

Page 83: ...our parameter settings and are satisfied with the results You should have also saved your settings NOTE Naming a Custom Tone Wheel is covered in more detail on page 39 Use the PAGE LEFT and PAGE RIGHT...

Page 84: ...has a magnetized rod associated with it When the tone wheels rotate a verysmall electricalcurrentisgeneratedinthecoileachtimeahighspotpassesthemagnet Thestrengthofthecurrentdetermines the loudness of...

Page 85: ...turn the control until you find the number you want Using the Drawbars and Keyboard to select Tone Wheels If you want to find a certain Tone Wheel quickly you can use the Drawbars and the playing key...

Page 86: ...w changed as has the note name When you pull out a Drawbar without touching any playing keys the lowest note represented bythat Drawbar will display Now suppose you want to select a specific Tone Whee...

Page 87: ...ft to increase the level of the selected Tone Wheel From the previous screen touch the PAGE RIGHT Touch Button once The legend underneath the word LPF should be blinking LPF Low Pass Filter ThisAdvanc...

Page 88: ...rom the previous screen touch the PAGE RIGHT Touch Button once The legend underneath the word HPF should be blinking HPF High Pass Filter This Advanced Feature allows you to adjust the level of the Hi...

Page 89: ...past number 4 If you do this you will see the number 5 and a blank name In this way you can create a Custom Tone Wheel without disturbing any of the preprogrammed Custom Tone Wheels If on the other h...

Page 90: ...el TRY THIS 1 Access the CUSTOM TONE WHEEL Edit Menu using the procedure described on page 32 You should now see Page 1 of the CUSTOM TONE WHEEL Edit Menu 2 Use the PAGE UP and PAGE DOWN Touch Buttons...

Page 91: ...ish to save the parameters you have changed touch the MENU EXIT or PLAY Touch Button If you want to overwrite the Custom Tone Wheel with your new edited settings touch the ENTER Touch Button The botto...

Page 92: ...XIT Touch Button once The Information Center Display should now look like this The word DRAWBAR should now be blinking 2 Touch the ENTER Touch Button once You will then be in the DRAWBAR Edit Menu and...

Page 93: ...bar type controls but theyfunctioned differently fromHammondHarmonicDrawbars Organ ThefirstfourDrawbarscontrolindividualpitches whilethenext three are Mixture Drawbars which cause multiple pitches to...

Page 94: ...ow use the Drawbars to control vintage combo organ tones The figure below shows how the Drawbars are allocated in Farf mode The above configuration follows the layout of the Combo Compact series of co...

Page 95: ...formation Center Display shows the following You may now use the Drawbars to control the voices of a classical pipe organ The figure below shows how the Drawbars are allocated in Pipe mode IMPORTANT N...

Page 96: ...rom the preceding page The Drawbars will now control the Pipe tones To access the PIPE Edit Menu do the following 1 From any of the PLAY Mode screens touch the MENU EXIT Touch Button once The Informat...

Page 97: ...Display should now look like this You are nowin the PIPE Edit Menu You maynowuse the PAGENAVIGATIONTouch Buttons in conjunction with the VALUERotaryControl to change the characteristics of the Pipevoi...

Page 98: ...te Dolce 4 FlDolce4 Flute 2 Flute 2 Mixture 3 ranks Mixt III Hautbois 8 Hautboi8 LOWER Principal 16 Princi16 Principal 8 Princi 8 Melodia 8 Melodia8 Rohr Flute 8 RohrFl 8 Prestant 4 Prestnt4 Flute 4 F...

Page 99: ...this Now you will see UPPER 2 on the top line of the Information Center Displayand OpnDiap8 on the lower line directlybelowit This means that you can nowedit the parameters for the Open Diapason 8 pip...

Page 100: ...OICE EDIT Options Description Function VOLUME Allows you to set the Volume for the selected Pipe Voice DETUNE Allows you to detune the selected Pipe Voice CHIFF Allows you to set the amount of Chiff o...

Page 101: ...n once The Information Center Display should now look like this The word DRAWBAR should now be blinking 2 From the A Screen touch the PAGE UP Touch Button five times The Information Center Display sho...

Page 102: ...this Pipe Voice Volume Noticethatthenumberunderneath VOL isblinking Youcannowmodifythecharacteristicsofeach Pipe Voice starting with Pipe Voice Volume You can select a Volume setting of from 0 softest...

Page 103: ...Detune This Advanced Featureallows you to detune eachindividual PipeVoice Youcanselect from 50 quarter stepflat through 50 quarter step sharp Turn the VALUE Rotary Control to the right to make the pit...

Page 104: ...ng reed in a manner similar to a reed instrument such as a clarinet Afluepipecanbevoicedinsuchawaysothatashortattacktransientisheardattheonsetofthetone Theterm chiff was coined bypipe organ makers to...

Page 105: ...ced Feature allows you to set the brightness of each individual Pipe Voice bysetting its Filter Cutoff point Select the Cutoff setting you want by doing the following Turn the VALUE Rotary Control to...

Page 106: ...ter Fromthepreviousscreen touchthePAGERIGHTTouchButtononce Thelegendbelowtheword IMG Image should now be blinking Pipe Voice Imaging This Advanced Feature allows you to simulate different arrangements...

Page 107: ...e between left and right InvertedPyramid whennotesareplayedchromaticallygoinguponthekeyboard the notes start at one end and alternate between left and right until they meet in the center NOTE The abov...

Page 108: ...THIS PAGE INTENTIONALLY LEFT BLANK TO PRESERVE PAGE FORMATTING...

Page 109: ...DRAWBAR EFFECTS...

Page 110: ......

Page 111: ...consist of two tilt tablets and a six position rotary knob to the left of the Drawbars which look like this ThesameVibratoandChoruschoicesaremadeontheSKXbymeansoftwoTouchTabsandtheVIB CHSEditMenu Vib...

Page 112: ...of the MENU Mode You will see A displayed in the extreme upper left corner of the Information Center Display This indicates that the MENU Mode has 4 Pages and that Page 1 is displaying 2 Touch the PA...

Page 113: ...rtcut Touch and hold anyof the VIBRATO CHORUSTouch Tabs After approximately1 second you will see the screen shown above YouarenowintheVIBRATOEdit Menu YoumaynowusethePAGENAVIGATIONTouchButtonsinconjun...

Page 114: ...ter organ V 3 Full Vibrato This gives the fullest amount of vibrato adding much warmth and enhancing your music Chorus TheChoruseffectistheresultofpartofthetoneisheardwithoutVibrato andpartcontainsthe...

Page 115: ...are in the VIB CHR Edit Mode you can use these FAVORITE Buttons to select the Vibrato ChorusModethatwillbeaddedtotheORGANsectionwheneitherofthetwoVIBRATOTouchTabs is ON LED lit Each Button is clearly...

Page 116: ...Mode you selected Fromthepreviousscreen touchthePAGERIGHTTouchButtononce Thenumbersunderneaththeword TREM should now be blinking Vibrato Rate This Advanced Feature allows you to select the Vibrato Ch...

Page 117: ...ing Turn the VALUE Rotary Control to the right to increase the amount of Tremulant Turn the VALUE Rotary Control to the left to decrease the amount of Tremulant VIBRATO Edit Menu Page 2 From the previ...

Page 118: ...gh 63V onlytheVibratosignal with no dry signal The middle or EVEN setting will mix the Vibrato and non Vibrato signals together in equal amounts Turn the VALUE Rotary Control to the right to increase...

Page 119: ...utton three times The Information Center Display should now look like this Youcannowadjustthedepthof V1 V2 V3 C1 C2 and C3 byusingthePAGELEFTandPAGERIGHT TouchButtonstonavigatehorizontallyamongthetwos...

Page 120: ...eer and organ enthusiast namedDonaldJ LesliewantedasoundfromaHammondOrganmorenearlyapproximatingthesoundofatheatreorgan particularly a realistic theatre organ tremulant He found that rotating a baffle...

Page 121: ...f the speaker cabinet In the mid 60 s an additional motor wasaddedtoboth Horn and Bass whichspunthe rotors muchmore slowlytosuggest thesoundof a celeste or a compound organ stop with two or more ranks...

Page 122: ...nge the sounds produced bythe Drawbars fromthe Leslie channel to thestationarychannel ThespeedoftherotorsofeithertheinternaldigitalLeslieoraconnectedLeslieSpeakerdepends upon the position of the LESLI...

Page 123: ...f the MENU Mode You will see A displayed in the extreme upper left corner of the Information Center Display This indicates that the MENU Mode has 4 Pages and that Page 1 is displaying 2 Touch the PAGE...

Page 124: ...ons on the previous page you should now see Page 1 of the LESLIE Edit Menu Leslie Parameters Your Hammond SKX has a special group of Leslie Parameters Using these special Leslie features you can defin...

Page 125: ...if you wish The first two pages of the Leslie Edit Menu allowyou to select the Leslie Cabinet you wish to use or modify as well as name a customLeslie Cabinet you have created The remaining pages all...

Page 126: ...detail starting on page 23 Use the PAGE LEFT and PAGE RIGHT Select Touch Buttons to select the character to be edited Turn the VALUE Rotary Control to the right to scroll forward through the character...

Page 127: ...e word AMP should now be blinking Leslie Amplifier Type This Advanced Feature allows you to select the Amplifier characteristics The data chart below shows the options you may select LESLIE AMPLIFIER...

Page 128: ...ows the options you may select LESLIE SPEAKER TYPES Description Function RotSmall A small 33 tall cabinet such as a model 142 or 145 RotLarge A standard size 41 tall speaker such as a 122 or 147 Stati...

Page 129: ...w Speed of the digital Leslie Horn The default setting is 36 You can select 0rpm which will cause the Horn Rotor to stop or from 24 through 318rpm Turn the VALUE Rotary Control to make your selection...

Page 130: ...0 through 12db Turn the VALUE Rotary Control to make your selection Fromthepreviousscreen touchthePAGERIGHTTouchButtononce TheInformationCenterDisplayshouldnow look like this The legend underneath the...

Page 131: ...2 through 5 seconds in 0 2 second increments Turn the VALUE Rotary Control to make your selection Fromthepreviousscreen touchthePAGERIGHTTouchButtononce TheInformationCenterDisplayshouldnow look like...

Page 132: ...his Advanced Feature allows you to change the sound characteristics of the Horn Rotor The data chart below shows the options you may select HORN CHARACTER Options Description Function 0 Flat response...

Page 133: ...edofthe digital Leslie Bass frequencies The default setting is 36 You can select 0rpm which will cause the Horn Rotor to stop or from 24rpm through 318rpm Turn the VALUE Rotary Control to make your se...

Page 134: ...through 12db Turn the VALUE Rotary Control to make your selection Fromthepreviousscreen touchthePAGEUPTouchButtononce TheInformationCenterDisplayshouldnowlook similar to this The number underneath the...

Page 135: ...hrough 12 5 seconds in 0 5 second increments Turn the VALUE Rotary Control to make your selection Fromthepreviousscreen touchthePAGERIGHTTouchButtononce TheInformationCenterDisplayshouldnow look simil...

Page 136: ...vered that the placement of the microphones greatly affects the character of the sound heard by the audience from the Leslie Speaker s Additionally ThisAdvancedFeatureallowsyoutosimulatevariousmicroph...

Page 137: ...he microphones at different distances from a Leslie Speaker cabinet since distance has an effect on how the Leslie Speaker reproduces through a sound system The choices are given in metric measurement...

Page 138: ...e SKX as shown below Connecting the SKX to a 6 or 9 pin Leslie Speaker You can connect your SKX to a Leslie Speaker cabinet having a 6 or 9 pin interface by doing the following 1 You will need a Lesli...

Page 139: ...ation etc 147 Stock Duplicates the characteristics of a 147 type Leslie Speaker tube sound but with slightly more high frequencies etc 147 Wild Similar to 122 Wild but with the characteristics of a 14...

Page 140: ...odify Besuretoselectone of the U or User cabinets 3 Make whatever changes you want to the editable parameters Slow and Fast Speeds Rise and Fall Times etc 4 Afteryouhavemadeallyoureditsandyouhavetheso...

Page 141: ...and saving a User Cabinet bring up Page 2 of the LESLIE Edit Menu You should be able to do thisbytouchingthePAGEUPTouchButtononcesinceyouarealreadyintheLESLIEEdit Menu The Information Center Display...

Page 142: ...r to this 4 If you DO NOT wish to save the name touch the MENU EXIT or PLAY Touch Button If you want to overwrite the Leslie Cabinet Name touch the ENTER Touch Button The bottomline of the Information...

Page 143: ...LOWER TO PEDAL...

Page 144: ......

Page 145: ...I pedalboard to play the sounds registered for the Lower Manual in addition to whatever Pedal registration may be selected Touch this Touch Tab ON LED lit to enable the LOWER TO PEDAL function Touch i...

Page 146: ...eft corner of the Information Center Display will be blinking flashing on and off 3 Touch the ENTER Touch Button Accessing the ZONES Edit Menu using the Shortcut Touch and Hold the LOWER TO PEDAL Touc...

Page 147: ...EXTRA VOICE SECTION...

Page 148: ......

Page 149: ...ICE Touch Tab groups are located to the right side of the Information Center Display Notice that there are two Extra Voice Groups 1 EXV1 and 2 EXV2 These two sections are identical This is so you can...

Page 150: ...ns Electric Pianos OTHER This category contains other keyboard instruments such as Harpsichords Accordions Clavs etc Wind instruments such as Trumpets Saxes etc as well as Glockenspiel Vibraphone Back...

Page 151: ...adjust the parameters which affect the EXTRA VOICE 1 Group 3 EXTRA VOICE 2 These Menu Pages allow you to adjust the parameters which affect the EXTRA VOICE 2 Group Accessing the EXTRA VOICE EDIT Menu...

Page 152: ...EDIT Menu the first screen you will see is the one unique to that particular EXTRA VOICE Group For example if you touch the A PIANO button in the EXTRA VOICE 1 Group the display will show the selected...

Page 153: ...the Volume From the previous screen touch the PAGE RIGHT Touch Button once The legend underneath the letters BAL should now blink Extra Voice Balance This Advanced Feature allows you to balance the tw...

Page 154: ...dvanced Feature allows you to determine whether you want to control the volume of the selected Extra Voices with a connected Expression Pedal You can select OF or off the Extra Voices will not receive...

Page 155: ...ctave range in which the selected Extra Voice will play Use the PAGE UP and PAGE DOWN buttons to select EXV1 or EXV2 The data chart below shows the options you may select Octave Options Description Fu...

Page 156: ...nced Feature allows you to set the lowest note the selected Extra Voice will play Use the PAGE UP and PAGE DOWN buttons to select EXV1 or EXV2 The data chart below shows the options you may select EXT...

Page 157: ...hest note the selected Extra Voice will play Use the PAGE UP and PAGE DOWN buttons to select EXV1 or EXV2 The data chart below shows the options you may select EXTRA VOICE ZONE Upper Limit Options 1C...

Page 158: ...rd through the choices Turn the VALUE Rotary Control to the left to advance backward through the choices NOTE If you have loaded additional Extra Voice Libraries the above also applies You can use the...

Page 159: ...ows you to determine how the Extra Voice will respond to key velocity You can select OF or off standard organ touch the notes sound at the same volume regardless of a light or heavy key pressure and 1...

Page 160: ...tion The red LED will light 2 If the A PIANO Acoustic Piano LED is not lit touch the A PIANO Touch Tab The Information Center Display should now look similar to this The lower line of the display shou...

Page 161: ...ch Tab in the EXTRA VOICE 1 Group The Information Center Display should now look similar to this The lower line of the display should now be blinking If Trumpet Str is not displaying 7 Touch the OTHER...

Page 162: ...Touch Tab The red LED will light 2 If the A PIANO Acoustic Piano LED is not lit touch the A PIANO Touch Tab The Information Center Display should now look similar to this The lower line of the display...

Page 163: ...ight 2 If the A PIANO Acoustic Piano LED is not lit touch the A PIANO Touch Tab The Information Center Display should now look similar to this The lower line of the display should now be blinking 3 Pl...

Page 164: ...one Extra Voice Group and the other manual from the other Extra Voice Group Using Drawbars and Extra Voices together on the same manual TRY THIS 1 Make sure the UPPER ON Touch Tab in the ORGAN sectio...

Page 165: ...lit touch the A PIANO Touch Tab The Information Center Display should now look similar to this The lower line of the display should now be blinking 6 Play some notes You will now hear the Piano sound...

Page 166: ...R ON and LOWER ON Touch Tabs in the ORGAN section are OFF red LED not lit 2 For this example make sure the EXTRA VOICE VOLUME and MIX BALANCE Rotary Control s are in the Center position 3 Now touch th...

Page 167: ...r to this The lower line of the display should now be blinking 5 Play some notes on the Upper Manual You will now hear the sound of an acoustic grand piano 6 Touch the UPPER ON Touch Button in the EXT...

Page 168: ...Turn the VALUE Rotary Control until you see SynStr FastMlw on the lower line of the Information Center Display as shown above 10 Play some notes on the Upper Manual You will now hear Piano and Strings...

Page 169: ...detail how to use the ProChord feature What Is ProChord PLEASE READ ProChord is a unique feature of certain Hammond Organ models including the Sk series which allows you to play professional right han...

Page 170: ...a minor third above the key you are holding by counting three 3 keys to the right not including the key you are holding For a C Minor Chord this note is E 1 C 2 E Seventh Chords Forming a Seventh Cho...

Page 171: ...e UPPER ON Touch Tab in the EXV1 section The red LED will light 2 Touch the OTHER Touch Tab repeatedly until the Information Center Display looks similar to the figure below The lower line of the disp...

Page 172: ...s with ProChord Each ProChord Extra Voice will be a melody note plus a different harmony pattern The Big Band Sax pattern has a 5 part open harmony pattern for example while the Old Time Pno pattern h...

Page 173: ...PATCHES FAVORITES...

Page 174: ......

Page 175: ...he sounds and controls on the SKX Selecting a Patch TRY THIS 1 Make sure the Information Center Display is in PLAY Mode If it is not touch the PLAY Touch Button once The Information Center Display sho...

Page 176: ...Y THIS 1 Set up a registration For this example use Drawbars Voices or both together 2 Touch the RECORD Touch Button The Information Center Display should look similar to this 3 Now touch the ENTER To...

Page 177: ...ry Knob to select the User Patch you want to change 2 Make whatever changes to the Patch you wish 3 After you have finished making your changes Touch the RECORD Touch Button The Information Center Dis...

Page 178: ...uch the MENU EXIT Touch Button once The Information Center Display should now look like this The word DRAWBAR should now be blinking 2 Touch the PAGE RIGHT Touch Button twice The Information Center Di...

Page 179: ...Display should now look like this You are now in the PATCH Edit Menu You may now use the PAGE NAVIGATION Touch Buttons in conjunction with the VALUE Rotary Control to make changes to the Patches These...

Page 180: ...the way to the left as in the above figure you may see a message such as USB is not ready if no USB Flash Drive is inserted In this case simply touch the ENTER Touch Button and the Patch Name screen w...

Page 181: ...elocity settings etc Use the PAGE LEFT and PAGE RIGHT Touch Buttons to move back and forth between DRAWB and EXV Turn the VALUE Rotary Control to turn the selected function ON or OFF From the previous...

Page 182: ...d Leslie EXV Extra Voice Effects controlled by the EFFECTS Rotary Knob and Touch Button Tremolo AutoPan Wah Wah etc NOTE Drawbar and Extra Voice Effects are covered in more detail in the Overall Effec...

Page 183: ...ogether with the names and volume settings of the Voices shown in the Information Center Display The Drawbar settings Leslie Vibrato Percussion Sustain and Volumes can be changed as you wish However i...

Page 184: ...res which control the FAVORITES are located in the PATCH Edit Manu TRY THIS 1 From any of the PLAY Mode screens touch the MENU EXIT Touch Button once The Information Center Display should now look lik...

Page 185: ...utton two times The Information Center Display should now look like this Notice that the left side of the Information Center Display now shows FAVORITE and that the word just underneath the word ACCES...

Page 186: ...Patch touch and hold the RECORD Touch Button and then touch a numbered FAVORITE Touch Button the selected Patch will be stored as a Favorite and the Patch data is also overwritten if you have made an...

Page 187: ...n Loading a Patch Into a Favorite You can customize the Favorites either with factory set Patches or with your own Patches in three ways Using the VALUE Rotary Control TRY THIS 1 Touch the PLAY Touch...

Page 188: ...ing Favorite When the above message disappears the FAVORITE is updated with your selected Patch Using the Shortcut from the FAVORITE Touch Buttons TRY THIS 1 Touch and Hold a FAVORITE Touch Button for...

Page 189: ...e updated with the new Patch Using the MENU Touch Buttons TRY THIS 1 Follow the instructions on pages 10 and 11 until the Information Center Display looks like this You are now in the FAVORITE portion...

Page 190: ...er Display is in this mode touching any of the numbered FAVORITE Touch Buttons will show which Patch is loaded into that particular Favorite 3 Touch one of the ten numbered FAVORITE Touch Buttons The...

Page 191: ...ten 10 Banks of Favorites so that you can have up to 100 Patches available through the FAVORITE Touch Buttons TRY THIS 1 Touch and Hold the MANUAL BANK Touch Button A FAVORITE button will light showin...

Page 192: ...Buttons are blinking This indicates that you are now able to select the FAVORITE Bank you want to use 5 While holding the MANUAL BANK Touch Button touch any one of the FAVORITE Touch Buttons After do...

Page 193: ...OVERDRIVE MULTI EFFECTS...

Page 194: ......

Page 195: ...of the Control Panel and consist of four Touch Tabs and a Rotary Control associated with each Touch Tab DRAWBAR OVER DRIVE and EFFECT These controls allow you to add Overdrive as well as Multi Effect...

Page 196: ...the order in which they appear in the Information Center Display Page 1 DRAWBAR OVERDRIVE When used with Drawbars Overdrive adds the fuzzy raspy dirty sound created by the vacuum tubes of a tube styl...

Page 197: ...proximately 1 second the screen shown below will display Notice that EX OD is blinking This occurs if you use the Shortcut to access the DRAWBAR OVERDRIVE Menu Page The instructions which follow assum...

Page 198: ...splay should now look like this The legend underneath EXP should be blinking Drawbar Overdrive Expression Control This Advanced Feature allows you to select whether you want to use a connected Express...

Page 199: ...wbars Each different Overdrive type simulates a particular type of pre amplifier or amplifier The data chart below shows the options you may select Drawbar Overdrive Type Options Description Function...

Page 200: ...WBAR MULTI EFFECTS Menu Page using the Touch Buttons 1 From either of the PLAY Screens touch the MENU EXIT Touch Button to see the first screen of the MENU Mode You will see A displayed in the extreme...

Page 201: ...ton two times The Information Center Display should now look like this You are now in the first page of the DRAWBAR EFFECT Menu Accessing the DRAWBAR MULTI EFFECTS Menu Page using the Shortcut Touch a...

Page 202: ...channels Wah Wah Adds and subtracts high frequencies Ring Modulation Merges two frequencies together to produce a bell like sound Phaser Varies the phase relationship of two audio signals to each oth...

Page 203: ...the Tremolo WAVE Tremolo Waveform This Advanced Feature allows you to select which waveform will be used to modulate the volume The data chart below shows the options you may select Drawbar Tremolo W...

Page 204: ...rough 127 fastest rate Turn either the VALUE or the EFFECTS AMOUNT Rotary Control to make your selection From the above screen touch the PAGE RIGHT Touch Button once The Information Center Display sho...

Page 205: ...he previous screen touch the PAGE LEFT Touch Button repeatedly until the words EFFECT TYPE appear on the top line of the display If Auto Pan does not display on the bottom line turn the VALUE Rotary C...

Page 206: ...nd move backl gradually S H Sample Hold which will cause the sound to move from Left to Right randomly DSQR Dull Square wave similar to SQR but with a smoother transition from Left to Right Turn the V...

Page 207: ...now look like this The number underneath the word DEP should be blinking DEP Auto Pan Depth This Advanced Feature allows you to adjust the intensity or depth of the panning effect You can select from...

Page 208: ...rd Wah Wah should be blinking From the above screen touch the PAGE RIGHT Touch Button once The Information Center Display should now look like this The legend underneath the word SRC should be blinkin...

Page 209: ...ol can be used to control the excursion of the Wah Wah effect When EXP is selected either the Expression Pedal or the DRAWBAR EFFECT Rotary Control can be used to control the Wah Wah sensitivity From...

Page 210: ...Drawbar Wah Wah Wave Options Description Function TRI Triangle wave which will change the sound smoothly from high to low to high SQR Square wave which will cause the filter to rise and fall suddenly...

Page 211: ...ng RATE Wah Wah Rate This Advanced Feature allows you to adjust the rate of the Wah Wah effect You can select from 0 slowest rate through 127 fastest rate NOTE The SOURCE must be set to LFO in order f...

Page 212: ...allows you to adjust the central frequency of the Wah Wah effect You can select from 0 lowest frequency through 127 highest frequency Turn the VALUE Rotary Control to the right to increase the freque...

Page 213: ...rn the VALUE Rotary Control until the Information Center Display looks like this The words Ring Mod should be blinking From the above screen touch the PAGE RIGHT Touch Button once The Information Cent...

Page 214: ...her Turn either the VALUE or the DRAWBAR EFFECTS Rotary Control to the left to make the ring frequency lower From the above screen touch the PAGE RIGHT Touch Button once The Information Center Display...

Page 215: ...ata chart below shows the options you may select Drawbar Ring Modulation Wave Options Description Function TRI Triangle wave which will cause the ring frequency to rise and fall gradually SQR Square w...

Page 216: ...ntrol to the right to make the rate faster Turn the VALUE Rotary Control to the left to make the rate slower From the above screen touch the PAGE RIGHT Touch Button once The Information Center Display...

Page 217: ...LUE Rotary Control until the Information Center Display looks like this The word Phaser should be blinking From the above screen touch the PAGE RIGHT Touch Button once The Information Center Display s...

Page 218: ...CTS Rotary Control make sure to touch the ON Touch Tab so that the red LED is lit then use the Rotary Control to make your adjustments From the above screen touch the PAGE RIGHT Touch Button once The...

Page 219: ...Control to the left to decrease the frequency From the above screen touch the PAGE RIGHT Touch Button once The Information Center Display should now look like this The number underneath the word MIX...

Page 220: ...ss Filter This Advanced Feature allows you to adjust the frequency limit beyond which the Phaser effect is applied You can select from 0 the effect is added to all frequencies through 127 the effect i...

Page 221: ...y and creating the sweeping effect From the previous screen touch the PAGE LEFT Touch Button repeatedly until the words EFFECT TYPE appear on the top line of the display If Flanger does not appear on...

Page 222: ...l to the left to decrease the depth From the above screen touch the PAGE RIGHT Touch Button once The Information Center Display should now look like this The number underneath the word RESO should be...

Page 223: ...ntrol to the left to shorten the Delay From the above screen touch the PAGE RIGHT Touch Button once The Information Center Display should now look like this The number underneath the word MIX should b...

Page 224: ...ss Filter This Advanced Feature allows you to adjust the frequency limit beyond which the Flange effect is applied You can select from 0 the effect is added to all frequencies through 127 the effect i...

Page 225: ...E appear on the top line of the display If Chorus does not appear on the bottom line turn the VALUE Rotary Control until the Information Center Display looks like this The word Chorus should be blinki...

Page 226: ...Control to the left to decrease the amount of Chorus From the previous screen touch the PAGE RIGHT Touch Button once The Information Center Display should now look like this The number underneath the...

Page 227: ...decrease the amount of Delay From the previous screen touch the PAGE RIGHT Touch Button once The Information Center Display should now look like this The number underneath the word MIX should be blin...

Page 228: ...of the effect You can select from 0 the effect is added to all frequencies to 127 the effect is the effect is added only to the high frequencies As the value is increased the effect is added to the hi...

Page 229: ...should now look like this The legend underneath the word TYPE should be blinking You can now select the characteristics for the Delay TYPE Delay Type This Advanced Feature allows you to select which w...

Page 230: ...right to increase the Delay Time Turn either the VALUE or the DRAWBAR EFFECT Rotary Control to the left to decrease the Delay Time From the previous screen touch the PAGE RIGHT Touch Button once The I...

Page 231: ...e balance between the echo repeats and the dry no Delay sound You can select from 0 only the dry sound with no Delay effect at all through 127 only the echo repeats are heard with no dry sound NOTE At...

Page 232: ...e EXTRA VOICE OVERDRIVE Menu Page using the Touch Buttons 1 From the PLAY Screen touch the MENU EXIT Touch Button to see the first screen of the MENU Mode You will see A displayed in the extreme upper...

Page 233: ...You are now in the OD EFF Edit Menu The number just below the word DRIVE should be blinking 4 Touch the PAGE UP Touch Button two times The Information Center Display should now look like this You are...

Page 234: ...Touch the PAGE DOWN Touch Button once The Information Center Display should now look like this You are now in that portion of the OD EFF Advanced Feature Menu that affects the Extra Voices These are...

Page 235: ...E should be blinking Extra Voice Overdrive Amount This Advanced Feature allows you to adjust the amount of Overdrive that you prefer You can select a value from 0 no Overdrive to 127 maximum Overdrive...

Page 236: ...Expression Pedal will control both Volume and Overdrive but by a lesser amount than EX OD Turn the VALUE Rotary Control to make your selection From the previous screen touch the PAGE RIGHT Touch Butt...

Page 237: ...ng the Touch Buttons 1 From the PLAY Screen touch the MENU EXIT Touch Button to see the first screen of the MENU Mode You will see A displayed in the extreme upper left corner of the Information Cente...

Page 238: ...fferent Drawbar Multi Effects in the order in which they appear in the Information Center Display EXTRA VOICE MULTI EFFECTS Description Function Tremolo Raises and lowers the amplitude or volume Auto...

Page 239: ...remolo WAVE Tremolo Waveform This Advanced Feature allows you to select which waveform will be used to modulate the volume The data chart below shows the options you may select Extra Voice Tremolo Wav...

Page 240: ...rough 127 fastest rate Turn either the VALUE or the EFFECTS AMOUNT Rotary Control to make your selection From the above screen touch the PAGE RIGHT Touch Button once The Information Center Display sho...

Page 241: ...enter Display should now look like this The legend underneath the word WAVE should be blinking You can now select the characteristics for the Auto Pan WAVE Auto Pan Waveform This Advanced Feature allo...

Page 242: ...lowest rate through 127 fastest rate Turn either the VALUE or the EFFECTS AMOUNT Rotary Control to make your selection From the above screen touch the PAGE RIGHT Touch Button once The Information Cent...

Page 243: ...From the above screen touch the PAGE RIGHT Touch Button once The Information Center Display should now look like this The legend underneath the word SRC should be blinking You can now select the char...

Page 244: ...en EXP is selected either the Expression Pedal or the EXTRA VOICE EFFECT Rotary Control can be used to control the Wah Wah sensitivity From the above screen touch the PAGE RIGHT Touch Button once The...

Page 245: ...TE The SOURCE must be set to LFO in order for this Advanced Feature to function The data chart below shows the options you may select Extra Voice Wah Wah Wave Options Description Function TRI Triangle...

Page 246: ...ary Control to the left to make the rate slower From the previous screen touch the PAGE RIGHT Touch Button once The Information Center Display should now look like this The legend underneath the word...

Page 247: ...until the Information Center Display looks like this The word Ring Mod should be blinking From the above screen touch the PAGE RIGHT Touch Button once The Information Center Display should now look li...

Page 248: ...either the VALUE or the EXTRA VOICE EFFECTS Rotary Control to the left to make the ring frequency lower From the above screen touch the PAGE RIGHT Touch Button once The Information Center Display shou...

Page 249: ...a chart below shows the options you may select Extra Voice Ring Modulation Wave Options Description Function TRI Triangle wave which will cause the ring frequency to rise and fall gradually SQR Square...

Page 250: ...ntrol to the right to make the rate faster Turn the VALUE Rotary Control to the left to make the rate slower From the above screen touch the PAGE RIGHT Touch Button once The Information Center Display...

Page 251: ...ALUE Rotary Control until the Information Center Display looks like this The word Phaser should be blinking From the above screen touch the PAGE RIGHT Touch Button once The Information Center Display...

Page 252: ...E EFFECTS Rotary Control make sure to touch the ON Touch Tab so that the red LED is lit then use the Rotary Control to make your adjustments From the above screen touch the PAGE RIGHT Touch Button onc...

Page 253: ...Control to the left to decrease the frequency From the above screen touch the PAGE RIGHT Touch Button once The Information Center Display should now look like this The numbers underneath the word MIX...

Page 254: ...ss Filter This Advanced Feature allows you to adjust the frequency limit beyond which the Phaser effect is applied You can select from 0 the effect is added to all frequencies through 127 the effect i...

Page 255: ...g the sweeping effect From the previous screen touch the PAGE LEFT Touch Button repeatedly until the words EFFECT TYPE appear on the top line of the display If Flanger does not appear on the bottom li...

Page 256: ...l to the left to decrease the depth From the above screen touch the PAGE RIGHT Touch Button once The Information Center Display should now look like this The number underneath the word RESO should be...

Page 257: ...ntrol to the left to shorten the Delay From the above screen touch the PAGE RIGHT Touch Button once The Information Center Display should now look like this The number underneath the word MIX should b...

Page 258: ...ss Filter This Advanced Feature allows you to adjust the frequency limit beyond which the Flange effect is applied You can select from 0 the effect is added to all frequencies through 127 the effect i...

Page 259: ...ion Center Display looks like this The word Chorus should be blinking From the above screen touch the PAGE RIGHT Touch Button once The Information Center Display should now look like this The number u...

Page 260: ...otary Control to the left to decrease the amount of Phasing From the previous screen touch the PAGE RIGHT Touch Button once The Information Center Display should now look like this The number undernea...

Page 261: ...comes greater as the value increases From the previous screen touch the PAGE RIGHT Touch Button once The Information Center Display should now look like this The legend underneath the word MIX should...

Page 262: ...s added to the higher frequencies Turn the VALUE Rotary Control to the right to narrow the frequency range to the high frequencies only Turn the VALUE Rotary Control to the left to broaden the frequen...

Page 263: ...y should now look like this The legend underneath the word TYPE should be blinking You can now select the characteristics for the Delay TYPE Delay Type This Advanced Feature allows you to select which...

Page 264: ...to increase the Delay Time Turn either the VALUE or the EXTRA VOICE EFFECT Rotary Control to the left to decrease the Delay Time From the previous screen touch the PAGE RIGHT Touch Button once The In...

Page 265: ...e balance between the echo repeats and the dry no Delay sound You can select from 0 only the dry sound with no Delay effect at all through 127 only the echo repeats are heard with no dry sound NOTE At...

Page 266: ...THIS PAGE INTENTIONALLY LEFT BLANK TO PRESERVE PAGE FORMATTING...

Page 267: ...EQUALIZER...

Page 268: ......

Page 269: ...ization However a true equalizer allows you control over more areas of the frequency range than just highs and lows The Equalizer functions of your SKX have this capability EQUALIZER Edit Menu This Ad...

Page 270: ...uch Button once The Information Center Display should now look like this 4 Touch the ENTER Touch Button The Information Center Display should now look like this You are now in the first page of the EQ...

Page 271: ...ge organs this control adjusts the treble response above 200Hz You can select from 9 minimum treble to 9 maximum treble 1 corresponds to the maximum of the original B 3 tone control 5 the middle 9 the...

Page 272: ...f Bass Mid range and Treble frequencies You can select from 9 minimum amount to 9 Maximum amount At 0 the level is flat Use the PAGE LEFT and PAGE RIGHT Touch Buttons to move back and forth among BASS...

Page 273: ...range and Treble frequency bands The data chart below shows the options you may select DRAWBAR EQUALIZER Central Frequency Options Description Function BASS 20Hz 200Hz MID 250Hz 3 1kHz TREB 4 0kHz 8...

Page 274: ...rst screen of the MENU Mode You will see A displayed in the extreme upper left corner of the Information Center Display 2 Touch the PAGE UP Touch Button twice The legend OD EFF in the upper left corne...

Page 275: ...Touch the PAGE UP Touch Button twice The Information Center Display should now look like this You are now in Page 3 of the EQUALIZER Edit Menu You may now make various changes to the tonal quality of...

Page 276: ...ure allows you to adjust the amount of Bass Mid range and Treble frequencies You can select from 9 minimum amount to 9 Maximum amount At 0 the level is flat Use the PAGE LEFT and PAGE RIGHT Touch Butt...

Page 277: ...range and Treble frequency bands The data chart below shows the options you may select EXTRA VOICE EQUALIZER Central Frequency Options Description Function BASS 20Hz 200Hz MID 250Hz 3 1kHz TREB 4 0kH...

Page 278: ...ton to see the first screen of the MENU Mode You will see A displayed in the extreme upper left corner of the Information Center Display 2 Touch the PAGE UP Touch Button twice The legend OD EFF in the...

Page 279: ...ouch the PAGE UP Touch Button four times The Information Center Display should now look like this You are now in Page 5 of the EQUALIZER Edit Menu You may now make various changes to the tonal quality...

Page 280: ...allows you to adjust the amount of Bass Mid range and Treble frequencies You can select from 9 minimum amount to 9 Maximum amount At 0 the level is flat Use the PAGE LEFT and PAGE RIGHT Touch Buttons...

Page 281: ...nge and Treble frequency bands The data chart below shows the options you may select EXTRA VOICE EQUALIZER Central Frequency Options Description Function BASS 20Hz 200Hz MID 250Hz 3 1kHz TREB 4 0kHz 8...

Page 282: ...THIS PAGE INTENTIONALLY LEFT BLANK TO PRESERVE PAGE FORMATTING...

Page 283: ...SPECIAL PERFORMANCE FEATURES...

Page 284: ......

Page 285: ...en of the MENU Mode You will see A displayed in the extreme upper left corner of the Information Center Display 2 Touch the PAGE UP Touch Button twice You will now see the letter C displayed in the up...

Page 286: ...ion Center Display should now look like this Reverb Type This Advanced Feature allows you to adjust the type of Reverb The data chart below shows the options you may select Reverb Options Description...

Page 287: ...select from 0 minimum decay time to 127 maximum decay time Turn the VALUE Rotary Control to the right to increase the Decay Time Turn the VALUE Rotary Control to the left to decrease the Decay Time D...

Page 288: ...and the UP Touch Tab allows you to transpose higher TRY THIS 1 Make sure the instrument is un transposed or playing in concert pitch TRANSPOSE Touch Tab LED not lit 2 Touch and Hold the TRANSPOSE Touc...

Page 289: ...tch Touch and Hold the TRANSPOSE Touch Tab and touch the UP Touch Tab repeatedly until the TRANSPOSE Touch Tab LED turns OFF and the Information Center Display shows 0 CONTROL Edit Menu This Advanced...

Page 290: ...3 Now touch the ENTER Touch Button once The Information Center Display should now look like this You are now in the CONTROL Edit Menu You may now use the PAGE NAVIGATION Touch Buttons in conjunction...

Page 291: ...d to the FOOT SW jack on the Accessory Panel EXPR The operation of a device connected to the EXP jack on the Accessory Panel GLIDE Portamento or bending of pitch DAMPER The operation of a device conne...

Page 292: ...types of devices The data chart below shows the options you may select FOOT SWITCH DEVICE SELECT Options Description Function FOOT SW A conventional foot switch such as the Hammond FS 9 CU 1 Control...

Page 293: ...one Foot Switch can be connected to the SK instrument thereby allowing you to control more than one function using the same Foot Switch jack If you wish to do this you will need a Stereo Adapter which...

Page 294: ...se the Foot Switch to add the Delay effect MUSIC START Allows you to use the Foot Switch to start or stop the Music Player MANUAL BASS Allows you to use the Foot Switch to triggers a Manual Bass note...

Page 295: ...re allows you to select the function of the Tip Mode of a connected Foot Switch Turn the VALUE Rotary Control to make your selection From the previous screen touch the PAGE RIGHT Touch Button once The...

Page 296: ...way you want EXPR Screen 1 Expression Source This Advanced Feature allows you to select the source of expression control The data chart below shows the options you may select Expression Source Options...

Page 297: ...om 40dB to 0dB The higher the number the greater the volume will be Turn the VALUE Rotary Control to make your selection From the previous screen touch the PAGE RIGHT Touch Button once The numbers jus...

Page 298: ...rom 0db to 40db minus 40 decibels Turn the VALUE Rotary Control to make your selection From the previous screen touch the PAGE RIGHT Touch Button once The Information Center Display should now look li...

Page 299: ...he angle of the Expression Pedal when depressed The diagram below shows the options you may select Turn the VALUE Rotary Control to make your selection NOTE You will also see MON on the extreme right...

Page 300: ...oot Switch function From the previous screen touch the PAGE UP Touch Button once The Information Center Display should now look like this The legend underneath the word RANG should be blinking You are...

Page 301: ...the Glide Attack Time Turn the VALUE Rotary Control to the left to decrease the Glide Attack Time From the previous screen touch the PAGE RIGHT Touch Button once The Information Center Display should...

Page 302: ...completion of the pitch excursion OFF The Glide effect works normally there is no change in volume Turn the VALUE Rotary Control to make your selection From the previous screen touch the PAGE RIGHT To...

Page 303: ...want to be able to damp or play continuously when a connected Damper pedal is pressed and held Use the PAGE LEFT and PAGE RIGHT Select Touch Buttons to move back and forth among UP Upper Manual Drawba...

Page 304: ...h Button will switch the Leslie rotors to FAST VIB UPPER The selected Touch Button will turn the Vibrato effect ON for the Upper Manual VIB LOWER The selected Touch Button will turn the Vibrato effect...

Page 305: ...ALUE Rotary Control to make your selection From the above screen touch the PAGE RIGHT Touch Button once The Information Center Display should now look like this The word underneath TIMEOUT should be b...

Page 306: ...elect the interval at which the Pop Up is displayed when you move the OVERDRIVE or EFFECT AMOUNT knob Th e setting range is 0 5 to 2 seconds At NO no Pop Up is displayed You can select 4 8 or 16 secon...

Page 307: ...IGHT Touch Button once The Information Center Display should now look like this The word underneath SND POINT should be blinking Sounding Point This Advanced Feature allows you to set the point along...

Page 308: ...n touch a key or keys The data chart below shows the options you may select TRANSPOSE OCTAVE ACTION Options Description Function NEXT If you are pressing and holding playing keys and you transpose the...

Page 309: ...perate independently when you turn one section ON its registration will add to the other if the other is also ON ALTERNATE The ORGAN and EXTRA VOICE Groups are mutually exclusive When you turn the ORG...

Page 310: ...t Menu NOTE For information about the Equalizer please consult the EQUALIZER section of this Guide 2 When the Advanced Feature you want is displaying Touch and Hold the RECORD Touch Button 3 While hol...

Page 311: ...MIDI...

Page 312: ......

Page 313: ...eceiving MIDI data from another instrument while MIDI OUT is for sending MIDI data out to another instrument In the example above the keyboard s of the sending or transmitting instrument MIDI OUT are...

Page 314: ...the MIDI data goes from the master instrument MIDI OUT to the slave instrument MIDI IN which receives the data and passes it along to a third instrument via the MIDI THRU connection IMPORTANT NOTE If...

Page 315: ...displayed in the extreme upper left corner of the Information Center Display 2 Touch the PAGE UP Touch Button three times You will see D displayed in the extreme upper left corner of the Information C...

Page 316: ...ta from the Upper Lower and Pedal divisions These channels will both send MIDI OUT and receive MIDI IN data and are therefore used when recording and playing back sequences NOTE The Upper Keyboard Cha...

Page 317: ...deal settings for each MIDI environment A group of these settings is called a MIDI Template This Advanced Feature Menu Page allows you to select the MIDI Template you want to use Use the PAGE RIGHT an...

Page 318: ...MIDI 304 MIDI Templates SKX HA O SKXOwner s Playing Guide...

Page 319: ...o set how incoming MIDI data external MIDI device connected via the MIDI IN port is handled The options are The data chart below shows the options you may select MIDI IN jack options Description Funct...

Page 320: ...Information Center Display should now look like this MIDI NRPN This Advanced Feature allows you to turn NRPN ON or OFF What Is NPRN NRPN or Non Registered Parameter Number is an expanded control chan...

Page 321: ...rs will be sent out as normal NRPN codes 21 The Leslie Parameters will be sent out as Leslie 21 series NRPN codes NOTE For a listing of the Leslie 21 NRPN codes please consult the MIDI Implenetation C...

Page 322: ...asier for someone to connect two or more brands of MIDI devices and use them As an example before General MIDI different manufacturers assigned different program numbers to different sounds If for exa...

Page 323: ...112 Shanai 17 Drawbar 49 Strings 1 81 Square 113 Tinkle Bell 18 Percussive 50 Strings 2 82 Sawtooth 114 Agogo Bells 19 Rock Organ 51 Synth 83 Calliope 115 Steel Drum 20 Church 52 Synth 84 Chiff Lead...

Page 324: ...ce When this switch is OFF Drawbar Data will not be transmitted Turn the VALUE Rotary Control to make your selection From the previous screen touch the PAGE RIGHT Touch Button once The Information Cen...

Page 325: ...messages What Is a Device ID In order to facilitate communication between MIDI devices from different manufacturers the MIDI Manufacturer s Association MMA assigns each maker of MIDI devices a unique...

Page 326: ...ion IMPORTANT NOTE If you attempt a Data Dump to the SKX when OFF is displayed the Information Center Display will flash Data Protect This ensures that you do not accidentally overwrite data From the...

Page 327: ...to a connected MIDI recorder To transmit your settings do the following 1 Make sure that the MIDI recorder is ready to receive data RECORD 2 Touch the ENTER Touch Button to start the data dump to the...

Page 328: ...d forth among UPPER LOWER and PEDAL Turn the VALUE Rotary Control to make your selection From the previous screen touch the PAGE RIGHT Touch Button once The Information Center Display should now look...

Page 329: ...er of the PLAY Screens touch the MENU EXIT Touch Button to see the first screen of the MENU Mode You will see A displayed in the extreme upper left corner of the Information Center Display 2 Touch the...

Page 330: ...de This Advanced Feature Menu Page allows you to select how the Manual Bass feature works The data chart below shows the options you may select Manual Bass Options Description Function LOW The bass no...

Page 331: ...ontrol to the left to locate the Manual Bass Split Point lower on the manual From the previous screen touch the PAGE RIGHT Touch Button once The Information Center Display should now look like this Th...

Page 332: ...data chart below shows the options you may select UPPER Octave Options Description Function 2 The sound is two octaves below the regular pitch 1 The sound is one octave below the regular pitch 0 The s...

Page 333: ...VALUE Rotary Control to the right to raise the Octave Turn the VALUE Rotary Control to the left to lower the Octave From the previous screen touch the PAGE UP Touch Button once than touch the PAGE LE...

Page 334: ...itted or OFF no MIDI information will be sent Turn the VALUE Rotary Control to make your selection From the previous screen touch the PAGE RIGHT Touch Button once The Information Center Display should...

Page 335: ...ion UPPER Use this setting if you are have thr Sk1 Sk1 73 or Sk1 88 and are using it with no Lower Manual or MIDI pedalboard LOWER Use this setting if you have the Sk2 or if you are using a connected...

Page 336: ...y Control to the left to locate the note range lower From the previous screen touch the PAGE RIGHT Touch Button once The Information Center Display should now look like this External Zone Upper Note L...

Page 337: ...tandard is fully compatible with General MIDI however instead of only 128 sounds it provides the means to have up to 16 384 different sounds This is accomplished by providing up to 128 banks of voices...

Page 338: ...east Significant Bit Turn the VALUE Rotary Control to make your selection From the previous screen touch the PAGE RIGHT Touch Button once The Information Center Display should now look like this Exter...

Page 339: ...s Advanced Feature if an external sound plays in a pitch range other than the one you find desirable The data chart below shows the options you may select Octave Options Description Function 2 The sou...

Page 340: ...e Controller 7 of the sound controlled by the selected External Zone You can select from 0 no volume through 127 maximum volume Turn the VALUE Rotary Control to make your selection NOTE In order for t...

Page 341: ...l to make your selection NOTE In order to hear the effect of this Advanced Feature the sound controlled from the External Zone must be connected vis Stereo both Left and Right channel outputs From the...

Page 342: ...n Pedal is closed or set at minimum You can select from 0 through 63 At 0 no sound will be heard Turn the VALUE Rotary Control to make your selection From the previous screen touch the PAGE RIGHT Touc...

Page 343: ...dness or sound level The difference lies with how they are customarily used in MIDI applications particularly in creating and playing back MIDI sequences The generally accepted protocol is to use Cont...

Page 344: ...playing and Note Off which releases the note and stops it from playing These two commands are always sent in pairs Once in a while a Note Off command may not follow a Note On command causing a note o...

Page 345: ...USING THE MUSIC PLAYER...

Page 346: ......

Page 347: ...d during playback Using the Music Player In order to play Song files using the Music Player a USB Flash Drive containing compatible Song data must be inserted into the USB Port on your SKX The next fe...

Page 348: ...wait 2 After the above message stops scrolling from any of the PLAY Mode screens touch the MENU EXIT Touch Button once The Information Center Display should now look like this The word DRAWBAR should...

Page 349: ...Song Name will now display Playing a Music File Accessing the MUSIC PLAYER using a Shortcut With a USB Flash Drive containing Song data inserted into the USB port of the SKX Touch the CONTROL and DRA...

Page 350: ...tice that the number underneath VOL is blinking Use the VALUE Rotary Knob to control the Volume of the Song now playing from 0 lowest setting to 127 highest setting To stop the song simply touch the E...

Page 351: ...on the number of songs available If only two Song files are available a DOWN arrow will show If there are three or more Songs you will see an UP DOWN arrow in the upper left corner of the display Whe...

Page 352: ...first if the Songs are played in order if the CHAIN Advanced Feature is set to ALL If you have a selection of Songs that you want to play in a particular order it is recommended that you manually ren...

Page 353: ...SPECIAL UTILITY FEATURES...

Page 354: ......

Page 355: ...ange is from A 430 through A 450 To access the TUNE Edit Menu do the following 1 From any of the PLAY Mode screens touch the MENU EXIT Touch Button once The Information Center Display should now look...

Page 356: ...hould now look like this 4 Now touch the ENTER Touch Button once The Information Center Display should now look like this You are now in the TUNE Edit Menu Turn the VALUE Rotary Control to the right t...

Page 357: ...access the DEFAULT Edit Menu do the following 1 From any of the PLAY Mode screens touch the MENU EXIT Touch Button once The Information Center Display should now look like this The word DRAWBAR should...

Page 358: ...Use the VALUE Rotary Control to select the Patch you want to initialize You can select from U001 to U100 and ALL all user patches GLOBAL Resets the Global Parameters Master Tune Foot Switch assignment...

Page 359: ...e PLAY Mode screens touch the MENU EXIT Touch Button once The Information Center Display should now look like this The word DRAWBAR should now be blinking 2 Touch the PAGE UP Touch Button four times T...

Page 360: ...he instrument will turn ON or OFF with the AC power switch but not turn OFF automatically From the previous screen touch the PAGE UP Touch Button once The Information Center Display should now look l...

Page 361: ...tion MAIN Main system program SUB Sub program INFORMATION Voice Information DSP Digital Signal Processor software BOOT Software for locating and initializing the main system program PRESET Factory Pat...

Page 362: ...r settings and Preset information only None of the Advanced Features may be accessed using the Touch Buttons However you may still record and save Patches using the RECORD Touch Button To restore the...

Page 363: ...USING THE USB PORT...

Page 364: ......

Page 365: ...ce USB Flash Drives are available in many different memory capacities however 1 or 2 Gigabytes Gb will be enough for the applications unique to the SKXs The term drive is not technically accurate sinc...

Page 366: ...lash Drive which either is empty or which does not have data you want to save The Formatting procedure will erase any data which may already be on the drive 2 When you have located a suitable Flash Dr...

Page 367: ...add more voices using the USB Flash Drive The following pages will explain this in detail What Is A Voice Library A Voice Library is a collection of sounds grouped together by type Strings Vocal Jazz...

Page 368: ...ontains the Voice Library downloads http hammondorganco com support downloads voice libraries The page will look similar to this On this page you will see names of different Voice Libraries The links...

Page 369: ...h contains the extracted file The file name s will be similar to this LibVLxxx sys The numbers in the file name will be the same for the extracted SYS file as for the host ZIP file NOTE The x s indica...

Page 370: ...and containing Voice Libraries into the USB Port 3 From any of the PLAY Mode screens touch the MENU EXIT Touch Button once The Information Center Display should now look like this The word DRAWBAR sh...

Page 371: ...the LIBRARY Edit Menu You may now use the PAGE NAVIGATION Touch Buttons in conjunction with the VALUE Rotary Control to Load Save or Delete Sound Libraries These changes are explained starting below...

Page 372: ...he top line shows the amount of memory the selected Voice Library will require The number on the bottom line shows the amount of available memory in the Sk s hardware In this way you can determine whe...

Page 373: ...ormation Center Display should now look similar to this If you have more than one Voice Library loaded use the VLAUE Rotary Knob to locate the Voice Library you wish to delete 3 When you have selected...

Page 374: ...7 to display it Otherwise continue reading The Information Center Display should look similar to this 2 Touch the PAGE RIGHT Touch Button two times The Information Center Display should now look simil...

Page 375: ...APPENDIX...

Page 376: ......

Page 377: ...Appendix 363 APPENDIX Specifications HA O SKX Owner s Playing Guide...

Page 378: ...Appendix 364 EXTRA VOICE Instrument List HA O SKXOwner s Playing Guide...

Page 379: ...Appendix 365 EXTRA VOICE Instrument List cont HA O SKX Owner s Playing Guide...

Page 380: ...Appendix 366 Preset Patch List HA O SKXOwner s Playing Guide...

Page 381: ...Appendix 367 Patch Parameter List HA O SKX Owner s Playing Guide...

Page 382: ...Appendix 368 Patch Parameter List cont HA O SKXOwner s Playing Guide...

Page 383: ...Appendix 369 Patch Parameter List cont HA O SKX Owner s Playing Guide...

Page 384: ...Appendix 370 Patch Parameter List cont HA O SKXOwner s Playing Guide...

Page 385: ...Appendix 371 Global Parameter List HA O SKX Owner s Playing Guide...

Page 386: ...Appendix 372 Leslie Parameter List System Parameter List Tone Wheel Parameter List Pipe Parameter List HA O SKXOwner s Playing Guide...

Page 387: ...Appendix 373 Drawbar Data List 1 Drawbar Data List 2 HA O SKX Owner s Playing Guide...

Page 388: ...Appendix 374 Custom Tone Wheels List HA O SKXOwner s Playing Guide...

Page 389: ...Appendix 375 MIDI Implementation Chart HA O SKX Owner s Playing Guide...

Page 390: ...Appendix 376 MIDI Implementation HA O SKXOwner s Playing Guide...

Page 391: ...Appendix 377 MIDI Templates HA O SKX Owner s Playing Guide...

Page 392: ...Appendix 378 MIDI Channels and Messages HA O SKXOwner s Playing Guide...

Page 393: ...Appendix 379 System Exclusive Messages HA O SKX Owner s Playing Guide...

Page 394: ...ild soap Immediately wipe dry with a soft dry cloth Keys And Buttons To clean keys and buttons use a clean soft cloth moistened with water Do not use any solvents thinners or dryers such as alcohol ga...

Page 395: ...dress listed above marked ATTENTION SERVICE DEPARTMENT Manufacturer SUZUKI MUSICAL INSTRUMENT MFG CO Ltd 25 12 Ryoke 2 Chome Hamamatsu 430 0852 Shizuoka JAPAN ACKNOWLEDGMENTS In appreciation of the ma...

Page 396: ......

Page 397: ......

Page 398: ...2018 Hammond Suzuki USA Inc HA O SKX Owner s Playing Guide FM2328 0718...

Reviews: