background image

11

TROUBLESHOOTING

If the Vacuum Sealer does not operate when it is plugged 

in and turned on, try any or all of the following:

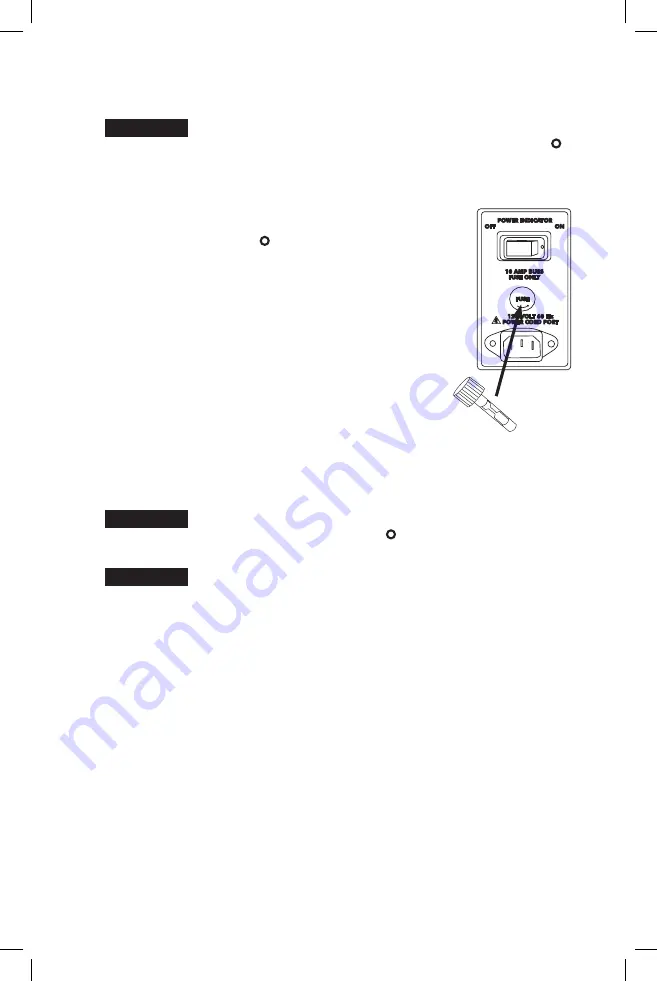
1. Make sure the Fuse is not blown. The Fuse is located 

on the right side of the unit directly above the Power 

Cord Port. Turn “OFF” ( ) and unplug the Vacuum 

Sealer. Twist off and remove the Fuse Cap. Remove 

and check the Fuse. The thin metal band in the 

center of the Fuse should be clean and unbroken. 

Only replace fuse with a 10-ampere cartridge fuse. 

Replace the Fuse Cap. 

2. Make sure the Connector at the end of the Power 

Cord is plugged completely into the Power Cord Port. 

3. Make sure the Power Cord is not damaged. DO NOT 

use a damaged Power Cord. Call Customer Service 

for information on part replacement. 

4. Try connecting the Power Cord Plug to another 

electrical outlet. 

CLEANING INSTRUCTIONS

• 

NEVER IMMERSE the Vacuum Sealer in water or other liquid.

• 

Wipe all outside surfaces including the plastic Vacuum Chamber and 

Vacuum Lid with a damp cloth or paper towel. Avoid spraying cleaner or 

any other liquid directly into the vent on the left side of the unit. DO NOT 

use abrasive cleansers! Abrasive cleansers will spoil the clarity of the 

Vacuum Lid.

• 

Avoid peeling or damaging the Seal Bar Tapes.

• 

Dry all surfaces and close the Vacuum Lid before storing the Vacuum 

Sealer. 

w

 WARNING

 Electrical Shock Hazard. 

Before cleaning the Vacuum 

Sealer, make sure the Vacuum Sealer is OFF ( ) and the plug is removed from 

the outlet/power source.

w

 WARNING

 Electrical Shock Hazard. 

Before assembling or 

disassembling the Vacuum Sealer, make sure the Vacuum Sealer is OFF ( )

and the plug is removed from the outlet/power source.

w

 CAUTION


Burn Hazard. 

The Seal Bar and Vacuum Chamber Seal get hot 

and can cause burns. Avoid contact. Allow Vacuum Sealer to cool for 20 minutes 

before cleaning.

Summary of Contents for HVS400

Page 1: ...EMENTS THE PRODUCT PICTURED MIGHT DIFFER SLIGHTLY FROM THE PRODUCT IN THIS BOX PARCE QUE LE FABRICANT AM LIORE CONTINUELLEMENT LE PRODUIT L IMAGE DU PRODUIT ILLUSTR PEUT TRE L G REMENT DIFF RENTE DU P...

Page 2: ...ce risk of unintentional starting Make sure the power switch is in the OFF position before attaching to the power source 10 Keep fingers clear of the heat sealing bar and seal bar tape at all times Th...

Page 3: ...tangled in or tripping over a longer cord If a longer cord is necessary an approved extension cord may be used The electrical rating of the extension cord must be equal to or greater than the rating...

Page 4: ...4 Power Cord Port 3 2 1 4 5 10 Power Cord Storage 9 PARTS AND FEATURES STO P MAN UA L SEAL STA RT PO WER VACUUM SEAL CO O L 6 7 8 11...

Page 5: ...DE SCELLEMENT ELEMENTO CALENTADOR DE LA BARRA DE SELLADO 7 15 MM LOWER SEAL BAR TAPE 2 NOTE ONE EXTRA SEAL BAR TAPE IS INCLUDED BANDE DE RUBAN INF RIEURE 15 MM REMARQUE UN RUBAN SUPPL MENTAIRE EST FO...

Page 6: ...REMOVE FIGURE 1 VACUUM CHAMBER SEALS There are two factory installed Oval Vacuum Chamber Seals on the Vacuum Sealer When the Vacuum Lid is closed and downward force applied they form an airtight seal...

Page 7: ...the Seal Bar Heating Element in manual mode when the Vacuum Lid is open When the Vacuum Lid is closed heat made by the Seal Bar Heating Element is absorbed by the vacuum bag and Vacuum Lid Seal When t...

Page 8: ...position Attach the Power Cord and plug into the electrical outlet 2 Turn the Vacuum Sealer ON 3 The POWER Light on the display and POWER INDICATOR Switch will illuminate and the Internal Cooling Fan...

Page 9: ...ord and plug into the electrical outlet 2 Turn the Vacuum Sealer ON 3 The POWER Light on the display and POWER INDICATOR Switch will illuminate and the Internal Cooling Fan will run 4 Open the Vacuum...

Page 10: ...w 15 MM Seal Bar Tape Do not allow the tape to contact anything while the adhesive is exposed 2 Place one end of the Seal Bar Tape on the flat area to the left side of the Seal Bar Heating Element Sli...

Page 11: ...CLEANING INSTRUCTIONS NEVER IMMERSE the Vacuum Sealer in water or other liquid Wipe all outside surfaces including the plastic Vacuum Chamber and Vacuum Lid with a damp cloth or paper towel Avoid spr...

Page 12: ...nent ad quatement et qu elles accomplissent les fonctions pr vues S assurer que toutes autres conditions ne nuisent pas au fonctionnement 8 Ne jamais utiliser un accessoire ou une pi ce d un autre fab...

Page 13: ...a rallonge doit tre du type mise la terre 3 fils Prendre toutes les pr cautions n cessaires pour installer la rallonge de mani re ne pas la faire courir sur le comptoir ou sur une table pour viter qu...

Page 14: ...14 Prise lectrique 3 2 1 4 5 10 Stockage de cordon d alimentation 9 PI CES ET CARACT RISTIQUES STO P MAN UA L SEAL STA RT PO WER VACUUM SEAL CO O L 6 7 8 11...

Page 15: ...ENLEVER FIGURE 1 GARNITURE DU CANAL D ASPIRATION Deux garnitures ovales superpos es en usine cerclent le canal d aspiration Lorsque l on ferme le couvercle et exerce une pression les deux garnitures...

Page 16: ...orsque le couvercle est ouvert En effet la chaleur produite par l l ment chauffant est absorb e par le sac sous vide et le joint du couvercle lorsque celui ci est ferm Mais s il est ouvert la chaleur...

Page 17: ...d alimentation et le brancher dans une prise de courant 2 Allumer la scelleuse interrupteur sur ON marche 3 Le voyant POWER alimentation sur le tableau et l interrupteur POWER INDICATOR voyant d alime...

Page 18: ...cher dans une prise de courant 2 Allumer la scelleuse interrupteur sur ON marche 3 Le voyant POWER alimentation sur le tableau et l interrupteur POWER INDICATOR voyant d alimentation s allument le ven...

Page 19: ...1 Retirer la pellicule de la bande de ruban de 15 mm neuve viter tout contact de la bande avec des objets d s que la pellicule est retir e 2 Placer une extr mit de la bande de ruban dans la zone plat...

Page 20: ...celleuse dans l eau ou tout autre liquide Passer un chiffon humide ou un essuie tout sur les surfaces externes notamment sur le canal d aspiration et le couvercle viter de vaporiser un nettoyant ou to...

Page 21: ...21 NOTES...

Page 22: ...st n funcionando correctamente y que realicen las funciones para las que est n concebidas Verifique otras condiciones que puedan afectar el funcionamiento 9 Nunca utilice ning n accesorio o pieza de o...

Page 23: ...able de extensi n para que no se pliegue sobre el mostrador o la mesera en donde ni os puedan tirar del mismo o tropezarse accidentalmente Servicios T cnicos Para asistencia o piezas de repuesto llame...

Page 24: ...24 Puerto del cable de alimentaci n 3 2 1 4 5 10 Almacenamiento del cable de alimentaci n 9 PIEZAS Y CARACTER STICAS STO P MAN UA L SEAL STA RT PO WER VACUUM SEAL CO O L 6 7 8 11...

Page 25: ...A DE VAC O Existen dos sellos ovalados de la c mara de vac o instalados de f brica en la selladora al vac o Cuando la tapa de vac o se encuentra cerrada y se empuja hacia abajo forma un sellado herm t...

Page 26: ...o calentador de la barra de sellado en modo manual cuando la tapa de vac o est abierta Cuando la tapa de vac o est cerrada el calor producido por el elemento calentador de la barra de sellado se absor...

Page 27: ...ladora al vac o en posici n ON encendido 3 La luz POWER alimentaci n en la pantalla y el interruptor POWER INDICATOR indicador de alimentaci n se encender n y el ventilador de refrigeraci n interno fu...

Page 28: ...posici n ON encendido 3 La luz POWER alimentaci n en la pantalla y el interruptor POWER INDICATOR indicador de alimentaci n se encender n y el ventilador de refrigeraci n interno funcionar 4 Abra la t...

Page 29: ...cinta entre en contacto con ning n elemento mientras el adhesivo se encuentra expuesto 2 Coloque un extremo de la cinta de la barra de sellado en el rea plana hacia el lado izquierdo del elemento cal...

Page 30: ...CA SUMERJA la selladora al vac o en agua o l quido Limpie todas las superficies exteriores incluidas la c mara de vac o de pl stico y la tapa de vac o con un pa o o con una toalla de papel h medos Evi...

Page 31: ...31 NOTAS...

Page 32: ...o y Cuidado pueden ir seguidos o no por un sufijo correspondiente a una o varias letras del alfabeto y sus combinaciones separadas o no por un espacio coma diagonal o gui n Como ejemplos los sufijos p...

Reviews: