


10
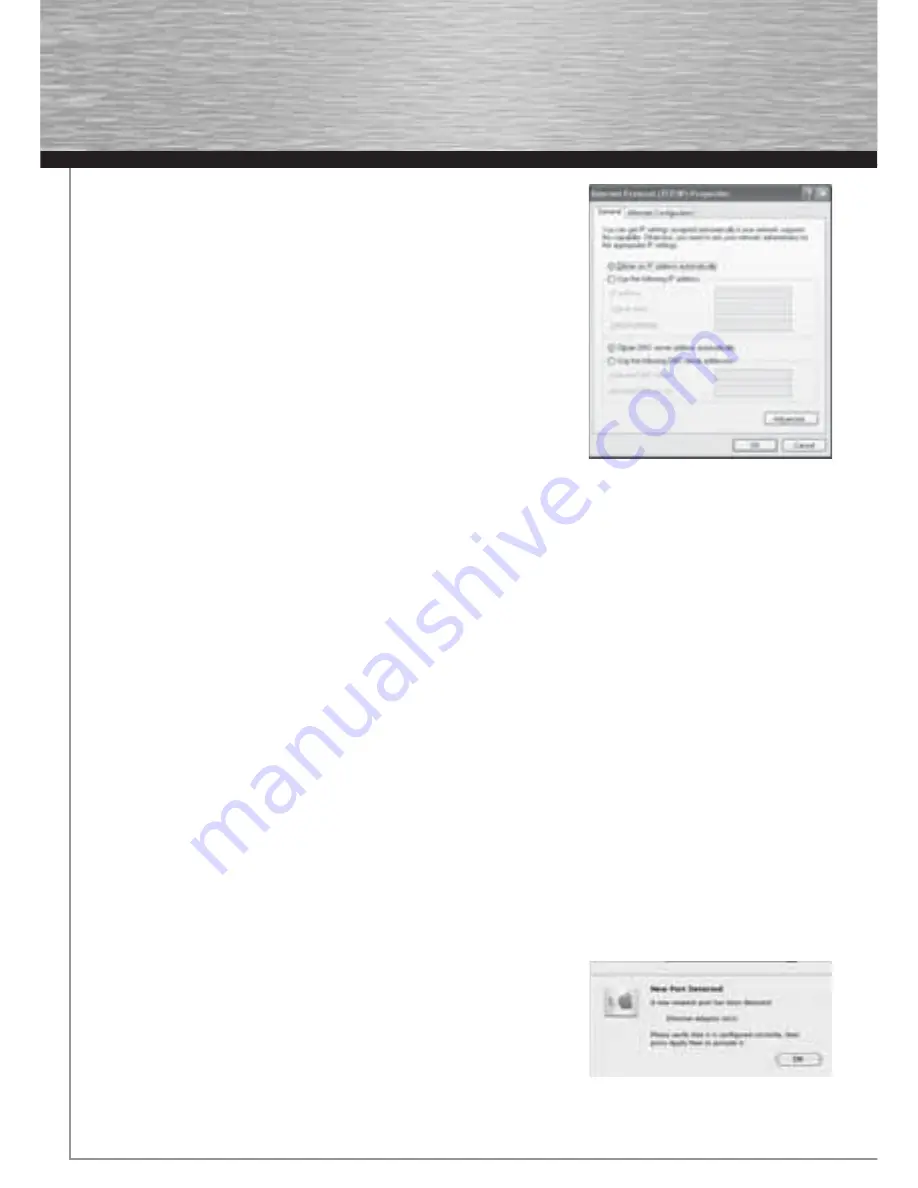
Select
Optain an IP address automatically
and
Optain DNS server address automati-
cally
, if there is a DHCP server in your network. Confi rm by clicking
OK
, and again in
the subsequent window. Your PC is now confi gured such that the router assigns the IP
address automatically.
If you do not have a device with an integrated DHCP server, you must assign the IP
addresses manually. The following example describes basic setup using manual
address assignment. For local networks, special address ranges are provided which
are not transmitted over the internet. As an example, a range that you can use for your
network is 192.168.1.1 to 192.168.1.254. The fi rst PC is assigned the address 192.168.1.1,
the second 192.168.1.2, the third 192.168.1.3, etc.
Select
Use the following IP address
and enter your IP address in accordance with the
sample.
1.PC = IP address 192.168.1.1 Subnet mask 255.255.255.0
2.PC = IP address 192.168.1.2 Subnet mask 255.255.255.0
Click
Ok
to confi rm your entries.
6. Uninstalling the driver and confi guration program on Windows
Switch off your PC and unplug the mains plug from the socket. Open the PC case. Remove the wireless LAN PCI card from the
PC and close the PC case again. Insert the mains plug in the socket again and start the PC. Save all open documents and close
all programs before uninstalling.
Select
Start => Settings => Control Panel => Software
To do so, select
Hama Wireless Utility
and click
Remove.
At the next prompt, click
Remove completely
. The program is now deleted
from your computer.
After the software is removed, you may have to restart the system. Save all open documents and close all programs before restarting
the PC.
7. Installing the driver and confi guration program on MAC OS X
Before installation, please save any open documents you may be working on. Then close all running programs. Ensure that you have
administrator authorisations to enable you to install the driver correctly.
Connect the device to a free PCI slot. Then start your Apple computer.
After the operating system has loaded completely and the desktop is complete, insert the enclosed driver CD-ROM in your drive. An
icon with the CD-ROM then appears on your desktop. Double-click the icon and select the MAC driver directory in the Finder window.
This directory contains the DMG fi le required for installation. Double click the
DMG fi le
to activate the image.
After you activate the image, select the correct directory for your installed MAC OS X Version and then double click the correspondi-
ng
PKG fi le
. Installation is now started.
Select your hard drive on which you want to install the driver and the confi guration program. You must then restart the system.
8. Confi guring the operating system and computer on MAC OS X
After you have installed the driver, you must confi gure the network environment in accordance with the new situation. To do so,
proceed as follows.
Click the
Apple
symbol in the upper menu bar and select the
Location
menu item.
Select the
“Network”
setting menu item. The following window opens. Click
OK
to
confi rm the message.
Note:
If the message shown above is not displayed, the device was not correctly identifi ed by your PowerMac. Ensure that the device
is connected properly!
00062742bda_GB.indd Abs2:10
00062742bda_GB.indd Abs2:10
17.09.2007 7:26:25 Uhr
17.09.2007 7:26:25 Uhr
Summary of Contents for 62742
Page 14: ...15...