


SeTuP
9
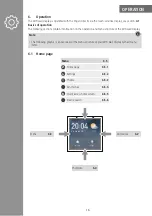
5.2 Initial setup of the WiFi wall display
After successful installation, the WiFi wall display switches on automatically and displays the welcome
screen. Follow the steps below to complete the initial setup:
•
On the welcome screen, tap the
arrow
at the bottom to start the set-up process.
•
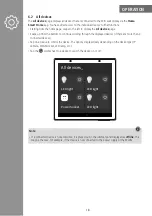
Select your preferred
language
.
•
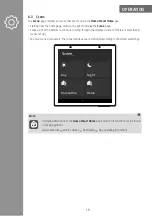
Select the desired
country
and
region
.
•
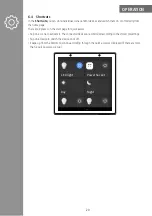
Select your 2.4 GHz
WLAn
(wireless network).
•
Enter your
WLAn password
.
•
Tap the
[Connect]
button.
•
Read and confirm the User Agreement and Privacy Policy by tapping the
[Agree]
button.
•
Tap the
[Agree]
button to synchronise the time zone of the WiFi wall display via the WLAN.
Alternatively, tap the
[Later]
button (not recommended).
•
Swipe down on the Date/Time screen and confirm by tapping the
tick
.
•
A QR code is displayed. Continue with the installation of the
Hama Smart Home
app, see Chapter
5.3 Installing the Hama Smart Home app
.


