halstrup-walcher P29 Original Instruction Manual Download Page 9


P29 Instruction Manual 


Start-up, maintenance, shipping 


Caution: Explosion hazard! Flush the system for the required period of time before 
start-up!


3.1 Start-up 

Carefully read and follow the start-up instructions listed below. Failure to follow these 
instructions can lead to an explosion in the instrument and injury to persons.


Installation and start-up of the instrument may only be performed by persons trained 
in handling equipment in areas with explosion hazards. 


The instrument must be separated from the electrical power supply during the following steps: 


  Install the instrument in the system (

only outside potentially explosive atmosphere

) - 

do 

not

 connect to the gas line 

at this time

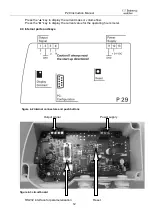
  Install all connecting electrical cables (powerless) in the instrument 

  Test the functions 

o

  Check 

the 

flow 

between 

plus 

and 

minus 

pressure 

connection  

(check the preflush function) 

o

  Apply supply voltage 

o

  Briefly check pressure measurement function 

o

  Switch supply off again 

  Tighten high strength cable glands 

  Unused high strength cable glands must be sealed 

  Close the housing 

  Before  connecting  the  instrument  to the gas  lines,  both  pressure  lines  should  be flooded 

with gas otherwise the instrument itself must be flooded with gas for a longer period of time. 
Appropriate equipment must be installed for this purpose 


Flushing process 

o

  Close gas supply lines 

o

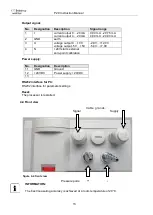
  Attach both pressure connections 

o


Tighten the terminals on the gas supply lines and check them 

o

  Approve gas supply lines for use 

o


Flood the device with gas for at least 6 minutes when it is switched off. To do 
this, there must be a differential pressure at the pressure connections. Notice 
the maximum system pressure 

 see 9.Technical data. 

o

  Only then may the electrical power supply to the instrument be switched on again 


This start-up regulation has the purpose of flushing the oxygen required for combustion out of 
the  instrument  so  that  only  a  pure  gaseous  atmosphere  is  present.  This  gas  atmosphere 
cannot ignite because no oxygen is present. This entire start-up procedure must be repeated 
if the  instrument  is  separated from  the gas  supply  line  even for  only  a  short  period  of time. 
Consequently,  both  pressure  ports  must  be  connected  to  the  pressurized  system  during 
operation. 


The  device  may  not  be  used  in  systems  with  natural  gas  unless  this  startup 
regulation is observed. 


Summary of Contents for P29

Page 1: ...Pressure Transducer Type P29 for Natural Gas halstrup walcher GmbH Stegener Stra e 10 D 79199 Kirchzarten Phone 49 0 76 61 39 63 0 Fax 49 0 76 61 39 63 99 E Mail info halstrup walcher com Internet ww...

Page 2: ...ion New 2 5 Services 3 1 flush revised New 3 3 leak test 3 3 shipping now 3 4 chapter 10 problem added All illustrations labelled New 10 1 Check fuse New 10 2 Replace fuse 9 Specifications overload ca...

Page 3: ...Instrument description 11 4 1 Features 11 4 2 User interfaces 11 4 3 Internal ports and keys 12 4 4 Front view 13 4 5 Readout of volume mass flow and flow velocity 14 Zero point calibration cycle 15 5...

Page 4: ...20 Zero point calibration 20 CS creep suppression 20 Lightning 20 Colour change 20 Brightness 20 Contrast 21 Read factory settings 21 Code 21 List of commands 22 Technical data 24 Trouble shooting Se...

Page 5: ...efully It is especially important to read and follow the notes on starting up in systems that use flammable gases Contact the manufacturer if you do not understand any part of this instruction manual...

Page 6: ...dicated on the rating plate and in the Technical data section of this manual The instrument may only be handled as indicated in this manual Modifications to the instrument are prohibited The manufactu...

Page 7: ...ent errors may occur if the instrument is not kept protected from sunlight Specific safety precautions are given in individual sections of this manual 2 5 Troubleshooting maintenance service repairs d...

Page 8: ...lead to bodily injury up to and including death if the corresponding instructions are not followed CAUTION This warns you of a potential hazard that could lead to significant property damage if corres...

Page 9: ...fore connecting the instrument to the gas lines both pressure lines should be flooded with gas otherwise the instrument itself must be flooded with gas for a longer period of time Appropriate equipmen...

Page 10: ...le pressure test For the leak test shut off the two pressure lines to the P29 and note the initial pressure display or output signal Observe the differential pressure for 1 minute The differential pre...

Page 11: ...terface Relay Keyboard Analogue output signal figure 4 1 functional description 4 2 User interfaces The following four keys are available Menu UP Right Enter Key Meaning Measurement Mode Meaning Menu...

Page 12: ...mass or volume flow Press the key to display the current value for the operating hours meter 4 3 Internal ports and keys figure 4 2 Internal connectors and push buttons Output signal Power supply figu...

Page 13: ...5V 5V 2 0V 12 0V 5 0V 7 0V 4 N 24V starts external zero point calibration Power supply No Designation Description 11 GND Ground 12 24VDC Power supply 24VDC 13 RS232 interface for PC RS232 interface f...

Page 14: ...s square rooted for example is the differential pressure value generated by a dynamic pressure probe at volume flow Analog current output signal 0 20 mA or 4 20 mA Analog voltage output signal 0 10 V...

Page 15: ...e adjusted in the Settings menu Zero point calibration can also be started with the Enter key if the device is in Measurement mode The P29 does not respond to keys being pressed during calibration 5 1...

Page 16: ...ing Warning Settings 7 1 Display The display unit can be selected with this menu item Press the and keys to select the unit you want and press Enter to confirm The type of display pressure flow rate e...

Page 17: ...le Value Unit 7 2 2 1 Value This is used to set the volumetric flow value displayed at the maximum scaled pressure 0 is always used as the lower scale value on the volumetric flow display root extract...

Page 18: ...f min km h 7 3 Warning INFORMATION For safety reasons relay outputs are not possible with the P29 However exceeding or falling below the switching thresholds can be signalled visually and acoustically...

Page 19: ...eded With this parameter you can set the duration of this warning signal for each warning The maximum value here is 1000 ms continuous tone If both warnings are active the longer warning signal of the...

Page 20: ...rameter to 0 deactivates automatic zero point calibration CS creep suppression This parameter specifies the value for creep suppression as a percentage If this value falls short of the measured pressu...

Page 21: ...ble Read factory settings The factory settings are established in the instrument before delivery With this menu item they can be reactivated if required Code You can use this menu item to specify an a...

Page 22: ...alSG Flow rate m s at max scale value ScalO Min 0 floating PRelai1 Switching pressure relay 1 Pa 120 120 of the measurement range floating RRelai1 Switching direction for Relay 1 1 decreasing 0 off 1...

Page 23: ...01 2 0 1 3 0 2 4 0 5 5 1 unsigned int UnitD Unit display 0 Pa 1 hPa 2 kPa 3 mbar 4 mmH2O 5 mmHg 6 Psi 7 inH2O 8 inHg 9 m s 10 m h 11 kg s 12 kg min 13 kg h 14 m s 15 mph 16 f s 17 f min 18 km h unsig...

Page 24: ...ssure 100 kPa for all measurement ranges Ambient conditions Medium Air non aggressive gases Operating temperature 10 C to 50 C Storage temperature 10 C to 70 C Electrical data Rated input approx 6 VA...

Page 25: ...cknowledge 10 1 Checking the fuse If the device does not work and in the case of devices with a display nothing is shown on the display the fuse may be defective To check the fuse follow the steps bel...

Page 26: ...following steps To change the fuse follow the steps below 1 Make sure that the device is no longer connected to the power supply 2 Pull the fuse upwards 3 Then reinsert the new fuse accordingly only u...

Page 27: ...P29 Instruction Manual 27 Dimension drawing figure 11 1 dimensional drawing...

Page 28: ...Pa mbar mmH2O mmHg psi inH2O inHg m s m h kg s kg min kg h m s mph f s f min km h Scaling Pressure Top xxx xx Bottom xxx xx Unit Pa hPa kPa mbar mmH2O mmHg psi inH2O inHg Vol Flow Value xxx xxxx Unit...

Page 29: ...n Italian French Output 4 20 mA 0 20 mA 5 5V 0 10 V Filter xxxxx ms key tone on off Resolution max 0 01 0 1 0 2 0 5 1 Zero point calibration xx min CS x x Lighting Off White Blue Colour change On Off...

Page 30: ...P29 Instruction Manual 30 Certificate of Conformity NEU_7100 004324_P29 docx 02 2023 Ts...

Page 31: ...P29 Instruction Manual 31 Notes...

Page 32: ...P29 Instruction Manual 32 Notes...

Reviews: