Confidential
80
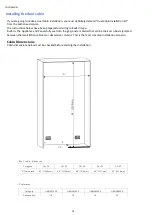
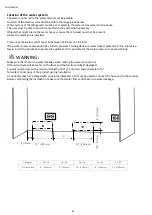
Location of the water system
The water connected to the water mains must be potable.
Location of the water system must be within the range given below.
Water system of the refrigerator must be connected to the water mains system in the house.
The user must be able to switch it on/off with the valve when necessary.
Objects that might pierce the water hoses or cause them to twist must not be present
where the water line is installed.
Pressure of the water system must be between 25-80 psi (1.7-5.5 Bar).
If the water pressure exceeds 80 psi, install a pressure limiting device or water impact protector to the inlet valve.
Never install the product or operate the appliance if it is possible for the water pressure to exceed 120 psi.
WARNING:
Make sure that there is no water leakage when making the water connections.
Otherwise, there will be water on the floor and the furniture will get damaged.
You will need a hose with a minimum length of 60" (1.5 meters) and a diameter of ¼"
for water connections of the product during installation.
A connector that has a thread with an external diameter of ¼ must be used to connect the hose end to the product.
Before completing the installation, make sure that water flows and there is no water leakage.
Category
18+24
18+30
24+24
24+30
30+30
“A” Dimension
8” (203mm)
8” (203mm)
14” (356mm)
14”
(356mm)
20” (508mm)
4
”
(10
2
mm
)
2
“
(50.8mm)
10
“
(254mm)
7/
8
”
(
21
mm)
A
“
10
“
(254mm)
Summary of Contents for HRBIAF18PR
Page 25: ...25 Removing the vent hole assembly Remove 5 screws to take out the Vent Hole Assembly...
Page 49: ...Confidential 49 HRBIAF24PR HRBIAR24PR HRBIAR30PR TF 18BINFIA...
Page 54: ...Confidential 54 Installing the furniture door 1 Attach the furniture door to the door...
Page 58: ...Confidential 58 Clip the cover furniture door bracket HRBIAF24PR HRBIAR24PR HRBIAR30PR...
Page 59: ...Confidential 59 Attach and screw the upper lower decorationcover HRBIAF18PR...
Page 60: ...Confidential 60 Attach and screw the upper lower decorationcover HRBIAF24PR HRBIAR24PR...
Page 63: ...Confidential 63 Attach the Trim door side Item No3...
Page 68: ...Confidential 68 Remove the upper adjustment kits HRBIAF18PR...
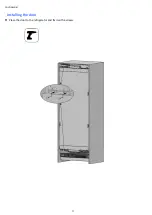
Page 77: ...Confidential 77 Installing the door Place the door to the refrigerator and fix it with 4screws...
Page 91: ...Confidential 91 You can see previous pages for other installation procedures...
Page 92: ...Confidential 92...

