background image


24 

 Hall Research Technologies, Inc. 

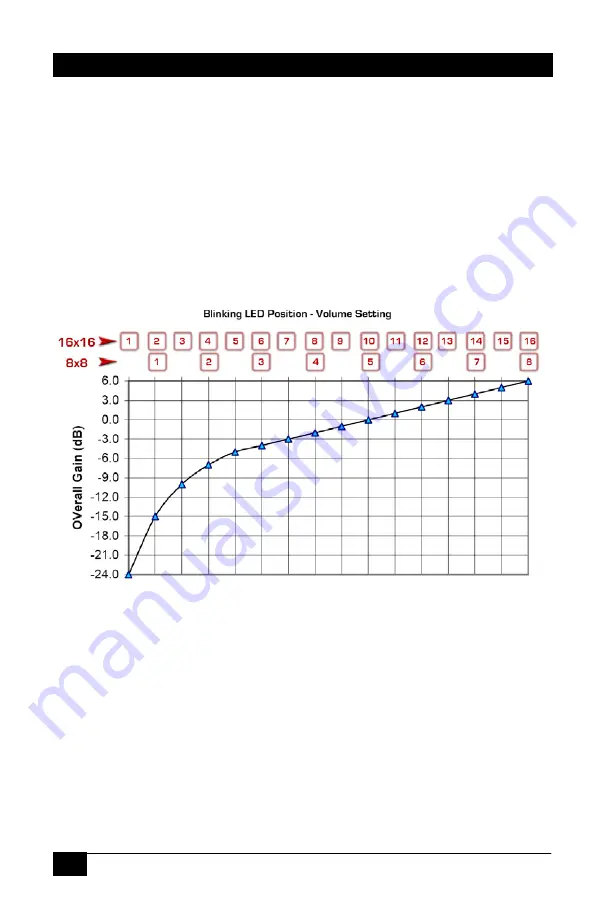
3.1.8.2 Adjusting the input audio Gain or attenuation 

 
Enter the audio adjustment mode as described above.  
Initially the audio gain level at the input is set to 0 db (gain of 1). Press and 
release the 

 or 

 button to change the gain settings. Each push is about 1dB 

change (see graph below). Press and hold the UP or DOWN button for more than 
1 second, the gain will keep changing at the rate of 3dB per second.  As you 
increase or decrease the volume, besides the LED on the top row that is showing 
the input channel you are adjusting, another blinking LED indicates the audio 
gain setting.  Again, position #10 indicates 0 db (or gain of 1).  The range of 
adjustment is about -24 dB to +6 dB (position 1 to position 16). 


Figure 14 – Graph of Audio Gain level versus Volume setting LED position 

 
In adjusting the volume you want to keep the sound level as read on the VU meter 
at or below Position 10 (0 VU) for the loudest level at the input. 
When finished, press the ENTER button to save any changes or exit the audio 
adjustment mode. When you exit this mode, the last audio input that was routed to 
output #1 prior to entering the setting mode will be restored! 
Audio Setup mode times out if no activity is detected for 1 minute, the last input 
gain settings will be saved. 
 

Summary of Contents for Genesis Series

Page 1: ...8 VGA HDTV Video Matrix Switch with Front Panel RS232 and Optional Audio IP Control This user s manual pertains to a variety of the Hall Research Genesis Line of 16x16 and 8x8 matrix switches that are constructed in a compact 2 RU chassis UMA1137 Rev F W Wi it th h S St ta an nd da ar rd d O Ou ut tp pu ut ts s W Wi it th h R RJ J4 45 5 O Ou ut tp pu ut ts s ...

Page 2: ......

Page 3: ...1 2 2 2 AV outputs on units with RJ45 11 2 2 2 1 RJ45 output with Video and Power JP 12 2 2 2 2 RJ45 output with Video and Audio JA 12 2 2 2 3 J45 output with Video and RS232 Serial JR 13 2 3 POWER INPUT CONNECTION 13 2 4 CONTROL INPUTS 14 2 4 1 Basic Unit with RS 232 Control no IP 14 2 4 1 1 Primary RS 232 Control Port 15 2 4 1 2 Auxiliary RS 232 Control Port 15 2 4 2 Units with IP control 16 3 0...

Page 4: ... 2 Adjusting the input audio Gain or attenuation 24 3 2 CONTROL COMMANDS RS 232 AND IP 25 3 2 1 Naming Functions 26 3 2 2 Routing Functions 26 3 2 2 1 To make a video tie 26 3 2 2 2 To make an audio tie 27 3 2 2 3 To make a synchronized audio video tie 27 3 2 3 Preset Pattern Saving and Routing Functions 27 3 2 3 1 To recall a saved preset Video routing pattern 27 3 2 3 2 To save the current Audio...

Page 5: ...asics of Serial Communication with the Outputs 32 3 2 13 2 Commands for Serial Communication with each Output 33 3 2 14 IP Control Basics 34 3 2 14 1 IP Setup Commands using the RS 232 Serial Port 35 3 2 14 2 IP Configuration through port 23 37 4 0 MAINTENANCE AND TROUBLESHOOTING 40 4 1 MAINTENANCE 40 4 2 TROUBLESHOOTING 40 5 0 SPECIFICATIONS 41 APPENDIX 1 FRONT PANEL QUICK REFERENCE GUIDE 42 APPE...

Page 6: ...ustments Input Type Option C Blank HD15 VGA RGBHV or HDTV YPbPr JP RJ45 UTP with power to senders JA RJ45 UTP with Audio of Inputs Option D 16 16 Inputs 8 8 Inputs Output Type Option E Blank HD15 VGA RGBHV or HDTV YPbPr JP RJ45 UTP with Power to receivers JA RJ45 UTP with Audio JR RJ45 UTP with RS232 JAR RJ45 UTP with Audio RS232 of Outputs Option F 16 16 Outputs 8 8 Outputs For Example VSM 16 16 ...

Page 7: ...on the front panel through one or two serial RS232 control ports or remotely via IP port 1 1 Features 9 Allows cross point switching of PC or HD video and audio signals 9 Multiple control methods including front panel serial and IP ports 9 Switched output can be blanked or muted 9 Wide bandwidth to support PC resolutions to 1920x1200 or HD to 1080p 9 Balanced stereo audio outputs allow interferenc...

Page 8: ...ose with HD15 connectors and then for units having RJ45 inputs Please keep in mind that some of the following information may not apply to every matrix switch 2 1 1 AV inputs on standard unit Figure 2 Audio and video inputs on Standard 16x16 unit 2 1 1 1 Video inputs The video connectors on the basic unit are HD15 female These are compatible with PC s VGA video signal RGBHV The Matrix is also comp...

Page 9: ...and Play LCD The procedure for doing this varies depending on the operating system and the video card in the PC It is generally found under Control Panel Display Settings Advanced Monitor tab An alternative method is a hardware solution which does not require any changes to the PC s display settings Hall Research manufactures EDID Emulators that are constructed as simple HD15 pass through adapters...

Page 10: ...ecause most notebook power supplies do not properly provide an AC ground path to the system ground some only have only 2 prong AC cords The switching power supply circuit will inject noise into the audio lines In this case the solution may be to attach a low resistance ground strap to the notebook The other option for eliminating the noise is to use a stereo audio Balun or isolator The Balun essen...

Page 11: ...5 from Receiver or Matrix Switch UVB1 CP S Active Balun with Ground Loop Isolation Component Video YPbPr Active Balun Sender for SD HDTV for up to 1000 ft and resolutions up to 1080p Compatible with UVB1 CP R and UV1 R WP wallplate receivers Includes Power Supply Can also be powered via Cat5 from Receiver or Matrix Switch 2 1 2 2 RJ45 input with Video and Audio The JA units are compatible with Hal...

Page 12: ...UVA 2 2 Channel VGA Audio to UTP CAT5 Video Splitter Sender UVA 4 4 Channel VGA Audio to UTP CAT5 Video Splitter Sender Supports 1600x1200 Local ports UVA 8 8 Channel VGA Audio to UTP CAT5 Video Splitter Sender Supports 1600x1200 Local ports 2 2 Output Audio Video Connections The output connections are described below first for standard units with HD15 and then for those with RJ45 outputs Figure 4...

Page 13: ...of each side that offer immunity to noise Figure 5 Typical balanced audio output connector The balanced audio outputs are provided on detachable screw terminals Mating connectors for all outputs are also provided Technical Note about Professional Audio Output Matrices with Pro Audio option can individually adjust the audio levels at each input Additionally they can set all the outputs to pro line ...

Page 14: ...d there Compatible receivers are listed in the following table PART NUMBER UV1 R Mini Cat VGA on UTP Receiver UV1 R WP Mini Cat VGA on UTP Receiver Single gang Wall Plate UVB1 CP R Component Video YPbPr Active Balun Receiver for SD HDTV for up to 1000 ft and resolutions up to 1080p 2 2 2 2 RJ45 output with Video and Audio JA The JA units are compatible with Hall Research s URA series of receivers ...

Page 15: ...For bidirectional communications please contact Hall Research sales for the compatible receiver Currently available compatible receivers are listed in the following table Technical Note about Video RS232 Outputs The matrices with JR output option are capable of sending and receiving RS232 data independently at each of the RJ45 outputs with the video on the same Cat5 cable The output channel number...

Page 16: ...2 port is on a screw terminal and the auxiliary port is on an RJ45 Caution on RJ45 Control Input Both matrices with IP control and those without have an RJ45 connector next to the RS 232 screw terminal This RJ45 connector is a 10 100 Base T Ethernet for the matrix with IP or a secondary RS 232 Serial control port for those matrices without IP feature It is easy to confuse their function A sure way...

Page 17: ...imary port The user can control the matrix from either or both ports The auxiliary RS 232 connector is an RJ45 Make sure to not connect this to any LAN devices The pinout for the auxiliary RS 232 follows the basic EIA 561 for TX RX and Ground Optional current limited 12v DC may also be provided max rated output current of 50 maDC that can be used to power external keypads or control devices please...

Page 18: ...serial commands via RS232 or through the IP port 3 1 Front Panel Buttons and Indicators An image of the front panel for the 16x16 matrix is shown below The 8x8 units have fewer INPUT and OUTPUT buttons than shown in this picture Figure 11 VSM 16 16 front panel controls indicators The front panel can be used for the following purposes Monitor Power On Off status View current routings ties either fr...

Page 19: ...is point you have to decide if you want to view from the point of view of the input or the output side To View from input side Press and release any Input button the backlit LED of that button will light and all the backlit LEDs for the outputs whose video and audio are both currently tied to this input will also light up solid Note If there is audio breakaway the output LED will not be lit An exa...

Page 20: ...u have to decide if you want to view from the point of view of the input side or the output side To View from input side Press and release any Input button the backlit LED of that button will light and all the backlit LEDs for the outputs whose video is currently tied to this input will also light up solid You can now use the and buttons to quickly go through all inputs You can also make new ties ...

Page 21: ...so make new ties by hitting output buttons New ties will not take effect unless ENTER is hit see next section When you are done viewing ties to exit you can hit ENTER If you don t hit any buttons then after 8 sec the view function times out and all the input and output LEDs will go out To View from output side Press and release any output button the backlit LED of that button will light and if tha...

Page 22: ...nput and output LEDs will go out Video only or Audio only Press and release the AUD and or VID buttons so that the backlit LED of the desired button is lit and the other one is off Follow the same procedure as described above 3 1 2 2 Making a tie by Output Video and Audio to follow each other Make sure both VID and AUD LEDs are lit indicating that your changes will be synchronized i e audio and vi...

Page 23: ...rrent AV routing pattern press and hold the PRESET button for 3 sec the backlit LED will start flashing this means that save preset function has been activated Press the desired input button to save the preset the button with light up Then hit the ENTER button to complete the operation Again you have 8 seconds to complete this sequence 3 1 5 Disconnecting all AV outputs blank preset There is a hid...

Page 24: ...ibility with a mixture of consumer and pro line levels at the inputs Press and hold the AUD button for approximately 3 seconds until the backlit LED starts to blink Press and release an input button whose audio you want to adjust The associated input LED lights up the matrix will temporarily route the audio input from the selected channel to audio output 1 and monitor its level on the front panel ...

Page 25: ...nnel row indicates the sound level The indicated gain attenuation is based on the matrix s internal reference level of 10dBV standard line level On a 16x16 matrix LED position 10 corresponds to 0 VU desired peak level Position 1 corresponds to 20 VU and position 16 corresponds to 6 VU Figure 12 Comparison with Analog VU meter on a 16x16 Matrix Figure 13 Graph of VU dB level versus LED bar length ...

Page 26: ...el you are adjusting another blinking LED indicates the audio gain setting Again position 10 indicates 0 db or gain of 1 The range of adjustment is about 24 dB to 6 dB position 1 to position 16 Figure 14 Graph of Audio Gain level versus Volume setting LED position In adjusting the volume you want to keep the sound level as read on the VU meter at or below Position 10 0 VU for the loudest level at ...

Page 27: ...ter These are available from Hall Research Model USB RS232 1 Figure 15 USB to RS 232 Adapter Use Figure 8 to connect the unit to the PC s serial port Use 9600 Baud 8 bits No Parity 1 Stop bit No flow control Upon power up the Matrix will output a screen similar to the figure below through its serial port s Figure 16 Power on screen Note on RS 232 commands When the front panel is in use for example...

Page 28: ...means that any place a is used as a valid command it means ALL OUTPUTS For example CV 1 means to connect all outputs to input 1 Blanking Video or Muting Audio When a 0 is used as an input channel number it means that the intent is to either blank when used with a video command mute when used with an audio command or both For example CV 0 means to blank all video outputs CA 0 means to mute all audi...

Page 29: ...r Note If the system does not have audio it will still accept this command but response will be missing audio tie line 3 2 3 Preset Pattern Saving and Routing Functions 3 2 3 1 To recall a saved preset Video routing pattern Command PRx cr stands for Preset Recall x preset can be 1 to 16 Response PRx cr CVn1 m1 cr CVn2 m2 cr 3 2 3 2 To save the current Audio Video routing pattern to a preset Comman...

Page 30: ...nd has no bearing on the audio input volume adjustment procedure To set audio output line level mode Command LPn cr stands for Line level Pro n 0 1 0 consumer 1 pro If the parameter n is missing then the unit will respond with the current setting Response LPn cr 3 2 7 To Adjust Audio Input Gain and Attenuation This command is valid for units with Pro Audio AP The wildcard character is acceptable f...

Page 31: ... 2 9 To Read Temperature inside the Matrix Command RT cr stands for Read Temperature Response Temperature in degrees C 32 500000 cr Temperature in degrees F 90 500000 cr 3 2 10 To Read the Firmware Version Command RI cr stands for Read Identity Response Unit s name User defined name of the unit Version 2 4 Firmware Version Build 7 Build number for mfg purposes only VSM I A 8 8 Model Characteristic...

Page 32: ... specific times throughout the day where any preset patterns 0 to 16 can be recalled You can set a schedule that is the same every day daily or is different for weekdays and weekends Presets 1 to 16 are those saved by the user and preset 0 disconnects all video and audio outputs Notes on Scheduling Presets When defining a schedule to skip the current prompt without making a change press ENTER Pres...

Page 33: ... to keep previous value Enter weekday Timer1 minute 00 59 Enter weekday Timer1 AM PM 0 1 Enter weekday Timer1 preset pattern 0 16 Remember Preset 0 disconnects outputs Data for timers 2 3 hit Esc if you are done at any time Enter weekday Timer4 hour 00 12 Enter weekday Timer4 minute 00 59 Enter weekday Timer4 AM PM 0 1 Enter weekday Timer4 preset pattern 0 16 Response if 4 was entered schedule on ...

Page 34: ...rix s outputs Matrix units with JR output option can send video and serial through the same RJ45 output connector A compatible receiver must be used at the remote end such as UR 232 for transmit only Referring to the above diagram two control ports are shown on the left The user communicates with the matrix s internal processor through either of these ports As seen on the right side of the block d...

Page 35: ...e than 64 characters to send then you have to use multiple commands The unit stores all characters in a buffer and then sends all characters at the specified baud rate to the desired output channel The unit does not care what data or characters are sent and they can range from hex 0 to hex FF What designates the end of the string are two specific bytes 17h 0Dh 17 hex W followed by 0D hex Carriage ...

Page 36: ... X Parity n 0 1 2 Tranmit Parity to target None Odd Even respectively Response XP n cr 3 2 14 IP Control Basics Figure 18 Control Block Diagram As shown in the figure above the matrix can be controlled via RS232 Serial port or through an IP Ethernet port if equipped If the unit is missing the IP port then in its place there is an auxiliary 2nd serial control port see section 2 4 1 2 The IP port of...

Page 37: ...P setting mode Response Enter IP commands This is the normal response meaning that IP setting through the RS 232 port is allowed Alternate Response IP commands not enabled Please refer to the manual This message indicates that IP setting through the RS 232 port is disabled on your unit for some reason Please refer to section 3 2 12 2 below to enable this mode 2 To get the current IP address of the...

Page 38: ...Response 1001 9 To set a port number IP port that controls the Matrix Command SPN1000 cr stands for Set Port Number Response OK if command completed successfully Error if command failed 10 To get a device host name Command GDN cr stands for Get Device Name Response xxxxxxxxxx Note on Device Name This is the host name assigned to the IP port it is independent of the name assigned to the matrix NU c...

Page 39: ...s default IP address as the host address Telnet commands and replies have the following format STX Command reply CR STX character ASCII code 2 or CTRL B from the keyboard The unit will respond with CTRL B A for most valid commands 1 To use the IP configuration Telnet commands you must first log in using the L command Command CTRL B L CR stands for Log in 2 To enable a serial IP setting serial prog...

Page 40: ...R 8 To set a subnet mask Command CTRL B SNM255 255 255 0 CR 9 To get a port number Command CTRL B GPN CR Response CTRL B A 1001 CR 10 To set a port number Command CTRL B SPN1000 CR 11 To get the current device name Command CTRL B GDN CR Response CTRL B A BB1123 A CR 12 To set a new device name Command CTRL B SDNconcert_hall CR 13 To Reboot device for the new parameters to take effect Command CTRL ...

Page 41: ...nn is any number except 180 Note on Accessing the Matrix via the Internet It is best to contact your IT or network administrator for assistance As mentioned earlier you can control the matrix through its IP via port 1001 default Most likely the unit will be on a local network connected to an Ethernet Switch or Router with a WAN connection To access the matrix from outside your local network you sh...

Page 42: ...xists inside the unit Opening the unit also voids your warranty If there is a problem with the 12 or 5v supplies you need to return the unit for repair Please see next section If the temperature is excessive in the unit you must make sure that there is adequate air flow around the unit 4 2 Troubleshooting Make sure that all your connections are solid and check the state of the LED s on the front o...

Page 43: ... Unbalanced Stereo Audio Input Levels 0 to 4dBu 0 78 to 1 23Vrms line level Audio Outputs Balanced Stereo on screw terminals Audio Bandwidth 10 Hz to 10 MHz could pass through analog or digital S PDIF audio sources Temperature Operating 32 to 122 F 0 to 50 C Storage 40 to 185 F 40 to 85 C Enclosure Steel with Aluminum front panel Battery Type CR2032 3v Lithium MTBF 90 000 hours calculated estimate...

Page 44: ...ton lights up Hit any of the 16 INPUT buttons Hit ENTR Save Presets Hold PRE until it starts blinking Hit any of the 16 INPUT buttons Hit ENTR Disconnect all outputs Hit PRE button lights up Hold While holding the hit button Reset to Factory Defaults Disconnect power Hold ENTR While holding ENTR plug power Set output audio line levels to Pro 4dBu Hold AUD until it starts blinking Hit either or but...

Page 45: ...to mute the output PRx Preset Recall x preset can be 1 to 16 PSx Preset Save x preset can be 1 to 16 NU Name Unit FR Factory Restore back to default settings FB Firmware Boot Resets the entire system RT Read Temperature RI Read Identity firmware version characteristics RV Read Voltage levels battery power supply RB Read Bar reads VU level of output 1 Left Chan DS Date and Time Read Set SS Schedule...

Page 46: ...44 Hall Research Technologies Inc ...

Page 47: ......

Page 48: ...Product Designed and Made in the USA ...

Reviews: