84
Maintenance and Service
5.5.1
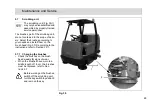
Filling the solution tank
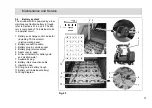
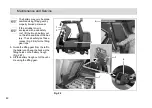
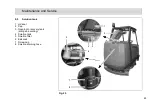
Fill the solution tank (Fig. 25/4) with
fresh water and cleaning agent before
starting with the work, also refer to Sec-
tion 3.1.4.
1. Park the vehicle on a level floor area.
2. Open the tank cap (Fig. 25/2) and
lock in place.
3. Fill the solution tank to the maximum
mark.
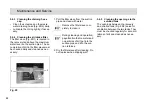
5.5.2
Emptying the solution tank
If the vehicle is to be left unused for a
longer period, the solution tank
(Fig. 25/4) should be emptied.
1. Park the vehicle so that the solution
draining hose (Fig. 25/8) can be
positioned over a drain in the floor.
2. Open the left and right rear doors.
3. Detach the solution draining hose
(Fig. 25/8) and lower it slowly.
4. Unscrew the screw cap (Fig. 25/7).
The quantity drained can be
regulated by turning the screw cap
and pivoting the cap open fully, if
necessary.
5. When the solution tank has been
completely emptied, screw the cap
shut again and attach the draining
hose again.
6. Close the left and right rear doors.
When disposing of the waste
water containing the cleaning
agent, observe all applicable
legal regulations.
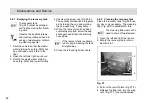
5.5.3 Cleaning the draining hose
cap
• The screw cap (Fig. 25/7) at the end
of the draining hose (Fig. 25/8)
should be cleaned at regular
intervals.
• Lubricate the O-ring lightly, if
necessary.
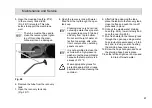
5.5.4 Cleaning the solution filter
The solution feed is equipped with a fil-
ter (Fig. 25/5) which must be cleaned if
dirt appears on the container. This is lo-
cated on the left-hand side of the vehi-
cle at the height of the brushes behind
the side panel.
1. Pivot the right-hand side panel up.
2. Close the ball cock (Fig. 25/6) to
prevent solution being supplied from
the tank.
3. Unscrew the container by hand and
pull the sieve insert out downwards.
4. Clean both parts with water and
reassemble them.

