


19
- HDMI
. The HDMI logo and High-Definition Multimedia Interface is a trademark
or registered trademark of HDMI Licensing.
-This TV can receive the High-Definition Multimedia Interface (HDMI).
-This TV supports HDCP (High-bandwidth Digital Contents Protection) Protocol for
720x480p, 1280x720p, and 1920x1080i resolution.
-When you connect this TV with a source device (DVD player, Set Top Box or PC)
supporting Auto HDMI function, the output resolution of the source device will be
automatically set to 1280x720p.
-If the source device does not support Auto HDMI, you need to set the output
resolution appropriately.
To get the best picture quality, adjust the DVD Player or Set Top Box’s output resolution
to 1280x720p, and the PC graphics card’s output resolution to 1024x768, 60Hz.
-If the source device has an HDMI output, no other audio connection is necessary
because HDMI-to-HDMI connecting includes both video and audio.
How To Connect
1. Connect the source device to HDMI port of this TV with an HDMI cable (not
supplied with this product).
2. No separated audio connection is necessary.
How To Use
-If the source device supports Auto HDMI function, the output resolution of the source
device will be automatically set to 1280x720p.
-If the source device does not support Auto HDMI, you need to set the output resolution
appropriately.
To get the best picture quality, adjust the output resolution of the source device to
1280x720p.
-Select HDMI input source by using TV/AV button.
How To Set
The method to set is similar to TV mode.
OTHER SETTING FUNCTION
TM
20
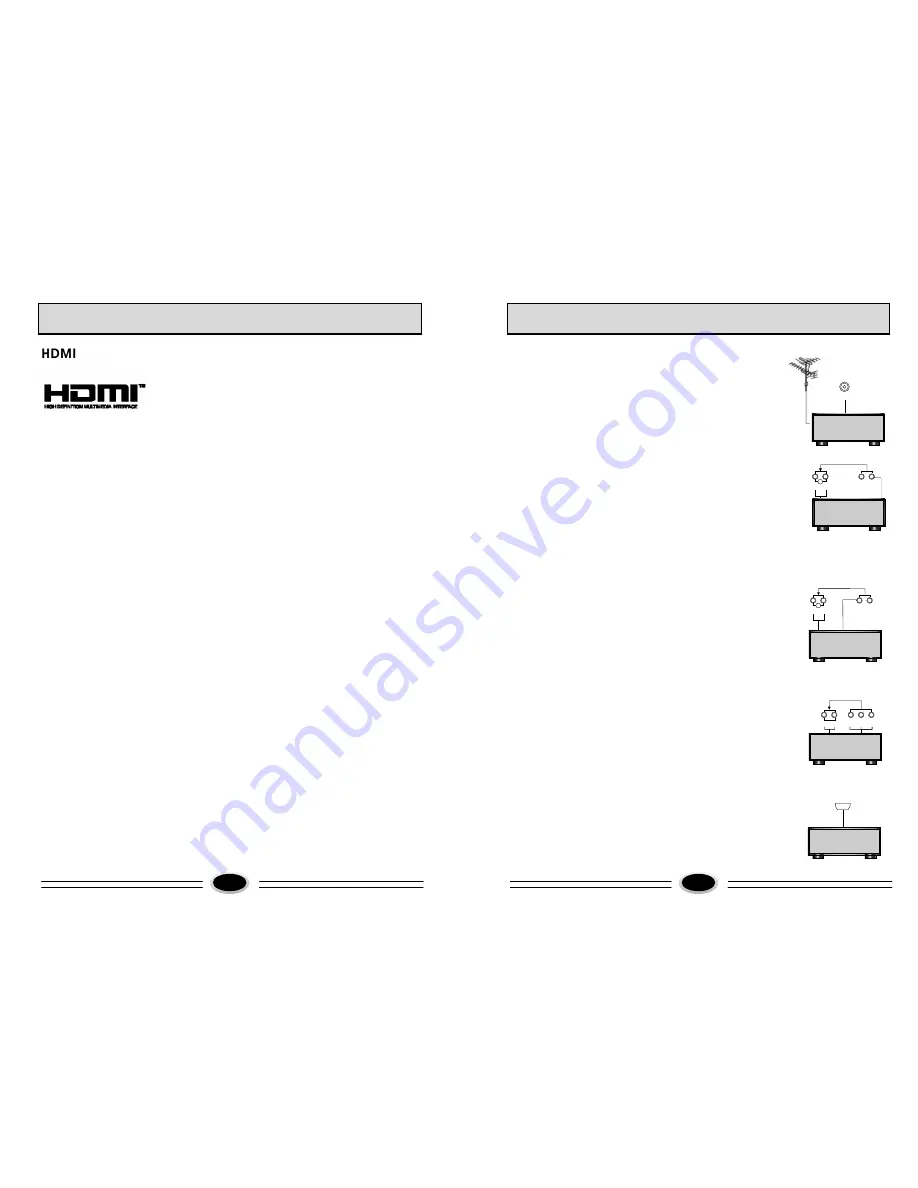
EXTERNAL AUDIO AND VIDEO EQUIPMENT CONNECTION
You can connect outside signal source VCR VCD
DVD PC equipment to the TV set.
Antenna Input
1.Connect the VCR radio frequency input to
the back radio frequency input of the LCD.
2. Connect the antenna to VCR antenna input.
3. Press TV/AV button to select TV mode.
4. Press PLAY button in VCR to start watching.
AV input
1.Connect audio video output port in VCD to
AUDIO IN and VIDEO IN port in TV set.
2. Press TV/AV button to select composite
VIDEO mode.
3. Press PLAY button in VCD to start watching.
S-VIDEO input
If you use S terminal as signal input source,
the image quality will be better than video(AV).
1.Connect S terminal output in DVD to S terminal
input in TV set.
2.Connect S terminal left/right audio output in DVD to
the relevant port in TV set.
3.Press TV/AV button repeatedly until the display
mode is S-VIDEO.
4.Press PLAY button in DVD to broadcast. At this time
the image programs in DVD will broadcast in TV set.
DTV input
1. Component terminal (Y/PbCb/PrCr) connect to the
component output of picture output device (such as
DVD, HDTV TUNER and so on ), the sound is input
from AUDIO IN:
2.Press TV/AV button to select HDTV mode.
3.Press PLAY button on the external device to start
watching.
HDMI input
1.Connect HDMI signal source output to the HDMI
input in this TV set.
2.Press TV/AV button to select HDMI mode.
3.Press PLAY button on the external device to start
watching.
ANT .
VCR
AUDIO IN
LL
RR
S-VIDEO
I N
VIDEO IN
VCD
A UD IO IN
L
R
S -V IDEO
IN
VIDEO IN
DVD
DVD
LL
RR
AU DI O IN
Y C b/Pb C r/Pr
HDMI
DVD
Summary of Contents for L26A6A-A1
Page 3: ......