background image

1- Safety information

GB

6


WARNING!

Installation 


Do not damage the refrigerant circuit. 


A shut-off valve must be installed between the hose and the do

-

mestic water connection in order to be able to interrupt the water 

supply if necessary.


The shut-off valve must be easy accessible after installation.


Install a pressure reducer when the water pressure in the hose 

exceeds 0.6 MPa.


Make sure only the delivered hose set are used. Old hose-sets 

should not be reused.


Only connect to drinking water supply.


Make sure the hose joints and connections are firm and there is 

no leakage.

Daily use


This appliance can be used by children aged from 8 years and 

above and persons with reduced physical, sensory or mental ca-

pabilities or lack of experience and knowledge if they have been 

given supervision or instruction concerning use of the appliance 

in a safe way and understand the hazards involved. 


Keep away children under 3 years of age from the appliance un-

less they are constantly supervised.


Children shall not play with the appliance.


If cool gas or other inflammable gas is leaking in the vicinity of the 

appliance, turn off the valve of the leaking gas, open the doors 

and windows and do not unplug a plug in the power cable of the 

appliance or any other appliance. 


Notice that the appliance is set for operation at a specific am

-

bient range between 10 and 43°C. The appliance may not work 

properly if it is left for a long period at a temperature above or be-

low the indicated range. 


Do  not  place  unstable  articles  (heavy  objects,  containers  filled 

with water) on top of the appliance, to ovoid personal injury 

caused by falling or electric shock caused by contact with water. 

Summary of Contents for HRF-522IS6

Page 1: ...GB User Manual Refrigerator Freezer HRF 522I 6 HRF 522I 7 Colour code S T CR BB W N GW G B GR X F or M...

Page 2: ...GB 2...

Page 3: ...get the best out of the appliance and ensure safe and proper installation use and maintenance Keep this manual in a convenient place so you can always refer to it for the safe and proper use of the a...

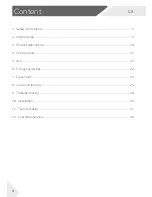
Page 4: ...rmation 5 2 Intended use 9 3 Product description 10 4 Control panel 11 5 Use 12 6 Energy saving tips 22 7 Equipment 23 8 Care and cleaning 25 9 Troubleshooting 28 10 Installation 32 11 Technical data...

Page 5: ...e appliance in an area suitable for its size and use Keep ventilation openings in the appliance or in the in built struc ture clear of obstruction Makesurethattheelectricalinformationontheratingplatea...

Page 6: ...and knowledge if they have been given supervision or instruction concerning use of the appliance in a safe way and understand the hazards involved Keep away children under 3 years of age from the app...

Page 7: ...arbonated beverages in the freezer as these will burst during freezing Checktheconditionoffoodifawarminginthefreezerhastakenplace Do not set unnecessarily low temperature in the refrigerator compartme...

Page 8: ...zard Do not try to repair disassemble or modify the appliance by your self In case of repair please contact our customer service Eliminate the dust on the back of the unit at least once in the year to...

Page 9: ...tels and other residential type environments as well as in bed and breackfast and catering business It is not intended for commercial or industrial use Changes or modifications to the device are not a...

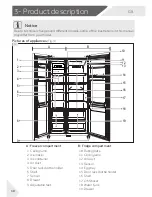
Page 10: ...or rack bottle holder 6 Shelf 7 Sensor 8 Drawer 9 Adjustable feet A Freezer compartment 10 Rating plate 11 Ceiling lamp 12 Air duct 13 Sensor 14 Egg tray 15 Door rack bottle holder 16 Shelf 17 OK Stic...

Page 11: ...elector and Super Freeze function on off C Fuzzy mode and Holiday function on off D Ice Maker function on off E Cool Water function on off and reset of Change Filter indicator F Panel lock selector In...

Page 12: ...them out of children s reach and dispose them in an environmentally friendly manner Clean the inside and outside of the appliance as well as the interior and accessories with water and a mild deterge...

Page 13: ...othaveanyspecialrequirements werecom mend that you use fuzzy mode In the Fuzzy mode the appliance can automatically ad just the temperature setting according to the ambient temperature and temperature...

Page 14: ...rtment is displayed Fig 5 7 2 3 3 Touch sequentially key B Freezer until the desired value of temperature is flashing Fig 5 7 2 4 A signal will sound at each key press The tempera ture increases in se...

Page 15: ...s 5 9 Super Freeze function Fresh food should be frozen as quickly as possible to the core This preserved the best nutritional value ap pearance and taste The Super Freeze function ac celerates the fr...

Page 16: ...ce maker depends on the ambient temperature frequen cy of freezer door openings and freezer compartment cooling temperature setting Typical quantity of ice production per day is 1 5kg 1 Take care the...

Page 17: ...dispenser lever with your glass Fig 5 12 1 WATER DISPENSER 5 12 1 5 11 1 Getting ice cubes 1 Take care the Ice Maker function is activated 2 Lift the ice container 1 and pull it out 2 Fig 5 11 1 3 Rem...

Page 18: ...er initial start up or following a lengthy break in use The first few glass of water you take out will be warmer than the next glasses This is normal If you like very cold water first put ice cubes fr...

Page 19: ...way oily acid dirt whenever it is found Defreeze frozen food in the fridge storage compartment This way you can use the frozen food to decrease the temperature in the compartment and save energy The a...

Page 20: ...isonous and nontoxic In order to avoid expiration of storage periods please note the freezing date time limit and name of the food on the packaging according to the storage periods of dif ferent foods...

Page 21: ...ome point temper ature rises affect the quality of food Consume defrosted food quickly Defrosted food cannot be re frozen unless it is first cooked otherwise it may bless edible Do not load excessive...

Page 22: ...sumption in creases the lower the temperature in the appliance is set Functions like Super Cool or Super Freeze consume more energy Allow warm food to cool down before placing it in the appliance Open...

Page 23: ...sert the door rack bottle holder the above steps are carried out in reverse order 1 2 1 7 1 7 2 7 4 Removable drawer To remove the drawer out of the fridge or freezer com partment pull out to the maxi...

Page 24: ...5 1 Removable shelf below the ice container 1 Press 1 the hook on the rear of the shelf upwards and then pull 2 the shelf forward so the hook is released Fig 7 5 1 1 2 Repeat step 1 on the other side...

Page 25: ...1 General Clean the appliance when only little or no food is stored The appliance should be cleaned every four weeks for good maintenance and to prevent bad stored food odors WARNING Do not clean the...

Page 26: ...both sides of the filter A anddisconnectbothpipes 2 Fig 8 5 1 2 Install the new filter in correct position the dart shows the direction of water flow Repeat step 1 in reverse order 3 Put the plug into...

Page 27: ...ction for the fridge Turn off the water supply some hours earlier before you switch off the appliance Take out the food Empty and clean the ice container Empty the water tank by using the water dispen...

Page 28: ...or gasket is dirty worn cracked or mismatched Clean the door gasket or replace them by the customer service The required air circulation is not guaranteed Ensure adequate ventilation The inside of the...

Page 29: ...ure accumu lates on the fridg es outside surface or between the doors The climate is too warm and too damp This is normal in damp climate and will change when the humidity de creases The door is not c...

Page 30: ...s than 0 15 MPa Check water pressure Filter is blocked Change the filter Cool Water Ice Maker function is not activated Activate Cool Water Ice Maker function Environmentalconditionsarenot sufficient...

Page 31: ...r than 5 hours make some ice and put it in a container in the top of the fridge com partment An inspection of the goods is required immediately after the interruption As temperature in the fridge will...

Page 32: ...cross section To achieve sufficient ventilation of the appliance for safety reasons the information of the required ventila tion cross sections must be observed Fig 10 4 50mm 10 4 Take the appliance...

Page 33: ...e pipe B1 B2 A 1 2 3 2 D E F 10 5 1 ArtNo 601 0010 SxS 661 9 Pipe to filter A B1 10 5 2 ArtNo 601 0005 SxS 661 9 Securing the p B1 A C 10 5 3 3 4 1 2 E F B2 D B1 10 5 4 10 5 5 Notice Water connection...

Page 34: ...ing the appliance to the power supply you have to wait at least 2 hours Fig 10 8 so that the oil runs back into the capsule 2 h 10 8 WARNING Do not adjust the hinge lifting shaft excessively to a heig...

Page 35: ...fore each connection check if power supply socket and fusing are appropriate to the rating plate the power socket is earthed and no multi plug or extension the power plug and socket are strictly accor...

Page 36: ...remove it 3 4 5 Refit the door by reversing the removal steps En sure that the grounding cable will be fixed by the screw 6 Refit the water coupler on the back of appliance see step 1 5 Notice Fridge...

Page 37: ...ing L 165 Star rating Temperature of other compartments 14 C Non applicable Frostfree system Yes Temperature rise time h 5 Freezing capacity kg 24h 12 Climate class This appliance is intended to be us...

Page 38: ...nty For general business enquiries please find below our addresses in Europe European Haier addresses Country Postal address Country Postal address Italy Haier Europe Trading SRL Via De Cristoforis 12...

Page 39: ...GB 39...

Page 40: ...HRF 522I 6 522I 7_GB V04_012017...

Reviews: