GB
10- Installation
33
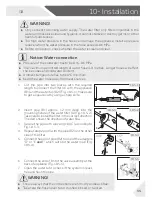
1. Cut the pipe into two pieces with the required
length to connect the filter (A) with the appliance
(B1) and the water tap (B2) (Fig. 10.5-1). Make sure
to get a square cut by using a sharp knife.
2. Insert pipe (B1) approx. 12 mm deep into the
mounting fixture of the water filter (A) (Fig. 10.5-2).
Take care to install the filter in the correct direction.
The dart shows the direction of water flow.
3. Secure the pipe with a locking clip (C) according to
Fig. 10.5-3.
4. Repeat step 2 and 3 with the pipe (B2) on the other
side of the filter
5. Connect the end of pipe (B2) to one of the adapters
“D” or “E
and
F” which suits to the water main (Fig.
10.5-4).
6. Connect the end of B1 to the valve assembly at the
back of appliance (Fig. 10.5-5).
7. Open the water tab to check if the system is leack
free and flush the pipe.
B1
B2
A
1/2“
3/2“
D
E
F
10.5-1
ArtNo.601-0010 - S xS 661-9 - Pipe to filter
A
B1
10.5-2
ArtNo.601-0005 - S xS 661-9 - S ecuring the p
B1
A
C
10.5-3
3/4“
1/2“
E
F
B2
D
B1
10.5-4
10.5-5
Notice: Water connection
▶
Pressure of the cold water has to be 0.15-0.6 MPa.
▶
The maximum permitted length of water hose is 8 metres. Longer hoses will affect
the ice cubes and cold water content.
▶
Ambient temperature has to be 0°C minimum.
▶
Keep the water hose away from heat sources.
WARNING!
▶
Ensure always that the connections are firm, dry and leack free!
▶
Take care the hose never to be crushed, kinked, or twisted
WARNING!
▶
Only connect to drinking water supply. The water filter only filters impurities in the
water and makes ice clean and hygienic. It cannot sterilize or destroy germs or other
harmful substances.
▶
Too high water pressure in the hose can damage the appliance. Install a pressure
reducer when the water pressure in the hose exceeds 0.6 MPa.
▶
Before connection, check whether the water is clean and clear.
Summary of Contents for HRF-522IS6
Page 2: ...GB 2...
Page 39: ...GB 39...


