hager domovea TJA450 Installer Manual Download Page 27

2

7

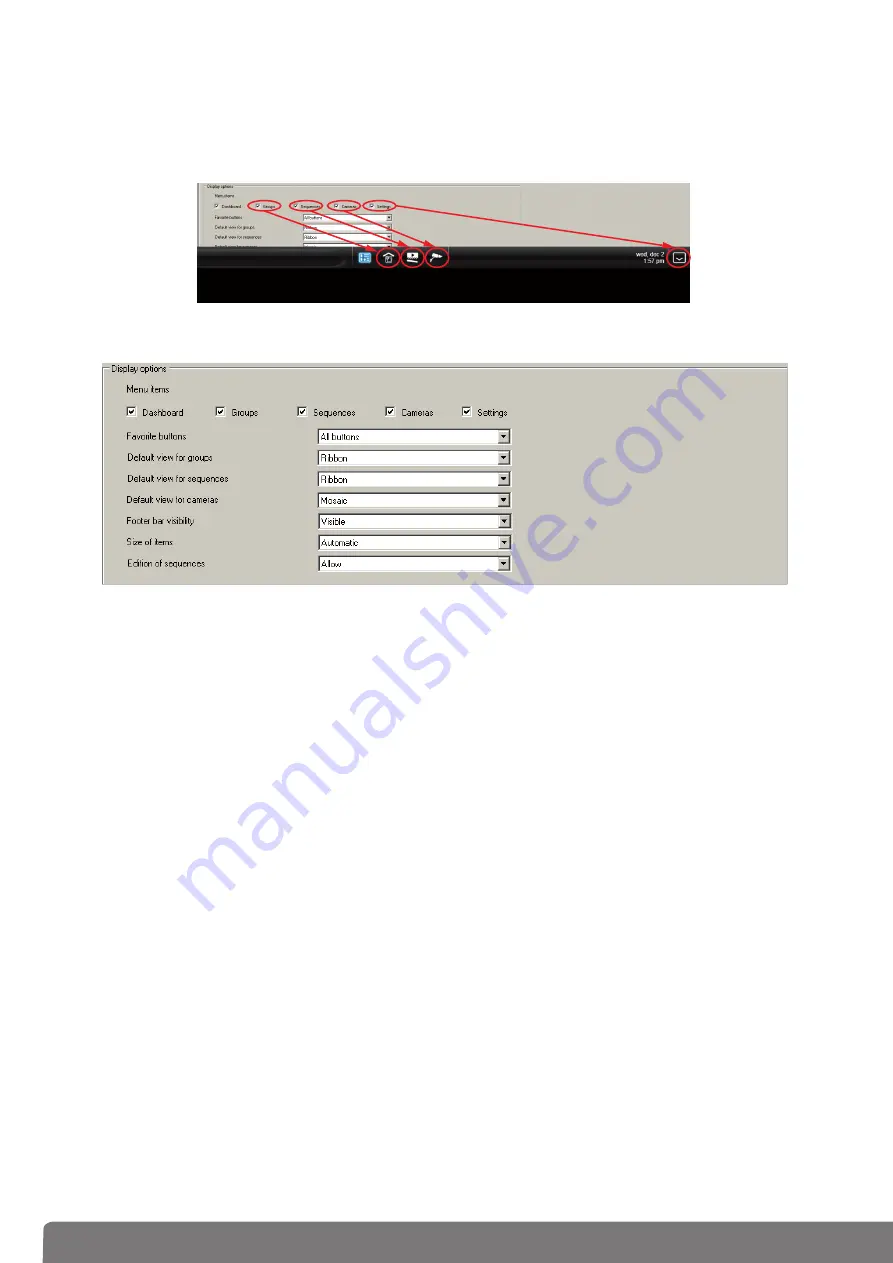
Desktop items: to select the favorite buttons of your choice to be displayed in the client software

(Control panel, Groups, Sequences, Cameras, Parameters).

Favorite buttons:

to select the displayed buttons

- All buttons: undisplayed buttons

- The button to display/hide the favourites: to display only the 'display/hide favourites' button

- No button: no button is displayed

Default view for groups/sequences/cameras:

to 

define 

the default view of groups/sequences/

cameras:

- Mosaic: display in a mosaic form

- Ribbon: display in a ribbon form 

- List: display in a list form

- No button: display of any button

Display of bottom bar:

to display or name the toolbar displayed at the bottom of the screen of the

client view

- Visible: full display of the toolbar 

- Reduced: simplified display of the toolbar

- Invisible: toolbar not displayed

Size of elements:

to select the size of the elements

- Normal: display of the elements to the default size 

- Wide: display of the elements to a size larger than the default size 

- Automatic: automatic scaling of the elements according to their number

Editing of sequences:

to authorize or not the editing of the sequences by the final client

- Authorize: to authorize the editing of sequences by the final client 

- Prohibit: to pr

ohibit editing of sequences by the final client 

 On 

Configuratio

n

sheet, in 

Password


protectio

n

(

5

), it’s possible to disable the access to certain areas

by password. 

Prom

p

t


for

 p

assword

to indicate the password used to access 

On 

client


startu

p

On

settings access

and 

Wh

en na

v

igati

n

g


outside default grou

p

.

 In the 

Configuration tab

, Display Options (

6

), the display features of the client toolbar can be set.

Summary of Contents for domovea TJA450

Page 1: ...tebis domovea server TJA450 GB...

Page 2: ...2 domovea server Installer manual...

Page 3: ...nection without DHCP server 9 2 Con guration tool description 10 2 1 General menu 10 2 2 Con guration menu 13 3 Start up guide for the Con guration tool 14 3 1 De ne the structure of the building 14 3...

Page 4: ...and has to be installed on a computer on a touch panel or on Media Center Up to 30 Clients may be installed behind a Server The Con gurator the con gurator is a software module also delivered together...

Page 5: ...uch as Microsoft Windows XP WIndows VISTA and Windows 7 1 4 Hardware installation server TJA450 The server should be installed in the VDI distribution panel 1 4 1 Connexion diagramm N B if there is no...

Page 6: ...255 255 It s possible to connect the server directly to the installer s PC where the con guration tool is installed In this case after 40 seconds the domovea server takes following IP address 192 168...

Page 7: ...d KNX network Loss of IP address of the server in xed IP con guration in this case the off line mode will en able you to read or recon gure the server IP address using domovea con guration software TJ...

Page 8: ...ck the Windows pause buttons Click the General tab the operating system will display as follows 64 bit operating system x64 will be printed after the name of the operating system 32 bit operating syst...

Page 9: ...etwork steps 1 through 7 Once both devices are on the same net you can work normally and proceed with next step Start the con guration tool and type the IP address of the server 8 to get connection an...

Page 10: ...address of KNX interface Default value 15 15 254 OK to validate Cancel to cancel the data entry Portal con guration to con gure the domovea portal settings See information note Portal remote access co...

Page 11: ...t OK to validate Adding and modifying a contact First name to enter the rst name of the contact Last name to enter the name of the contact Email to enter the contact email address Mobile phone to ente...

Page 12: ...er Occupation rate of icons and screen backgrounds indi cates the percentage of space used and maximum space usable for storing screen backgrounds and icons Con guration data size indicates the space...

Page 13: ...the selected archive Set as reference archive allows setting the selected archive as the reference archive on the server or on the portal View archive informations allows displaying the selected arch...

Page 14: ...g 3 oors with different rooms on each ground oor garage of ce First oor bedroom kitchen and sitting room Attic In each room there are different applications garage general OFF lights general UP shutte...

Page 15: ...be seen on the client when acceding to the group choose Background 5 To personalize the icon proceed a click on it 6 then select the requested icon in the displayed icon list and click on Apply 7 Afte...

Page 16: ...shutters dimmers etc and the result is the following 3 2 KNX Linking This chapter describes the procedure to link the created devices with the objects of the KNX project created by TX100 or ETS 3 2 1...

Page 17: ...ool bar of the Devices window allows to display all devices according to various criteria Allows to sort the devices based on type Light shutter scene meter Allows to sort the devices alphabetically A...

Page 18: ...e selected output or input type is different from that of the device the following message will be displayed Then click on OK and repeat the operation using compatible input or output Output No 1 grou...

Page 19: ...ing To create this new device do a right hand click of the mouse on the selected input in the right hand window Keeping mouse button depressed drag and drop input 1 to an empty section of the Devices...

Page 20: ...file select device view 1 and select the devices to be exported 2 To export data select File in the menu 1 then Save as CSV XML in submenu 2 then select Export 3 and the XML format 4 in the popup disp...

Page 21: ...S 3 Import the xml file of the ETS programming 4 The data of ETS addresses will appear on the right hand side of the screen To match the ETS addresses with the domovea structure you only have to drag...

Page 22: ...the esf le open your project in ETS select File in the menu 1 then Save as CSV XML in the sub menu 2 then select Export in the window to Export to OPC server 3 Select the destination directory name th...

Page 23: ...BL C2x 232D BL C3x 233D Sony SNC CSXXP series 241Q SNC DFXXP series 241S SNC DHXXX series M10xx SNC PX series M3011 SNC RX550P series M3014 SNC RZXXP series P3301 SNC Z20P series P3343 Vivotec 21XX se...

Page 24: ...plate 2 domovea invites you to select the template le with excam extension clicking on Open will validate the selection 3 A con rmation window appears and click on OK to validate 4 Once the process is...

Page 25: ...to define a new profile 2 On properties box fill Name to give a name to each profile created and Description to add a description to each profile 3 On Configuration sheet in General settings 4 fill L...

Page 26: ...can be selected 4 Mosaic type of view displays the devices under the form of icons and descriptions Details type of view displays the devices in a list form with their icon their name and their descri...

Page 27: ...l display of the toolbar Reduced simpli ed display of the toolbar Invisible toolbar not displayed Size of elements to select the size of the elements Normal display of the elements to the default size...

Page 28: ...rmats exist the 4 3 16 9 and most recently 8 5 The main screen size in pixels for the 4 3 screens are 800x600 1024x768 1152x864 1280x960 and 1600x1200 For 16 9 1366x766 1920x1080 and 2048x1152 And for...

Page 29: ...The launch of a sequence may be manual icon on a client but may also be a trigger built with schedulers bus events or device events The actions that can be done with sequences are to create new seque...

Page 30: ...lect Automation on the menu 1 and click on Add to define a new sequence 2 From the device list drag and drop each device to be included into the sequence 3 Select the status to be applied by double cl...

Page 31: ...tarting the sequence i e a bus event To add a starting event click List of starting events 4 then Adding 5 and On KNX bus event 6 Following window is displayed define parameters The condition is if be...

Page 32: ...type of notification email or domovea popup Contacts if the notification is an email use this field to define the recipient s of the email The contacts are defined in the General server settings Came...

Reviews: