background image

XLR Balanced Input

Check output from source for proper signal polarity

Pin 1

= GND

Pin 2

= (+)

Pin 3

= (–)

INPUT

FROM

SOURCE

XLR Unbalanced Input

Connect (–) and GND (shield) terminals at 

both ends

of cable to

prevent unstable amplifier operation

Pin 1

= GND

Pin 2

= (+)

Pin 3

= GND

INPUT

FROM

SOURCE

DETERMINING ACOUSTIC CENTER

Finding the “Acoustic Center” is accomplished by positioning the monitors so
coherent arrival of the transducers occurs at ear level. The Acoustic Center is
located 3 to 4 feet in front of the monitor, measuring perpendicularly from the
center point of the cabinet (midway between the woofer and tweeter). Our
tests have shown that a flat phase and frequency response occurs just above
and below the Acoustic Center with the minimum and maximum height
spanning between the tweeter dome and woofer dust cap.

– 6 –

XLR WIRING CONFIGURATIONS

Using the balanced XLR input is recommended for installations where long cable runs are used or when the potential for stray electromag-
netic fields from other wires exists.  There is a balanced and unbalanced method in which the XLR inputs can be used.  The first method is
an XLR Balanced Input using 3-conductor cable.  The balanced signals carried on pins 2 and 3 are equal in amplitude and opposite in phase.
Pin 1 is the ground and shield.   In this configuration, noise common on both phases of signal are effectively "canceled" out.  The second
method is an XLR Unbalanced Input using 2-conductor cable with the signal carried in the center conductor and the ground carried on the
shield.  Many popular mixers use unbalanced outputs and can be used with the XLR balanced input.  However, in this type of configuration
we recommend using twisted pair cable or short cable length to prevent residual ground noise.

INPUT SWITCH

The unbalanced input uses a conventional RCA phone jack. Move
the input switch ON (-->) to use this jack.  The balanced input jack
is an XLR plug.  The XLR jack is connected according to the IEC and
AES standard. Move the input switch OFF (<--) to use this jack.

MOUNTING

The monitor may be mounted on a wall or ceiling, using suitable
mounting hardware. The base of the monitor includes mounting
inserts designed for use with “OmniMount Systems®” or equivalent
mounting products

1

.

If you mount the monitors to a wall or ceiling, you must take special
care to mount them securely to prevent them from falling and caus-
ing damage or injury. Make sure that the mounting hardware (fas-
teners and connectors) and the surface you are mounting to are each
capable of securely holding the monitor in place even if it is struck
or moved. Make sure the mounting hardware, fasteners, and con-
nectors are rated for an object at least as heavy and bulky as the
monitor.

Use good judgement and common sense throughout all phases of
the installation and use mounting techniques appropriate for the sur-
face you select. Use the mounting hardware according to the man-
ufacturer's recommendation and provide adequate reinforcement to
the monitors if needed. Do not mount the monitor only to drywall—
make sure the fasteners are secured to a stud, joist, or other structural
support. If appropriate, use a secondary support for added safety—a
properly installed safety cable provides an extra margin of safety and
can be installed out of sight easily.


Unbalanced 
Input

Move input
switch 
RIGHT 
(-->) to use 
RCA
connector

Balanced 
Input

Move input 
switch 
LEFT (<--) 
to use 
XLR 
connector

OmniMount Part #

100 WB / 100 WBX

OmniMount Part #

100 ST-MP / 100 STX-MP

1 “OmniMount Systems®”

is a registered trademark of OmniMount 

Systems, 1501 West 17th Street, Tempe, Arizona 85281-6255, 

TEL (602) 829-8000 FAX (602) 756-9000. 

OmniMount Systems is not affiliated with Hafler or Rockford Corporation.

Summary of Contents for TRM6.1

Page 1: ......

Page 2: ...S A Importer s Name ________________________________________________________ Importer s Address ________________________________________________________ Type of Equipment 2 channel Audio Power Amplif...

Page 3: ...TC 20Hz 20kHz 0 1 THD 35 Watts RMS 6 ohms high frequency 50 Watts RMS 4 ohms low frequency Signal to Noise 100dB CMRR 70dB typical 1kHz Input Impedance 47k per phase balanced 47k unbalanced Input Sens...

Page 4: ...f the equip ment s plug be able to fully insert into the mating receptacle Never remove the round grounding pin on the plug in an attempt to mate to a two wire ungrounded receptacle use a grounding ad...

Page 5: ...rioente requerida pra la operaci n segura de todo el equipo conectado Aun m s las extensiones deben proveer de la misma conecci n aterrada de tres hiles Es importante que el enchufe se pueda introduci...

Page 6: ...rt des util isations de ce mat riel L utilisation de rallonge t d adaptateur est d consell e moins d tre en mesure de fournir la charge lectrique requise un fonctionement sans risque de tout mat riel...

Page 7: ...isten Anwendungen v l lig ausreicht Wenn Sie Verl ngerungskabel benutzen achten Sie darauf das dies die erforderlichen Str me bertragen k nnen Benutzen Sie immer dreiadrige Verl ngerungskable 11 ZEITR...

Page 8: ...i impieghi L impiego di prolunghe e adattatori sconsigliato se questi non garantiscono la potenza sufficiente per i corretto fuinzionamento degli apparati connessi E alters importante che vengano semp...

Page 9: ...matic Diagram 7 PC Board Layout 12 OPERATION Input Sensitivity 13 Bass Roll Off 13 Bass Shelving 14 Treble Shelving 14 AC Line 14 Power Switch 14 Status LED 15 Rubber Pad 15 Break In and Warm Up 15 Cl...

Page 10: ...r The high frequency channel features up to 4dB of Treble shelving while the low frequency channel features up to 4dB of Bass shelving In addition the low frequency channel includes an active 2nd orde...

Page 11: ...y an active node formed by the driver transistors at ultrasonic frequencies This allows amplifier performance similar to Trans nova which is highly stable and linear while utilizing the advantages of...

Page 12: ...his type of shielding prevents color and image distortion when placing the woofer in close proximity to direct view CRT television receivers and computer monitors THE RESULT Prevents distortion in TV...

Page 13: ...nt Panel View 4 Rear Panel View Woofer Tweeter Rubber Pad Status LED Wave Guide Heatsink AC Line Input AC Line Fuse Balanced Input Unbalanced Input Sensitivity Bass Roll Off Bass Shelving Treble Shelv...

Page 14: ...TION Aiming the monitors directly forward Fig 1 may cause response problems resulting in inadequate stereo imaging Aiming the monitors toward you and spaced equally like a triangle Fig 2 provides the...

Page 15: ...noise INPUT SWITCH The unbalanced input uses a conventional RCA phone jack Move the input switch ON to use this jack The balanced input jack is an XLR plug The XLR jack is connected according to the I...

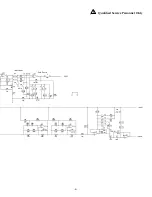
Page 16: ...SCHEMATIC DIAGRAM NOTES Unless specified otherwise 1 All resistors in ohms 2 All capacitors in microfarads 3 Channel 1 only shown 7...

Page 17: ...Qualified Service Personnel Only 8...

Page 18: ...SCHEMATIC DIAGRAM NOTES Unless specified otherwise 1 All resistors in ohms 2 All capacitors in microfarads 3 Channel 1 only shown 9...

Page 19: ...Qualified Service Personnel Only 10...

Page 20: ...11 S CHEMATIC Diagram NOTES Unless specified otherwise 1 All resistors in ohms 2 All capacitors in microfarads 3 Channel 1 only shown Qualified Service Personnel Only...

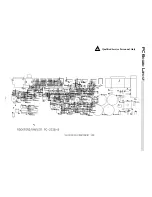
Page 21: ...PC B OARD L AYOUT Qualified Service Personnel Only 12...

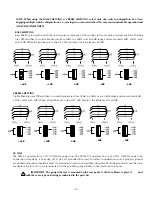
Page 22: ...Y select only one switch configuration at a time Engaging multiple switch configurations i e moving two or more switches ON may cause undesirable operation and is NOT RECOMMENDED I N P U T 11dB Input...

Page 23: ...equencies from 5kHz to 20kHz over an 8dB range and are marked 4dB 2dB 2dB and 4dB When all switches are in the OFF left position the treble level is at 0dB 14 2dB 4dB 2dB 0dB 4dB 2dB 4dB 2dB 0dB 4dB A...

Page 24: ...ED Amplifier operation is monitored internally and has a status LED This indicator can be used for system troubleshooting in case of aberrant behavior RUBBER PAD A large rubber pad is supplied to elim...

Page 25: ...1 10W 1 RM 10 2001B R172 RES 2 0K OHM 1 10W 1 RM 10 2001B R173 RES 2 21K OHM 1 10W 1 RM 10 2211B R174 RES 1 33K OHM 1 4W 1 RM 4 1331C R175 35 7K OHM 1 10 WATT 1 RM 10 3572B R176 RES 909 OHM 1 10W 1 RM...

Page 26: ...C44 CAP 220PF 50V 5 CDS 221CAAA C45 CAP 01UF 50V CYV 103 033 C46 CAP 01UF 50V CYV 103 033 C47 CAP 001UF 50V CYV 102 033 C48 CAP 001UF 50V CYV 102 033 C49 CAP 220PF 50V 5 CDS 221CAAA C5 047UF 50V CYV 4...

Page 27: ...T3906LT1 PNP SS 0791 Q7 XSTR MMBT3906LT1 PNP SS 0791 Q8 XSTR MMBT3904LT1 NPN SS 0792 U1 OPAMP TL072CD SS 143SM U112 OPAMP TL072CD SS 143SM U2 OPAMP TL072CD SS 143SM U3 OPAMP TL072CD SS 143SM U4 OPAMP...

Page 28: ...TRM6 1 FUNCTIONAL BLOCK DIAGRAM 19...

Page 29: ...nt end drive current and drive the positive output MOSFET Q20 The same is true for buffer transistors Q31 and Q33 and negative output MOSFET Q4 CALIBRATION WARNING Only a competent technician should a...

Page 30: ...gnal from U1A pin 1 and the inverting input signal from U1B pin 7 are summed together to form an unbalanced signal at U4A pin 1 Input Circuit Tweeter Crossover The balanced input signal at U1A pin 1 a...

Page 31: ...w pass filter at U2A which cascades with the previous filter at U112B to produce an overall 4th order slope of 24dB octave for the woofer amplifier Thermal Protection The thermal protection is activat...

Page 32: ...pin 9 of U5D Excessive drive sig nal at pin 6 or pin 8 will trigger its comparator low and light the CLIP THERMAL indicator red On Indicator The bicolor LED CR3 will remain green unless a THERMAL or C...

Page 33: ...e replacement tweeter into wave guide 8 Snap the tweeter into wave guide 9 Follow steps 1 5 in reverse order to install wave guide assembly CAUTION Reconnect wires as indicated in each diagram Wave Gu...

Page 34: ...connect PCB mounted power switch wires FIG 8 CAUTION Reconnect wires as indicated in diagram FIG 5 Amplifier Replacement Remove only these 2 screws FIG 6 PCB Mounted LED Harness FIG 7 PCB Mounted Spea...

Page 35: ...than Hafler or an Authorized Hafler service center 3 Any product purchased outside the United States please contact your local dealer 4 Shipping charges to get the unit to Hafler 5 Any product which...

Page 36: ...This product is designed developed and assembled in the USA by a dedicated group of American workers The majority of the components used in the con struction of this product are produced by American...

Reviews: