background image

NOTICE - IMPORTANT SAFETY INFORMATION

1.

READ INSTRUCTIONS

All the safety and operating instructions of your Hafler equipment
should be read before power is applied to the equipment.

2.

RETAIN OWNER'S MANUAL

These safety and operating instructions should be retained for
future reference.

3.

HEED WARNINGS

All warnings on the equipment and in the operating instructions
are important and should be followed.

4.

FOLLOW INSTRUCTIONS

All operating and use instructions are important and should be
followed.

5.

HEAT

The equipment should be kept away from areas of high temper-
ature, i.e., heater vents, radiators, stoves/ovens, fireplaces, etc.

6.

VENTILATION

The equipment should be used in an area suitable for proper ven-
tilation.  Care should be taken not to impede airflow in and
around the cabinet.  

7.

WATER AND MOISTURE

The equipment should not be used in or around water, such as a
bathtub, sink, or swimming area.  Also, the equipment should not
be used in areas prone to flooding, such as a basement.

8.

POWER SOURCES

The equipment should be connected only to a power source of
the same voltage and frequency as that listed on the rear panel
above the power cord entry point.

9.

POWER CORD PROTECTION

Power cords should be arranged so they do not interfere with the
movement of objects in the room: people, fan blades, utility
carts, etc.  Also, care should be taken that the cord is not pinched
or cut, and placed so it is not in danger of being pinched or cut,
as in under a rug, around a tight corner, etc.

10.

POWER CORD GROUNDING

The power supply cord is of a three wire grounded type, designed
to reduce the risk of electric shock sustained from a live cabinet.
It is assumed to be of suitable length for most uses of the equip-
ment.  The use of extension cords and power strips is discouraged
unless they are of suitable rating to deliver the required total cur-
rent for safe operation of all connected equipment.  Furthermore,
extension cords or power strips must provide the same three wire

grounded connection.  It is important that the blades of the equip-
ment’s plug be able to fully insert into the mating receptacle.

Never remove the round grounding pin on the plug in an attempt
to mate to a two wire ungrounded receptacle:

use a grounding

adaptor with the grounding tab or wire suitably connected to
earth ground.

11.

NON-USE PERIODS

During periods of extended non-use, the power cord should be
unplugged from the power source.

12.

CLEANING

The equipment should be cleaned only as detailed in the operat-
ing instructions.

13.

OBJECT AND LIQUID ENTRY

Care should be taken so that objects and/or liquids, such as clean-
ing fluids or beverages, are not spilled into the enclosure of the
equipment.

14.

DAMAGE REQUIRING SERVICE

Hafler equipment should be serviced by qualified service person-
nel when:

A. The power supply cord or plug has been damaged, or

B. Objects have fallen onto, or liquid has been spilled into the 

equipment, or

C. The equipment has been exposed to rain, or

D. The equipment does not appear to operate normally or 

exhibits a marked change in performance, or

E. The equipment has been dropped, or the enclosure has 

been damaged.

15.

SERVICING

The user should not attempt to service the equipment beyond that
which is described in the operating instructions.  All other service
should be referred to qualified service personnel.

16.

CARTS AND STANDS

The equipment should be used with carts or stands only of suffi-
cient strength and stability for the use intended. An equipment
and cart combination should be moved with care. Quick stops
and starts, excessive force, and uneven surfaces may cause the
equipment and cart combination to topple.

– ii –

The lightning flash with arrowhead symbol within an equilateral trian-
gle is intended to alert the user to the presence of uninsulated "dan-
gerous voltage" within the product's enclosure, that may be of suffi-
cient magnitude to constitute a risk of electric shock to persons.

The exclamation point within an equilateral triangle is intended to
alert the user of the presence of important operating and maintenance
(servicing) instructions in the literature accompanying the appliance.

C A U T I O N

RISK OF ELECTRIC SHOCK

DO NOT OPEN

WARNING:

  TO PREVENT FIRE OR SHOCK HAZARD 

DO NOT EXPOSE THIS EQUIPMENT TO RAIN OR MOISTURE.

!

Summary of Contents for TRM6.1

Page 1: ......

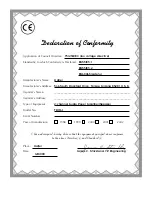
Page 2: ...S A Importer s Name ________________________________________________________ Importer s Address ________________________________________________________ Type of Equipment 2 channel Audio Power Amplif...

Page 3: ...TC 20Hz 20kHz 0 1 THD 35 Watts RMS 6 ohms high frequency 50 Watts RMS 4 ohms low frequency Signal to Noise 100dB CMRR 70dB typical 1kHz Input Impedance 47k per phase balanced 47k unbalanced Input Sens...

Page 4: ...f the equip ment s plug be able to fully insert into the mating receptacle Never remove the round grounding pin on the plug in an attempt to mate to a two wire ungrounded receptacle use a grounding ad...

Page 5: ...rioente requerida pra la operaci n segura de todo el equipo conectado Aun m s las extensiones deben proveer de la misma conecci n aterrada de tres hiles Es importante que el enchufe se pueda introduci...

Page 6: ...rt des util isations de ce mat riel L utilisation de rallonge t d adaptateur est d consell e moins d tre en mesure de fournir la charge lectrique requise un fonctionement sans risque de tout mat riel...

Page 7: ...isten Anwendungen v l lig ausreicht Wenn Sie Verl ngerungskabel benutzen achten Sie darauf das dies die erforderlichen Str me bertragen k nnen Benutzen Sie immer dreiadrige Verl ngerungskable 11 ZEITR...

Page 8: ...i impieghi L impiego di prolunghe e adattatori sconsigliato se questi non garantiscono la potenza sufficiente per i corretto fuinzionamento degli apparati connessi E alters importante che vengano semp...

Page 9: ...matic Diagram 7 PC Board Layout 12 OPERATION Input Sensitivity 13 Bass Roll Off 13 Bass Shelving 14 Treble Shelving 14 AC Line 14 Power Switch 14 Status LED 15 Rubber Pad 15 Break In and Warm Up 15 Cl...

Page 10: ...r The high frequency channel features up to 4dB of Treble shelving while the low frequency channel features up to 4dB of Bass shelving In addition the low frequency channel includes an active 2nd orde...

Page 11: ...y an active node formed by the driver transistors at ultrasonic frequencies This allows amplifier performance similar to Trans nova which is highly stable and linear while utilizing the advantages of...

Page 12: ...his type of shielding prevents color and image distortion when placing the woofer in close proximity to direct view CRT television receivers and computer monitors THE RESULT Prevents distortion in TV...

Page 13: ...nt Panel View 4 Rear Panel View Woofer Tweeter Rubber Pad Status LED Wave Guide Heatsink AC Line Input AC Line Fuse Balanced Input Unbalanced Input Sensitivity Bass Roll Off Bass Shelving Treble Shelv...

Page 14: ...TION Aiming the monitors directly forward Fig 1 may cause response problems resulting in inadequate stereo imaging Aiming the monitors toward you and spaced equally like a triangle Fig 2 provides the...

Page 15: ...noise INPUT SWITCH The unbalanced input uses a conventional RCA phone jack Move the input switch ON to use this jack The balanced input jack is an XLR plug The XLR jack is connected according to the I...

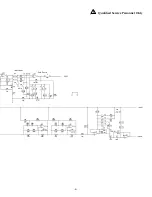
Page 16: ...SCHEMATIC DIAGRAM NOTES Unless specified otherwise 1 All resistors in ohms 2 All capacitors in microfarads 3 Channel 1 only shown 7...

Page 17: ...Qualified Service Personnel Only 8...

Page 18: ...SCHEMATIC DIAGRAM NOTES Unless specified otherwise 1 All resistors in ohms 2 All capacitors in microfarads 3 Channel 1 only shown 9...

Page 19: ...Qualified Service Personnel Only 10...

Page 20: ...11 S CHEMATIC Diagram NOTES Unless specified otherwise 1 All resistors in ohms 2 All capacitors in microfarads 3 Channel 1 only shown Qualified Service Personnel Only...

Page 21: ...PC B OARD L AYOUT Qualified Service Personnel Only 12...

Page 22: ...Y select only one switch configuration at a time Engaging multiple switch configurations i e moving two or more switches ON may cause undesirable operation and is NOT RECOMMENDED I N P U T 11dB Input...

Page 23: ...equencies from 5kHz to 20kHz over an 8dB range and are marked 4dB 2dB 2dB and 4dB When all switches are in the OFF left position the treble level is at 0dB 14 2dB 4dB 2dB 0dB 4dB 2dB 4dB 2dB 0dB 4dB A...

Page 24: ...ED Amplifier operation is monitored internally and has a status LED This indicator can be used for system troubleshooting in case of aberrant behavior RUBBER PAD A large rubber pad is supplied to elim...

Page 25: ...1 10W 1 RM 10 2001B R172 RES 2 0K OHM 1 10W 1 RM 10 2001B R173 RES 2 21K OHM 1 10W 1 RM 10 2211B R174 RES 1 33K OHM 1 4W 1 RM 4 1331C R175 35 7K OHM 1 10 WATT 1 RM 10 3572B R176 RES 909 OHM 1 10W 1 RM...

Page 26: ...C44 CAP 220PF 50V 5 CDS 221CAAA C45 CAP 01UF 50V CYV 103 033 C46 CAP 01UF 50V CYV 103 033 C47 CAP 001UF 50V CYV 102 033 C48 CAP 001UF 50V CYV 102 033 C49 CAP 220PF 50V 5 CDS 221CAAA C5 047UF 50V CYV 4...

Page 27: ...T3906LT1 PNP SS 0791 Q7 XSTR MMBT3906LT1 PNP SS 0791 Q8 XSTR MMBT3904LT1 NPN SS 0792 U1 OPAMP TL072CD SS 143SM U112 OPAMP TL072CD SS 143SM U2 OPAMP TL072CD SS 143SM U3 OPAMP TL072CD SS 143SM U4 OPAMP...

Page 28: ...TRM6 1 FUNCTIONAL BLOCK DIAGRAM 19...

Page 29: ...nt end drive current and drive the positive output MOSFET Q20 The same is true for buffer transistors Q31 and Q33 and negative output MOSFET Q4 CALIBRATION WARNING Only a competent technician should a...

Page 30: ...gnal from U1A pin 1 and the inverting input signal from U1B pin 7 are summed together to form an unbalanced signal at U4A pin 1 Input Circuit Tweeter Crossover The balanced input signal at U1A pin 1 a...

Page 31: ...w pass filter at U2A which cascades with the previous filter at U112B to produce an overall 4th order slope of 24dB octave for the woofer amplifier Thermal Protection The thermal protection is activat...

Page 32: ...pin 9 of U5D Excessive drive sig nal at pin 6 or pin 8 will trigger its comparator low and light the CLIP THERMAL indicator red On Indicator The bicolor LED CR3 will remain green unless a THERMAL or C...

Page 33: ...e replacement tweeter into wave guide 8 Snap the tweeter into wave guide 9 Follow steps 1 5 in reverse order to install wave guide assembly CAUTION Reconnect wires as indicated in each diagram Wave Gu...

Page 34: ...connect PCB mounted power switch wires FIG 8 CAUTION Reconnect wires as indicated in diagram FIG 5 Amplifier Replacement Remove only these 2 screws FIG 6 PCB Mounted LED Harness FIG 7 PCB Mounted Spea...

Page 35: ...than Hafler or an Authorized Hafler service center 3 Any product purchased outside the United States please contact your local dealer 4 Shipping charges to get the unit to Hafler 5 Any product which...

Page 36: ...This product is designed developed and assembled in the USA by a dedicated group of American workers The majority of the components used in the con struction of this product are produced by American...

Reviews: