H
D
E
0
9
/2
015
732.
29.
49
8
ZN 6.
172.
090
0.
90a
12
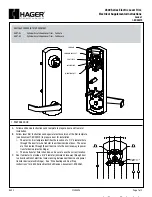
5. Start-up
The product is supplied in so-called simple mode type "Construction site lock".
These instructions only describe start-up in this mode.
• Details for the use of the product with software applications can be found in the
relevant software documentation.
• The "Construction site lock" mode will be permanently shut off once the product
is configured for the first time using the Dialock MDU. After that, reactivating this
mode is only possible after a reset.
5.1 Initial
start-up
The work operations only need to be carried out once during initial start-up. The
individual work operations must be carried out within a short time window. Therefore:
• First study every work operation and have the keys that are needed at the ready
before commencing with initial start-up.
• Perform the work operations quickly and without interruptions.
6. Allocating locking authorisations
Locking authorisations for user keys can be allocated in 3 different categories:
•
Normal user keys
All doors to which the user key has locking authorisation can be opened with
these user keys. The locks lock again automatically after 3 seconds. Doors with
the "Do not disturb" function activated cannot be opened.
•
Privileged user keys
Privileged user keys have the same rights as normal user keys, but can also open
doors with the "Do not disturb" function activated.
For step-by-step instructions "
" see illustrations
.
NOTE
Warning of abuse!
Unauthorised persons can gain access to rooms using the programming and
clearing keys.
> Only personnel who are authorised by the operator may allocate locking
authorisations!
> Take care when allocating locking authorisations to avoid overlapping
or mistakes.
> Keep programming and clearing keys in a safe place and protect from
abuse.
For step-by-step instructions "
Schließrechte zuweisen - normale
" see illustrations starting on page
.
For step-by-step instructions "
" see illustrations starting on page
.
BA_DT700_DT710.book Seite 12 Donnerstag, 17. September 2015 11:34 11