Table 1 Instrument configurations
Model
Syringes
Pumps
AT1102
1
0
AT1112
1
1
AT1122
1
2
AT1222
2
2
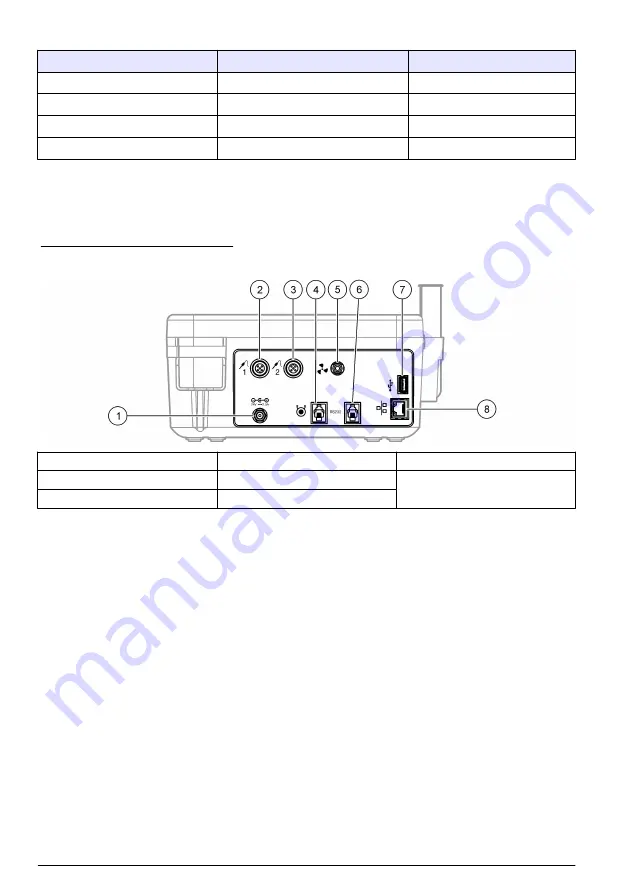
Instrument connections
shows the connections on the rear panel of the instrument. Use the USB port on the side of
the instrument for the USB applications key supplied with the instrument. Use the USB port on the
rear of the instrument to connect to a printer, mouse, keyboard or a USB hub.
Figure 2 Instrument connections
1
24 V external power supply port
4
External pump port
7
USB port
2
Sensor 1 port
5
External propeller port
8
Ethernet port
3
Sensor 2 port
6
Serial port
Product components
Make sure that all components have been received. Refer to the packing list in the box. If any items
are missing or damaged, contact the manufacturer or a sales representative immediately.
6
English
Summary of Contents for TitraLab AT1102
Page 2: ...English 3 Fran ais 24 Espa ol 47 Portugu s 70 93 112 135 2...
Page 31: ...Fran ais 31...
Page 44: ...44 Fran ais...
Page 54: ...54 Espa ol...
Page 67: ...Espa ol 67...
Page 77: ...Portugu s 77...
Page 90: ...90 Portugu s...
Page 96: ...2 USB USB USB USB 2 1 24V 4 7 USB 2 1 5 8 3 2 6 3 1 3 3x 5 2 1 4 1 96...
Page 98: ...GFCI GFI 1 2 2 96 3 180 5 7 98...
Page 99: ...1 95 99...
Page 100: ...100...
Page 101: ...102 1 2 5 5 1 2 3 101...
Page 102: ...102...
Page 103: ...MSDS SDS USB 103...
Page 104: ...6 6 1 4 2 5 3 2 104...
Page 105: ...MSDS SDS 1 Settings 2 Select 105 105 3 Back 1 Settings 2 3 4 5 105...
Page 109: ...2 Toggle Syringe replacement 98 1 Pump activation Start 2 Toggle 109...
Page 110: ...1 Select Reset 110...
Page 111: ...Edit PtPt ORP 111...
Page 114: ...1 2 3 4 5 1 1 1 6 11 2 7 12 2 3 8 13 1 4 USB 9 14 5 10 1 2 1 2 1 1 AT1102 1 0 AT1112 1 1 114...
Page 115: ...1 AT1122 1 2 AT1222 2 2 2 USB USB USB USB 2 1 24 V 4 7 USB 2 1 5 8 3 2 6 HACH Japan 115...
Page 116: ...3 1 3 3 5 2 1 4 1 1 116...
Page 118: ...15 cm 6 AC GFCI GFI 1 2 2 115 3 2 1 2 180 2 2 5 7 118...
Page 119: ...1 114 119...
Page 120: ...120...
Page 121: ...122 1 2 5 121...
Page 122: ...5 1 2 3 122...
Page 123: ...MSDS SDS USB 123...
Page 124: ...124...
Page 125: ...6 6 1 4 2 5 3 2 125...
Page 126: ...MSDS SDS 1 Settings 2 Select 126 5 PC 126 3 Back 1 Settings 2 Applications Edit 3 Edit 126...
Page 128: ...MSDS SDS 1 1 Start 2 USB 3 4 5 6 7 122 8 Start 9 10 Skip Stop 11 12 Next 13 Exit 128...
Page 130: ...4 5 6 Continue 7 Yes No 8 Exit 127 Maintenance 1 Syringe activation 130...
Page 131: ...2 2 Toggle 2 Syringe replacement 118 1 Pump activation 2 Toggle 131...
Page 132: ...1 Select Reset 132...
Page 134: ...Burette fails to fill Burette failed to read delivered volume 134...
Page 138: ...2 USB USB USB USB 2 1 24V 4 7 USB 2 1 5 8 3 2 6 138...
Page 139: ...3 1 3 3x 5 2 1 4 1 1 139...
Page 141: ...AC GFCI GFI 1 2 2 138 3 180 5 7 141...
Page 142: ...1 137 142...
Page 143: ...143...
Page 144: ...145 1 2 5 5 1 2 3 144...
Page 145: ...145...
Page 146: ...MSDS SDS USB 146...
Page 147: ...6 6 1 4 2 5 3 2 147...
Page 148: ...MSDS SDS 1 2 148 PC 148 3 1 2 3 148...
Page 149: ...4 5 USB 5 1 2 22 154 1 2 USB USB USB 3 4 5 USB 1 2 3 4 2 5 6 MSDS SDS 149...
Page 150: ...1 2 USB 3 4 5 6 7 145 8 9 10 11 12 13 1 2 USB 3 150...
Page 151: ...1 2 3 4 5 6 7 8 9 10 1 2 3 4 5 6 7 8 Purge 149 151...
Page 152: ...1 2 2 2 141 1 2 152...
Page 153: ...153...
Page 154: ...1 PtPt ORP 154...
Page 155: ...155...
Page 156: ......
Page 157: ......


