


2-1
2
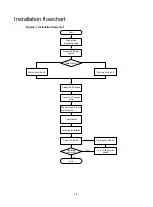
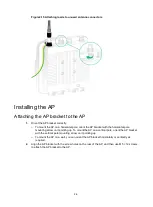
Installing the AP
IMPORTANT:
For optimal radio coverage, use professional technical engineers to install the AP as a best
practice.
Pre-installation tasks
Before installing an AP, perform the following tasks:
•
Connect the AP to a power source and the network. Examine the LEDs to verify that the AP
can operate correctly. For more information about the AP LEDs, see "
•
Verify that cabling at the installation site has been completed.
•
Record the MAC address and serial number marked on the rear of the AP for future use.
Before installing the AP, read the following restrictions and guidelines carefully:
•
The AP is large and heavy. Avoid bodily injury and device damage during the installation.
•
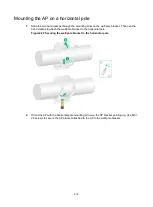
If you install the AP on a pole, make sure the pole is vertical to the ground and iron
components have been treated with corrosion protection. Make sure the installation height and
location of the AP meet the requirements.
•
If you pole-mount the AP on the top of a building, make sure the AP does not project beyond
the sides of the building.
•
To avoid high temperature caused by exposure to the sun, install the AP in a place without or
with less direct sunlight and take protection measures if necessary.
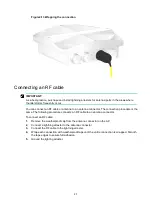
Before connecting cables to the AP, read the following guidelines carefully:
•
Route cables according to the cabling design.
•
Arrange cables firmly and neatly without crossing, twisting, or cracking them.
•
Do not route cables together with high-voltage electric power pipelines, fire-fighting pipes, or
lightning protection cables to avoid electromagnetic interference.
•
Use PVC pipes, iron pipes, Plica tube, or cable troughs for cable routing. Route cable pipes
and troughs neatly against the wall and connect them through hoses or pipe joints at the bend.
Secure cable pipes and troughs by using cable ties or angle steels at the spacing of 1 m (3.28
ft) to 1.5 m (4.92 ft) and ground the two ends in the case of metal tubes.
•
When you route PVC pipes outdoors in a horizontal way, cut an opening at the bottom of the
PVC pipes every 6 m (19.69 ft) to avoid water accumulation.
•
When routing cables outdoors without using cable casings, create drip loops on the cables to
prevent the rainwater from flowing into the Ethernet ports of the device along the cables.
•
Seal the holes for routing cables in the wall with waterproof and flame retardant material.


