background image


4-5


      Compiled date   : Nov 17 2006, 12:20:43  

      CPU type        : BCM1125H 

      CPU L1 Cache    : 32KB 

      CPU Clock Speed : 600MHz 

      Memory Type     : DDR SDRAM     

      Memory Size     : 1024MB      

      Memory Speed    : 166MHz      

      BootWare Size   : 512KB 

      cfa0 Size      :  256MB 


      CPLD Version is 003 

      PCB Version is Ver.C 


  Press Ctrl+B to enter extend boot menu...  

The last line provides you an access to the Boot Menu. 


z


To enter the BootWare main menu, press 

Ctrl + B

 within five seconds. For details about the 

BootWare main menu, refer to section “BootWare Main Menu” on page 5-3. If you perform no 
operation or press a key other than 

Ctrl + B

 within five seconds, once the remaining comes to 0, 

the system starts the auto boot process. The following information appears:  

  The current starting file is main application file--flash:/main.bin! 


  The main application file is self-decompressing........................................ 

........................................................................................ 

........................................................................................ 

........................................................................................ 

........................................................................................ 

........................................................................................ 

..................OK! 


  System is starting... 

User interface con0 is available. 


Press ENTER to get started.           

The information above indicates that the auto boot of the LSQM1WCMB0 access controller module is 
completed. 


Press 

Enter

. The following prompt appears:


<H3C> 

This means that the LSQM1WCMB0 is ready to configure. 


Summary of Contents for H3C S7500E Series

Page 1: ...H3C LSQM1WCMB0 Access Controller Module Installation Manual Hangzhou H3C Technologies Co Ltd Manual Version T2 080413 20090605 C 1 05...

Page 2: ...ecPoint SecEngine SecPath Comware Secware Storware NQA VVG V2 G Vn G PSPT XGbus N Bus TiGem InnoVision and HUASAN are trademarks of Hangzhou H3C Technologies Co Ltd All other trademarks that may be me...

Page 3: ...module 5 Software Maintenance Introduces the software maintenance for the H3C LSQM1WCMB0 access controller module covering the BootWare menus software upgrade and password loss handling 6 Troubleshoo...

Page 4: ...umentation set includes the following Manual Description H3C WX Series Access Controllers User Manual Provides a guide to the operation of H3C series access controller products including access contro...

Page 5: ...echnical Support customer_service h3c com http www h3c com At http www h3cnetworks com Documentation Select Drivers Downloads in the Support area Select Documentation for Type of File and select Produ...

Page 6: ...oduction to the Console Cable 3 1 Connecting the Console Cable 3 2 Removing and Installing the LSQM1WCMB0 3 2 Removing the LSQM1WCMB0 3 3 Installing the LSQM1WCMB0 3 3 4 Initial Startup of the Access...

Page 7: ...TFTP 5 16 Uploading and Downloading Application and Configuration Files Using FTP 5 18 Setting Application and Configuration File Types 5 20 Setting File Types Through BootWare Menu Options 5 20 Setti...

Page 8: ...mplement the wireless access control functionality The LSQM1WCMB0 access controller module can start working as soon as it is installed into a slot of a switch Physical Properties of the LSQM1WCMB0 Fi...

Page 9: ...ts the front panel of the LSQM1WCMB0 Figure 1 2 Front panel of the LSQM1WCMB0 1 USB interfaces 2 10 100 1000Base T management Ethernet interface 3 LINK LED 4 ACT LED 5 Console port 6 Ejector lever Tab...

Page 10: ...hazards such as ungrounded power system unreliable grounding and moist floor z Locate the emergency power switch in the equipment room before installing the access controller module so that you can cu...

Page 11: ...trostatic discharge ESD that will cause the complementary metal oxide semiconductor CMOS circuitry to fail A proper temperature condition must also be maintained to prevent premature material aging an...

Page 12: ...ssible from the grounding device or lightning protection grounding device of the power supply equipment z Keep the switch far away from high power radio launchers radars and equipment with high freque...

Page 13: ...on Introduction to the Console Cable As shown in Figure 3 1 the console cable is an 8 core cable with an RJ 45 connector at one end for the console port of the LSQM1WCMB0 and a DB 9 female connector a...

Page 14: ...nsole cable to the console port of the LSQM1WCMB0 The console port is clearly identified Be sure to plug the cable into the correct port With the LSQM1WCMB0 powered on it is recommended to operate the...

Page 15: ...empty install a blank filler panel to prevent dust from getting into the switch chassis and ensure good ventilation Installing the LSQM1WCMB0 1 Face the front side of the switch 2 Choose an empty slo...

Page 16: ...ort of the PC 2 Connect the RJ 45 connector of the console cable to the console port of the LSQM1WCMB0 Setting Terminal Parameters Before configuring your access controller module through a console te...

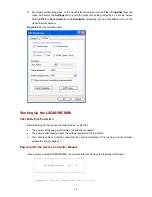
Page 17: ...me field and click OK The Connect To dialog box appears as shown below Figure 4 3 Connect To dialog box 2 Select a serial port from the Connect using drop down list Be sure to select the serial port t...

Page 18: ...4 3 Figure 4 4 Set serial port parameters To use the default settings click Restore Defaults 4 Click OK The HyperTerminal window appears as shown below Figure 4 5 HyperTerminal window...

Page 19: ...QM1WCMB0 Checks Before Power On Before starting up the access controller module verify that z The power cables and ground cable are correctly connected z The power outlet voltage meets the voltage req...

Page 20: ...u refer to section BootWare Main Menu on page 5 3 If you perform no operation or press a key other than Ctrl B within five seconds once the remaining comes to 0 the system starts the auto boot process...

Page 21: ...uccessfully please repower device after the upgrade process At this prompt power off and restart the device so that the new CPLD version takes effect z The LSQM1WCMB0 access controller module provides...

Page 22: ...ackup file z Secure application file secure file These files are stored in the built in CF card with an extension name of bin Typically the default application file is written into the built in CF car...

Page 23: ...ed z The length of a configuration file name must not exceed 64 characters including the drive name and the string terminator For example if the drive name is cfa0 the maximum length of a file name is...

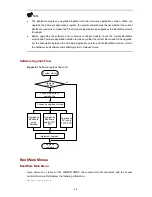
Page 24: ...for the upgrade For the association between the Comware application version and the BootWare version refer to the hardware and software compatibility matrix in Release Notes Software Upgrade Flow Fig...

Page 25: ...ferred to as BootWare main menu in this manual unless otherwise stated At the prompt above press Ctrl B The system prompts you for the password Please input BootWare password You have three chances to...

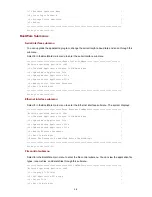
Page 26: ...n Menu Enter your choice 0 5 Ethernet interface submenu Select 3 in the BootWare main menu to enter the Ethernet interface submenu The system displays Enter Ethernet SubMenu Note the operating device...

Page 27: ...re application version When you upgrade the Comware application program the system automatically checks whether the current BootWare version is compliant with the Comware application and upgrades the...

Page 28: ...ty the baud rate needs to be reduced Follow these steps to change the serial communication baud rate 1 Enter the BootWare main menu and select 2 to enter the serial interface submenu Then select 5 in...

Page 29: ...e 5 4 Reconnect the call 6 Then press Enter in the serial interface submenu The system prompts the current baud rate and returns to the parent menu Enter Serial SubMenu Note the operating device is cf...

Page 30: ...re 3 Update Basic BootWare 4 Modify Serial Interface Parameter 0 Exit To Main Menu Enter your choice 0 4 3 Select 4 in the BootWare operation serial interface submenu The system prompts you to modify...

Page 31: ...nter your choice 0 4 6 Select 1 in the BootWare operation serial interface submenu The following prompt appears Please Start To Transfer File Press Ctrl C To Exit Waiting CCCCCCCCCCCCCCCCCCCCCCCCCCCCC...

Page 32: ...upgrading the software check the current BootWare version and application program version to make sure that the correct file is used for the upgrade z After you download files with a changed baud rat...

Page 33: ...IP Address 192 168 0 2 Gateway IP Address 192 168 0 1 After modification of the parameters the system display returns to the BootWare operation Ethernet interface submenu BOOTWARE OPERATION ETHERNET...

Page 34: ...ge Device Operation 0 Reboot Enter your choice 0 9 0 7 Select 0 in the BootWare main menu to reboot the LSQM1WCMB0 access controller module Upgrading Applications The same procedure is used to upgrade...

Page 35: ...e you need to configure the Ethernet interface of the LSQM1WCMB0 access controller module as follows Select 3 in the BootWare main menu to enter the Ethernet interface submenu Then select 5 to enter t...

Page 36: ...band management interface to a PC with a network cable Figure 5 7 Set up a software upgrade environment 2 Run TFTP Server on the PC and specify the path of the application file to be downloaded The T...

Page 37: ...on page 5 1 Maintaining the Application and Configuration Files Through the CLI After the LSQM1WCMB0 access controller module is normally started you can upgrade back up and restore the application an...

Page 38: ...3C 2 Perform the following to backup or restore download a file z To back up startup cfg on the LSQM1WCMB0 by saving it as startup bak on the TFTP server use the following command H3C tftp 192 168 0 1...

Page 39: ...tion configured you can use FTP to download and upload files The FTP server supports multi user access When the remote FTP client sends a request to the FTP server the FTP server executes an action ac...

Page 40: ...files z To backup main bin on the LSQM1WCMB0 to the PC do the following ftp binary Set the transfer mode to binary 200 Type set to I ftp lcd c temp Change the local path Local directory now C temp ft...

Page 41: ...P Server Version 2 0 User 192 168 0 1 none guest 331 User name ok need password Password 230 User logged in ftp 5 Maintain the software of the LSQM1WCMB0 Use the get and put commands to download and b...

Page 42: ...N A cfa0 startup cfg Setting application file types 1 Select 2 in the file control submenu The following information appears M MAIN B BACKUP S SECURE N A NOT ASSIGNED NO Size B Time Type Name 1 20710...

Page 43: ...rn to the BootWare main menu Setting File Types Through the CLI Viewing all files View the files in the current file system with the dir command H3C dir Directory of cfa0 0 rw 795 Jan 20 2006 11 58 50...

Page 44: ...con 0 H3C ui aux0 authentication mode password H3C ui aux0 set authentication password simple 123456 This information indicates that password authentication is used for console port login the passwor...

Page 45: ...e unable to perform some higher privilege operations Follow these steps to bypass the super password 1 Select 8 in the BootWare main menu The following message appears Clear Application Password Succe...

Page 46: ...ase wait Backup bootrom completed By now the entire BootWare has been copied to the CF card z To backup the extended BootWare use the following command H3C bootrom backup part Now backuping bootrom pl...

Page 47: ...e located contact your local dealer for help Troubleshooting the Configuration System If the LSQM1WCMB0 access controller module passes the POST after the switch is powered on the console terminal con...

Page 48: ...ppendix A Obtaining Support for your Product A 1 Register Your Product A 1 Purchase Value Added Services A 1 Troubleshoot Online A 1 Access Software Downloads A 1 Telephone Technical Support and Repai...

Page 49: ...rvices are offered to fill resource gaps and ensure the success of your networking projects More information on 3Com maintenance and Professional Services is available at http www h3cnetworks com Cont...

Page 50: ...Com for repair you must first obtain a return authorization number RMA Products sent to 3Com without authorization numbers clearly marked on the outside of the package will be returned to the sender u...

Reviews: