background image

General Operation 

• 

The EG1400 is controlled by the on/off power control switch located 
on the hose handle.  The headlight will operate when the EG1400 is 
turned on.   

• 

To lower wand from the upright position, simply press on the handle 
release pedal. 

• 

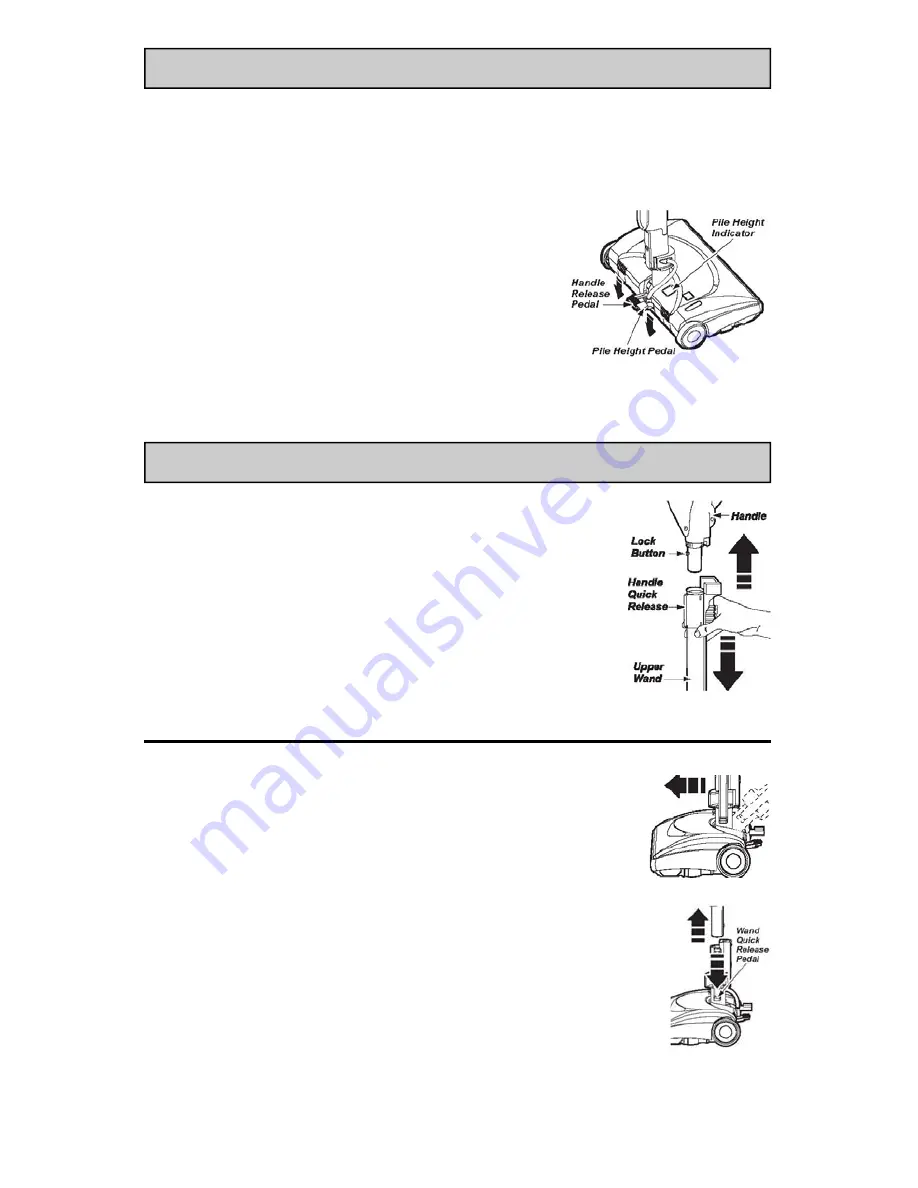
The powerhead has a pile height pedal 
for various carpet heights.  (Fig. D) Select 
a pile height setting by pressing the small 
pedal on the rear of the EG1400. Use the 
extra low setting for short napped carpets 
and the high setting for plush carpets.   


CAUTION: 

Do NOT leave the EG1400 running in one spot in the  

upright position for any length of time.  Damage to carpet may occur. 

Attachments 

Using attachments on the hose handle: 
1.  Press handle quick release button, then pull up on  
      handle. (Fig. E)  NOTE: if the EG1400 is  
      attached, turn the powerhead off before removing  
      handle from wands. 


2.  Slide attachments firmly on hose handle as needed.   
     In some cases, the button may need to be  
     depressed to allow the attachment to slide up  
     higher where it can seal on the metal tube. 


Using attachments on wands: 
1.  To remove the wands from the EG1400, lock wands    
       in straight-up position.  (Fig. F)                                                                 
 
2.  Press wand quick release pedal with foot and pull 

straight up out of the EG1400. (Fig. G)  The plug 
and cord do not have to be removed to use  

      attachments on wands. 
 
3.  Put attachment on wands as needed.  In some cases,  
      the button may need to be depressed to allow the  
      attachment to slide up higher where it can seal on the  
      metal tube. 
 

Fig. D 

Fig. E 

Fig. F 

Fig. G 

Summary of Contents for EG1400

Page 1: ...Electric Powerhead Owners Manual P N 9476...

Page 2: ......

Page 3: ...pulling on cord To unplug grasp the plug not the cord Do not handle system or appliance with wet hands Do not put any object into openings Do not use with any opening blocked Keep openings free of dus...

Page 4: ...uum cleaner s parts and features to assure its proper and safe use Review these before using your cleaner WARNING Always unplug the EG1400 before cleaning the brush area as brush may suddenly restart...

Page 5: ...EG1400 until the wand button 2 snaps into place 3 Secure cord into the cord holder on wand swivel 4 Connect EG1400 plug into the plug holder Fig B Do NOT force 5 Insert the hose handle into the wand...

Page 6: ...sing attachments on the hose handle 1 Press handle quick release button then pull up on handle Fig E NOTE if the EG1400 is attached turn the powerhead off before removing handle from wands 2 Slide att...

Page 7: ...e agitator jam If the agitator slows down or stops the overload protector shuts off the EG1400 The power unit will continue to run To correct the problem turn off the power unit remove obstruction the...

Page 8: ...dle release pedal and lower the swivel Lift rear latches up Fig I 3 To remove cover grasp the side and pull out 4 Depress tabs on rear of agitator cover and rotate forward to release from the EG1400 b...

Page 9: ...ont edge of base as shown Fig O 5 Rotate cover back Press cover firmly until side and rear tabs snap into place Fig P 6 Turn EG1400 upside down and replace 2 cover screws Fig L Fig M Fig N Fig O Fig P...

Page 10: ...EG1400 Explosion Parts List...

Page 11: ...9452 7958 9453 Screw Motor Gasket Belt Motor Spring Lower Plate Motor Motor Bridge Overload Protector Light Bulb Bulb Socket Handle Release Pedal Swivel Furniture Guard Wire Connector Swivel Seal Whe...

Page 12: ...in a commercial application pursuant to Seller s instructions will be free from defects in materials and workmanship for a period of ninety 90 days from the date of the initial sale by H P PRODUCTS I...

Reviews: