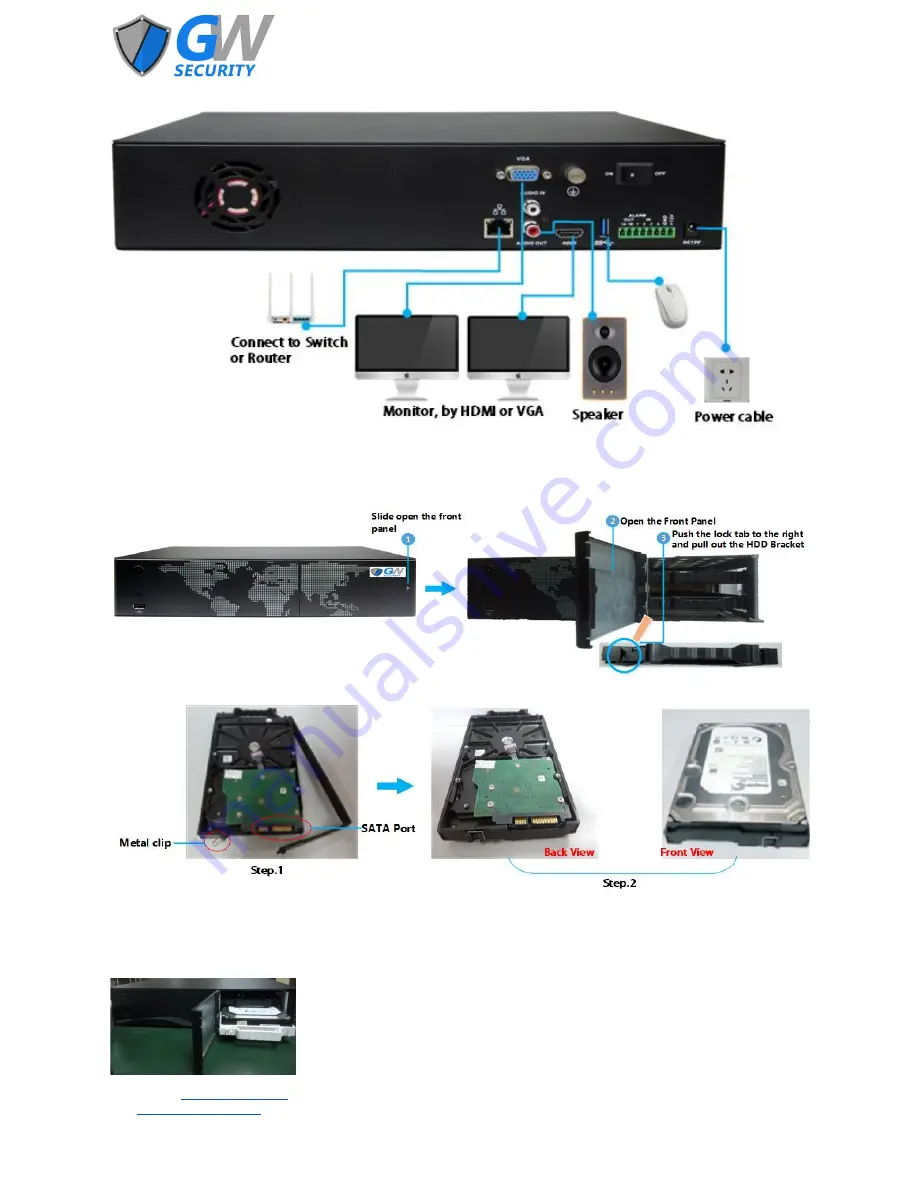
GW Security GW-NVR2208E-8P User Manual Download Page 6


(GW3208E shown) 

3.2 Installing a HDD 

Open the front panel as pictured. 


Install the HDD into the HDD placement bracket. 


Step 1: Open the HDD bracket by unlatching the metal clip on back of the bracket. Place the bracket around the HDD and 
ensure the SATA port connectors are aligned with the opening in the bracket and not covered. 
Step 2: Close the metal clip to secure the HDD in the bracket. 
Step3: Insert the HDD into the NVR and close the front panel as shown below. 


Official Website: 

www.gwsecurityusa.com


Email: 

[email protected]


Business Hours: Mon-Fri 9am to 5:30pm PST/PDT 
Tel: 626-350-0555 

Summary of Contents for GW-NVR2208E-8P

Page 1: ...Network Video Recorder User Manual...

Page 2: ...rd 6 4 3 Mouse Operation 7 4 4 Virtual Keyboard 7 4 5 Navigation Bar 7 5 The Main Menu 8 5 1 Main Menu Flowchart 9 5 2 Data Inquiry 10 5 2 1 Time Inquiry 10 5 2 1 1 Intel Play 10 5 2 2 Data Manager 12...

Page 3: ...D Manager 30 5 8 1 Basic Information 30 5 8 2 HDD Group 31 5 8 3 Storage Settings 31 5 8 4 SMART 32 5 9 System Information 32 5 9 1 Device Information 32 5 9 2 Channel Status 33 5 9 3 Alarm Status 33...

Page 4: ...ce with wet hands Do not remove any cable connectors while the device is powered on Do not open the NVR s case while the power is on 4 Qualified Technician All examination and repair work should be do...

Page 5: ...allation 3 1 NVR Connections Diagram Follow the pictures below when connecting cables and components GW2208E P shown Official Website www gwsecurityusa com Email support gwsecurityusa com Business Hou...

Page 6: ...lace the bracket around the HDD and ensure the SATA port connectors are aligned with the opening in the bracket and not covered Step 2 Close the metal clip to secure the HDD in the bracket Step3 Inser...

Page 7: ...W2208E P shown To shut down the NVR press the Shutdown button on the front of the unit or by right clicking and selecting Shutdown from the menu in the NVR interface After the NVR has shut down the un...

Page 8: ...p the page Scroll Down In Selection Box Scroll down through options In Scrollbar Scroll down the page 4 4 Virtual Keyboard Whenever text needs to be input into a field in the NVR interface a virtual k...

Page 9: ...or playback of the last five minutes Left click for quick access to the cloud services interface 5 The Main Menu After logging in the Main Menu can be access either by left clicking the icon on the Na...

Page 10: ...rt 2 Flowchart Part 3 Note Different models may have slightly different menu options This chart is from the 22XX series Official Website www gwsecurityusa com Email support gwsecurityusa com Business...

Page 11: ...ay square on the calendar means that there are video files on that date A light gray square indicates that than there are no video files of that date The light blue square indicates the selected date...

Page 12: ...channel and confirm Left click and drag to select a zone for playback and then left click the icon Official Website www gwsecurityusa com Email support gwsecurityusa com Business Hours Mon Fri 9am to...

Page 13: ...Manager In the Data Inquiry interface left click on the Data Mgr tab In the Data Manager interface you can check video files based on channel number or video type Official Website www gwsecurityusa co...

Page 14: ...up The NVR can backup channel data to either a local HDD or to a remote HDD In order to backup data follow these steps Backup channel Choose the channel s to back up Query time Enter a start and end t...

Page 15: ...eters and the file type Finally left click save 5 4 Record Go to Main Menu Record 5 4 1 Recording Parameters Go to Main Menu Record Record Para to enter the Recording Parameters interface When using t...

Page 16: ...d bitrate should be within the supported bitrate range of the IPC Pre record The NVR will record video before the event occurs The value ranges from 5 to 30 seconds depending on the bitrate stream Del...

Page 17: ...power restored 5 4 3 Scheduled Recording Go to Main Menu Record Schedule to enter the scheduled recording interface To schedule recording times for a channel follow these steps Channel No Select the...

Page 18: ...ea Double left click to remove the selected area The selected area is highlighted in yellow Day and Time Select the days and times the channel will detect motion Functions as per scheduled recording L...

Page 19: ...creen When selected the channel triggering an alarm will display full screen Alarm Push When selected a message will be sent to a smartphone when an alarm occurs NOTE The RealViewPro app must be insta...

Page 20: ...Management interface the system will automatically search all IP Camera s that are within the same network and display them in a list Available cameras are shown on the upper half of the interface an...

Page 21: ...t does not require a username and password 5 6 1 3 Adding via Smart Access Left click Smart Access and the system will automatically add all IP Cameras to the system in the same order shown in the ava...

Page 22: ...icon of a paired camera to change the camera s IP address port and or username password 5 7 Settings Management Go to Main Menu Settings Management 5 7 1 General Settings Go to Main Menu Settings Man...

Page 23: ...ngs interface The following time parameters can be set or changed Date Input the date manually or via the calendar by double left clicking Date Format Select the format to display the date Time Input...

Page 24: ...chronize time must be manual input It is recommended this setting is selected Server The time synchronization server can be selected or manually input Port Input the desired port The default is 123 Up...

Page 25: ...elect a desired position from the drop down menu Some models do not have a separate menu for adjusting the position Save Left click to save the settings 5 7 3 2 Display Sequence Go to Main Menu Settin...

Page 26: ...eo to be set in one of five preset modes that adjust brightness color and sharpness 5 7 4 Network Sub menu Go to Main Menu Settings Management Network This sub menu may have different features for dif...

Page 27: ...allows for a remote connection to the NVR by a computer or smartphone via the internet To set up a DDNS follow these steps Server Select the desired server The default selection is multi super ddns co...

Page 28: ...ngs are not necessary The following PPPOE parameters can be set or changed Username Password Enter the username and password of the ADSL account These can only be obtained from your Internet Service P...

Page 29: ...Confirm with the email provider the correct port number Period Enter the period in minutes between email notifications If there are multiple alerts within the time period only one email for the first...

Page 30: ...Scan the first QR code with a smartphone to download the client app and install it Scan the second QR code with the same smartphone to add the NVR device to the app 5 7 4 7 Network Bridge Only the GW...

Page 31: ...d stop recording Only one NVR s bridge mode can be activated at once Do not connect the LAN port the PoE port or the SDA port on the same network While enabled cameras found are those connected to eit...

Page 32: ...be set for the system The following data overwrite parameters can be set or changed Overwrite Select either Auto or Manual from the drop down menu The default selection is Auto If manual is selected t...

Page 33: ...ation about each HDD connect to the NVR Information such as the HDD model serial number firmware version current temperature health status and other SMART attributes are displayed 5 9 System Informati...

Page 34: ...ugh the initial basic setup of the NVR system 5 10 2 Account Maintenance Go to Main Menu System Maintenance Account to enter the account maintenance interface The default administrator username is adm...

Page 35: ...Left click USB Upgrade in the upgrade interface and confirm the upgrade 5 10 4 3 Upgrade via Web Browser To upgrade via remote web browser follow these steps Enter the NVR IP address into the web brow...

Page 36: ...hree different methods Method 1 If there is a static WAN IP address available the user can assign the static IP to the NVR and access the NVR directly using the static IP address from a browser smartp...

Page 37: ...20p 1280x720 60Hz UXGA 1600x1200 60Hz 1280x1024 60Hz Audio output 1x RCA Linear 1 k Decoding Decoding standard H 265 H 264 Live view Playback resolution Up to 12 MP for the first 2 Ch up to 8MP on oth...

Page 38: ...ating conditions Temperature 10 C to 55 C 14 F to 131 F Humidity 10 to 90 Dimensions WxLxH 340 x 217 6 x 77mm 13 8 x 8 5 x 3 Official Website www gwsecurityusa com Email support gwsecurityusa com Busi...

Reviews: