background image


GDM-397/GDM-461 User Manual 

O

VERVIEW 

This User Manual covers information on safety and cautions. Please read the 
relevant information carefully and observe all the Warnings and Notes. 
 

Warning 

To avoid electric shock or personal injury, read the “Safety Information” and 
“Rules for Safe Operation” carefully before using the Meter. 


Digital Multimeter Model GDM-397 and GDM-461 (True RMS) (hereafter referred 
to as “the Meter”) are auto ranging multimeters.  
 
The Meter can measure AC/DC Voltage and Current, Resistance, Diode, 
Continuity Buzzer, Capacitance, Frequency and Temperature (

˚

C or 

˚

F). In addition 

to the conventional measuring functions, there is an RS232C or USB serial port 
(optional), data hold, relative mode, peak measurement (GDM-461), low battery 
display, display backlight (GDM-397) and sleep mode. Except where noted, the 
descriptions and instructions in this User Manual apply to both 

GDM-397 

and


GDM-461


Summary of Contents for GDM-397

Page 1: ...Handheld Digital Multimeter GDM 397 GDM 461 USER MANUAL GW INSTEK PART NO 82DM 46100M01 ISO 9001 CERTIFIED MANUFACTURER...

Page 2: ...another language without prior written consent The information in this manual was correct at the time of printing However we continue to improve our products and therefore reserve the right to change...

Page 3: ...10 Functional Buttons 11 Display Symbols 12 MEASUREMENT OPERATION 14 A DC AC Voltage Measurement 14 B DC AC Current Measurement 17 C Resistance Measurement 20 D Testing for Continuity 23 E Testing Dio...

Page 4: ...Mode GDM 397 only 39 GENERAL SPECIFICATIONS 40 Accuracy Specifications 42 DC Voltage 42 AC Voltage 44 DC Current 46 AC Current 48 Resistance 50 Capacitance 52 Frequency 54 Diode Test 55 Continuity Tes...

Page 5: ...Model GDM 397 and GDM 461 True RMS hereafter referred to as the Meter are auto ranging multimeters The Meter can measure AC DC Voltage and Current Resistance Diode Continuity Buzzer Capacitance Frequ...

Page 6: ...K type Temperature Probe thermocouple GDM 397 only 1 piece 4 Multi Purpose Socket 1 piece 5 9V Battery NEDA1604 6F22 or 006P built in 1 piece 6 RS232C Interface Cable 1 piece 7 USB Interface Cable Opt...

Page 7: ...IV Primary supply level overhead lines cable systems etc Use the Meter only as specified in this User Manual otherwise the protection provided by the Meter may be impaired In this manual a Warning id...

Page 8: ...around the connectors Inspect the test leads for damaged insulation or exposed metal Check the test leads for continuity Replace damaged test leads with those of the same type before using the Meter a...

Page 9: ...esistance continuity and diodes Before measuring current check the Meter s fuses and turn off the current that is to be tested before connecting the Meter to the circuit After connecting the circuit r...

Page 10: ...Turn the Meter off when it is not in use and take out the battery when not using it for a long time Constantly check the battery as it may leak when it has not been used for some time replace the batt...

Page 11: ...GDM 397 GDM 461 User Manual 9 The Meter Structure see figure 1 1 LCD display 1 2 3 4 5 6 2 Functional buttons 3 Yellow button 4 Blue button 5 Rotary switch 6 Input terminals figure 1...

Page 12: ...osition Function V mV AC and DC Voltage Measurement Resistance Measurement Diode Test Continuity Test Capacitance Test Hz Frequency and Duty Cycle Test C Temperature in Celsius GDM 397 only F Temperat...

Page 13: ...ycle measurement RANGE Press RANGE to enter the manual ranging mode the Meter beeps Press RANGE to step through the ranges available for the selected function the Meter beeps Press and hold RANGE for...

Page 14: ...t resolution 7 MANU Indicator for manual ranging mode 8 OL The input value is too large for the selected range 10 Diode Test 11 The continuity buzzer is on 12 MAX MIN Maximum and Minimum reading 13 Da...

Page 15: ...iamp 1 x 10 3 or 0 001 amperes A Microamp 1x 10 6 or 0 000001 amperes nF F mF F F Farad The unit of capacitance mF Milli farad 1 x 10 3 or 0 001 farads F Microfarad 1 x 10 6 or 0 000001 farads nF Nano...

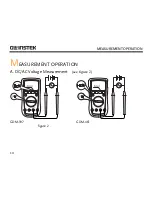
Page 16: ...MEASUREMENT OPERATION 14 MEASUREMENT OPERATION A DC AC Voltage Measurement see figure 2 V GDM 397 A V GDM 461 figure 2...

Page 17: ...ad into the COM terminal 2 Set the rotary switch to V DC measurement is the default or press the BLUE button to switch between DC and AC measurement mode Connect the test leads across to the DUT The m...

Page 18: ...ause measurement errors in high impedance circuits If the circuit impedance is less than or equal to 10k the error is negligible 0 1 or less For GDM 397 When measuring mV you must press RANGE manually...

Page 19: ...GDM 397 GDM 461 User Manual 17 B DC AC Current Measurement see figure 3 A GDM 397 A GDM 461 figure 3...

Page 20: ...ls do not connect them in parallel to any circuit To measure current do the following 1 Insert the red test lead into the mA or A input terminal and the black test lead into the COM terminal 2 Set the...

Page 21: ...ent to be measured is unknown set to the highest range and reduce the range step by step until a satisfactory reading is obtained For safety the measurement time for currents greater than 5A 5A should...

Page 22: ...MEASUREMENT OPERATION 20 C Resistance Measurement see figure 4 mAuA COM V Hz figure 4...

Page 23: ...sure resistance connect the Meter as follows 1 Insert the red test lead into the terminal and the black test lead into the COM terminal 2 Set the rotary switch to resistance measurement is the default...

Page 24: ...see that the test leads are properly connected and are not loose For high resistance measurements 1M it is normal to take several seconds to obtain a stable reading To obtain a stable reading use test...

Page 25: ...GDM 397 GDM 461 User Manual 23 D Testing for Continuity see figure 5 figure 5...

Page 26: ...into the terminal and the black test lead into the COM terminal 2 Set the rotary switch to and press BLUE button to select measurement mode 3 The buzzer sounds continuously if the resistor to be teste...

Page 27: ...GDM 397 GDM 461 User Manual 25 E Testing Diodes see figure 6 figure 6...

Page 28: ...ead into the COM terminal 2 Set the rotary switch to and press BLUE button to select the measurement mode 3 For forward voltage drop readings on any semiconductor component place the red test lead on...

Page 29: ...indicate that the diode being tested is open or that the polarity is reversed The Meter will display the forward voltage drop in voltage V units When diode testing has been completed disconnect the c...

Page 30: ...MEASUREMENT OPERATION 28 F Capacitance Measurement see figure 7 mAuA V Hz figure 7...

Page 31: ...397 press BLUE button to select the nF measurement mode At that time the Meter will display a fixed value as shown below which is the internal capacitance of the Meter To ensure accuracy when measurin...

Page 32: ...It takes a longer time to measure a capacitance of more than 100 F The LCD displays OL to indicate that the tested capacitor is shorted or it exceeds the maximum range When capacitance measurement ha...

Page 33: ...8 GDM 397 GDM 461 figure 8 Warning To avoid personal harm do not attempt to input more than 30V rms when testing frequency To measure frequency connect the Meter as follows 1 Insert the red test lead...

Page 34: ...w button GDM 461 to select measurement mode Note Input Amplitude DC offset is zero GDM 397 When 10Hz 10MHz 200mV a 30Vrms GDM 461 When 10Hz 10MHz 300mV a 30Vrms When 10MHz 40MHz 400mV a 30Vrms When 40...

Page 35: ...GDM 397 GDM 461 User Manual 33 H Temperature Measurement GDM 397 only see figure 9 figure 9...

Page 36: ...e probe to the object being measured After few seconds the measured value shows on the display 4 Press BLUE button to toggle between C and F temperature Note To avoid measurement errors especially low...

Page 37: ...use Hold mode to determine if circuits are without power The Hold mode will not capture unstable or noisy readings The Hold mode is applicable to all measurement functions Press HOLD to enter Hold mod...

Page 38: ...AX MIN to start recording of maximum and minimum values Steps the display through high MAX and low MIN readings The Meter enters manual ranging mode after pressing MAX MIN button Press and hold MAX MI...

Page 39: ...a Press and hold the REL button for over 2 seconds to enter or exit RS232C or USB mode The sleep mode feature will be disabled after entering RS232C or USB mode the icon on the LCD will disappear GDM...

Page 40: ...lays the result For instance if the stored value is 20 0V and the present measurement value is 22 0V the reading would be 2 0V If a new measurement value is equal to the stored value then the reading...

Page 41: ...use the backlight function Press and hold the HOLD LIGHT button yellow button for over 2 seconds to turn the display backlight on The display backlight will automatically turn off around after 10 seco...

Page 42: ...AmA Input Terminal 1A H 240V 6x25mm Fused Protection for 10A Input Terminal 10A H 240V 6x25mm Display GDM 397 Maximum reading 4000 frequency 9999 analogue bar graph 41 segments GDM 461 Maximum readin...

Page 43: ...pe 9V NEDA1604 or 6F22 or 006P Under the presence of electromagnetic fields the instrument may have measurement errors Measurement will return to normal when the interference is removed Dimensions HxW...

Page 44: ...aranteed for 1 year Operating temperature 18 C 28 C Relative humidity 75 DC Voltage GDM 397 Range Resolution Accuracy Input Impedance Fixed Value Input 40mV 0 01mV 0 8 3 Around 3000M 1000V dc 750V ac...

Page 45: ...GDM 461 User Manual 43 GDM 461 Range Resolution Accuracy Input Impedance Fixed Value Input 220mV 0 01mV 0 1 5 Around 3000M 1000V dc 750V ac 2 2V 0 0001V 0 1 2 Around 10M 22V 0 001V 220V 0 01V 1000V 0...

Page 46: ...uracy Input Impedance Fixed Value Input 45 400Hz 40mV 0 01mV 1 2 5 Around 3000M 1000V dc 750V ac 400mV 0 1mV 1 0 3 4V 0 001V Around 10M 40V 0 01V 400V 0 1V 750V 1V 1 2 5 Displays effective value of a...

Page 47: ...1 5 50 Around 3000M 1000V dc 750V ac 2 2V 0 0001V 0 8 10 1 2 50 Around 10M 22V 0 001V 220V 0 01V 2 0 50 750V 0 1V 1 2 10 3 0 50 True RMS is applicable from 10 of range to 100 of range AC crest factor...

Page 48: ...A 1 0 2 Fuse 1 F1A H 240V CE 6 x 25mm 4000 A 1 A 40mA 0 01mA 1 2 3 400mA 0 1mA 4A 0 001A 1 5 3 Fuse 2 F10A H 240V CE 6 x 25mm 10A 0 01A Remarks When 5A Continuous measurement is allowed When 5A Contin...

Page 49: ...1 A 0 5 10 Fuse 1 F1A H 240V CE 6 x 25mm 2200 A 0 1 A 22mA 0 001mA 220mA 0 01mA 10A 0 001A 1 2 50 Fuse 2 F10A H 240V CE 6 x 25mm Remarks When 5A Continuous measurement is allowed When 5A Continuous me...

Page 50: ...A H 240V CE 6 x 25mm 4000 A 1 A 40mA 0 01mA 1 5 5 400mA 0 1mA 4A 0 001A 2 0 5 Fuse 2 F10A H 240V CE 6 x 25mm 10A 0 01A Remarks When 5A Continuous measurement is allowed When 5A Continuous measurement...

Page 51: ...5 10 1kHz 5kHz Fuse 2 F10A H 240V CE 6 x 25mm 2 0 50 Remarks When 5A Continuous measurement is allowed When 5A Continuous measurement for less than 10 seconds with intervals of more than 15 minutes be...

Page 52: ...tance GDM 397 Range Resolution Accuracy Overload Protection Remark 400 0 1 1 2 2 1000V dc 750V ac When measuring below 2k apply REL to ensure measurement accuracy 4k 0 001k 1 0 2 40k 0 01k 400k 0 1k 4...

Page 53: ...ange Resolution Accuracy Overload Protection Remark 220 0 01 0 5 10 1000V dc 750V ac When measuring below 2k apply REL to ensure measurement accuracy 2 2k 0 0001k 22k 0 001k 220k 0 01k 2 2M 0 0001M 0...

Page 54: ...GDM 397 Range Resolution Accuracy Overload Protection Remark 40nF 0 01nF 3 0 5 1000V dc 750V ac There is around 10nF residual reading when the circuit is open 400nF 0 1nF 4 F 0 001 F 40 F 0 01 F 400...

Page 55: ...Remark 22nF 0 001nF 3 0 5 1000V dc 750V ac There is around 50pF residual reading when the circuit is open To measure a small value of capacitance use REL to ensure accuracy 220nF 0 01nF 2 2 F 0 0001 F...

Page 56: ...offset is zero GDM 397 When 10Hz 10MHz 200mV a 30Vrms GDM 461 When 10Hz 10MHz 300mV a 30Vrms When 10MHz 40MHz 400mV a 30Vrms When 40MHz unspecified When measuring on line frequency or duty cycle unde...

Page 57: ...rotection GDM 397 0 1 1000Vdc 750Vac GDM 461 0 01 GDM 397 Open circuit voltage is around 0 45V Broken circuit resistance value is around 35 the buzzer does not beep Good circuit resistance value is 10...

Page 58: ...Protection C 1 C 40 20 C 8 5 1000Vdc 750Vac 20 0 C 1 2 4 0 100 C 1 2 3 100 1000 C 2 5 2 F 1 F 40 4 F 8 6 4 32 F 1 2 5 32 212 F 1 2 4 212 1832 F 2 5 3 Thermocouple It is suitable to use K type thermoc...

Page 59: ...libration performance test and service information To avoid electrical shock or damage to the Meter do not get water inside the case General Service Periodically wipe the case with a damp cloth and mi...

Page 60: ...MAINTENANCE 58 Do not use or store the Meter in a place of humidity high temperature or in the presence of explosives inflammable materials and strong magnetic fields Replacing the Battery figure 12...

Page 61: ...re opening the case bottom To replace the battery See figure 12 1 Turn the Meter power off and remove all connections from the terminals 2 Remove the screw from the tilt stand and the battery compartm...

Page 62: ...MAINTENANCE 60 Replacing the Fuses figure 13...

Page 63: ...eter power off and remove all the connections from the terminals 2 Remove the screw from the tilt stand and the battery compartment and separate the battery compartment and the tilt stand from the cas...

Page 64: ...l the screw 7 Rejoin the tilt stand battery compartment and case bottom and reinstall the screw USB and RS232C Serial Port USB is optional at extra cost Please refer to the Installation Guide Computer...

Reviews: