background image

11

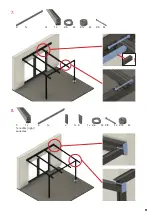
7.

E 1x

G 1x

Z.6 2x

Z.9     2x

Z.12 2x

8.

F 1x
1x rechts | right | 
correctes

J 1x K 1x Z.6 2x Z.8 2x Z.12 2x

E 1x

!

11

Summary of Contents for 4295003

Page 1: ...Premium Terrassendach 3x3 m Art Nr 4295003 4295015 4295103 4295115 Montageanleitung Assembly instructions Instructions de montage D GB F...

Page 2: ...endach muss auf einem ebenen festen Untergrund z Beton Betonplatten montiert werden Fundamentma e L nge 40cm x Breite 40cm x Tiefe 80cm Reinigen Sie die Hohlkammerplatten mit Wasser und einem milden R...

Page 3: ...on hollow blocks etc Keep the gutter free of leaves dirt and snow The patio roof must be mounted on a level solid foundation e g concrete concrete slabs Foundation dimensions length 40cm x width 40cm...

Page 4: ...de fixation s par Veillez ce que la goutti re soit exempte de feuilles de salet s et de neige Le toit de terrasse doit tre mont sur une base plane et solide par ex b ton dalles de b ton Dimensions de...

Page 5: ...fosten vormontiert mit Stand fu Pre assembled post with stand Poteau pr assembl avec em pi tement 2x J Deckel Vorderer Quertr ger Pfette Cap of front cross beam purlin Fermeture de la poutre avant pan...

Page 6: ...Aufnahme f r Quertr ger Holder for cross beam Support pour poutre transver sale 6x Z 16 M8 DIN 1661 A2 M8 DIN 1661 A2 M8 DIN 1661 A2 8x Z 17 Kantenverschlu band mit Membrane Edge closing tape with mem...

Page 7: ...7 1 Z 3 8x 1008 mm 1008 mm 1008 mm 48 mm 2 B 1x Z 4 8x Z 2 8x 7...

Page 8: ...3 F 2x M 2x Z 10 4x Z 11 4x Abstand Distance Distance min 100 mm max 600 mm 1x links left gauche 1x rechts right correctes 3a G 2x M 2x Z 10 4x Z 11 4x Abstand Distance Distance min 100 mm max 600 mm...

Page 9: ...9 3b F 2x G 2x Z 14 6x Z 15 6x 4 C 1x I 2x Z 14 8x bereits vormontiert bereits vormontiert already pre assembled already pre assembled d j pr assembl d j pr assembl 9...

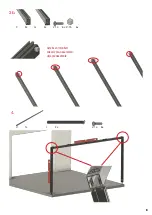
Page 10: ...10 5 F 1x 1x links left gauche J 1x K 1x Z 6 2x Z 8 2x Z 12 2x 6 E 1x G 1x Z 6 2x Z 9 2x Z 12 2x 10...

Page 11: ...11 7 E 1x G 1x Z 6 2x Z 9 2x Z 12 2x 8 F 1x 1x rechts right correctes J 1x K 1x Z 6 2x Z 8 2x Z 12 2x E 1x 11...

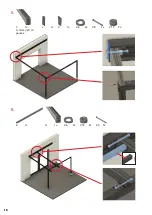
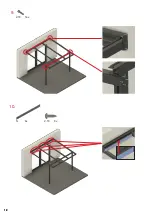
Page 12: ...12 9 Z 19 16x 10 N 3x Z 19 9x 12...

Page 13: ...13 11 Z 2 8x Z 3 8x Z 4 8x 12 D 1x Z 16 8x 13...

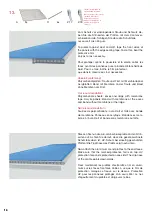
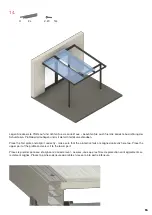
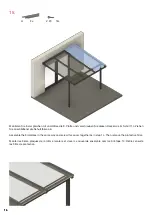
Page 14: ...du profil est dirig vers le bas Zum Schutz vor eindringendem Staub und Schmutz kle ben Sie die Stirnseiten der Platten mit dem Kantenver schlussband ab Schlagen Sie dazu die Schutzfolie nur so weit wi...

Page 15: ...erschrauben Place the first plate and align it correctly make sure that the protective foils are aligned correctly here too Place the upper part of the profile and screw it to the lower part Placez le...

Page 16: ...wie im Schritt 14 Ziehen Sie anschlie end die Schutzfolien ab Assemble the 3rd plates in the same way and screw this cover together as in step 14 Then remove the protective films Monter les 3 me plaqu...

Page 17: ...17 16 17 L 2x Z 19 8x Z 1 4x 17...

Page 18: ...18 18 P 1x A B C 18...

Page 19: ...19 19...

Page 20: ...8440 Telefax 09367 984429 kuernach scobalit de Scobalitwerk Wagner GmbH Hermann Ilgen Stra e 7 D 04808 Wurzen Telefon 03425 814708 Telefax 03425 814709 wurzen scobalit de Scobalitwerk Wagner GmbH Buch...

Reviews: