Gudsen MOZA Pro Manual Download Page 22


Using the Main Menu


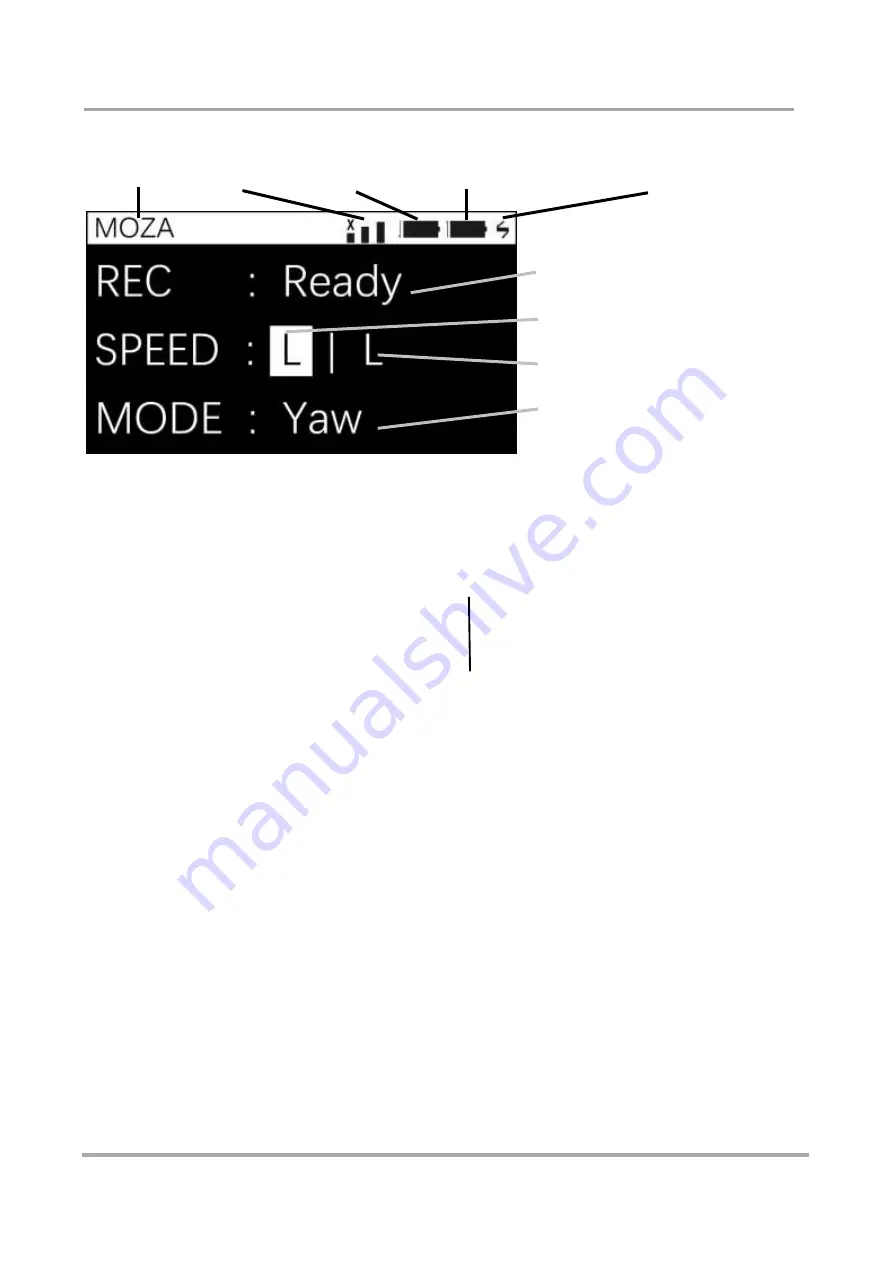
     LOGO   Connection State   Gimbal Power level   Thumb Controller Power     Charing icon 


录制状态

                                  Recording State 


                                         Focus Speed 


调焦速度

                                                Gimbal Speed 


遥控速度

                                                Follow Operation Mode 


REC


Ready                       Ready to record 
Recording                   Recording 
   
SPEED Status


     Focus Adjustment Speed          Remote Control Speed 
                     L Low            L Low  
                     M Medium         M Medium                
                     H High           H High 
   

FOLLOW MODE: 

Yaw                         Yaw axis follow, tilt axis locked 
Pit                         Yaw axis locked, tilt axis follow 
Pit-Yaw                     Pan axis and tilt axis follow 
All Lock                    All-lock 


Summary of Contents for MOZA Pro

Page 1: ...User manual...

Page 2: ...ut minor errors and omissions may still exist When in doubt please refer to the actual product 2 Gudsen isresponsible for the warranty and maintenance of the product itself However Gudsen assumes no l...

Page 3: ...Specifications 43 Thumb Controller Specifications 43 Intelligent Battery 43 Charger Battery 43 FAQs 44 Maintenance 46 Terms Conditions User Note 1 In the Box 2 Safety Instructions 3 Operation Guide M...

Page 4: ...a maximum payload of 10kg that can support most large cinema cameras The wireless thumb controller designed exclusively by Gudsen Technology works perfectly with MOZA Pro for camera recording and focu...

Page 5: ...1 1 4 Screw x 1 Quick Install Assembly X 1 Camera Mounting Plate x 1 1 4 Camera Screw x 2 3 8 Camera Screw x 1 Tool Bag X 1 Follow Focus Assembly Tube x 2 1 4 Screw x 1 3 8 Screw x 1 Lens Support x1...

Page 6: ...roller are powered by a large capacity lithium battery If misused the battery could explode resulting in fire and possible chemical burns Please observe the following precautions 1 Do not dismantle th...

Page 7: ...an Yaw Arm 7 Mainboard 8 Roll Motor 9 Roll Arm U shaped arm 10 Tilt Motor 11 Camera Upper Mount Assembly 12 Camera Lower Mount Assembly 13 Safety Pin for Gimbal 14 Locking knob for Gimbal 15 3 5mm DC...

Page 8: ...PM 5 Knob to Lock Camera Upper Mount Assembly 6 Knob to Adjust Tilt Balance of Camera Upper Mount Assembly 7 Knob to Adjust Tilt Balance of Camera Lower Mount Assembly 8 Knob to Adjust Right Left Bala...

Page 9: ...is not installed on the MOZA Pro Make sure that the thumb controller is sufficiently charged before attempting to use it Always check the battery levelbefore use Press the ON OFF button for 3 seconds...

Page 10: ...per rod holder Insert the two shorter rods with grooves into the upper rod holder and make sure the groove is upwards This will make it convenient to hold the MOZA Pro Tighten all knobs and screws to...

Page 11: ...crews in the mounting plate and 3 8 Choose the correct screw holes for your camera s configuration Change the horizontal position of the camera on the mounting plate to make sure it is centered Slide...

Page 12: ...1 dismantle the rolling arm and take out the roll axis extension arm 1 Fit the roll axis extension arm to the parting position and use 7 screws to fix the port 3 to finish the installation 7 Installin...

Page 13: ...3 small counterweights 155g each and 1 weight connector The weight connector is locked to the specialized quick release plate via 2 M4 12 cylindrical screws The counterweights can be installed directl...

Page 14: ...Balance 1 2...

Page 15: ...knobs to slide the camera left or right until the roll axis be comes level Then tighten the two lock knobs 4 Balancing the pan axis Loosen the lock knob to slide the compartment forward or backwards u...

Page 16: ...ing Getting Started Some things to remember before you get started 1 Heavy lenses may be necessary in certain cases but heavy lenses change the camera s center of gravity causing oscillation Use the l...

Page 17: ...er to the thumb controller function instructions Pan Mode The default mode The tilt and roll axes will lock The lens will keep level and forward and follow the pan axis movement Tilt Mode Only the rol...

Page 18: ...the MOZA Pro It isvery flexible and can change its shape to adapt to various situations Users can choose the proper mode for their shooting circumstances The specific steps for transformation areasfol...

Page 19: ...osition will then become the new stable position and MOZA will balance according to it The control effect won t be interrupted by your movement or a Follow effect You can control the gimbal s movement...

Page 20: ...OLEO SPEED OPTION S ROLLER Interface Diagram LOGO JOYSTICK ON OFF Wireless Thumb Controller...

Page 21: ...etween Low Medium High A long press will change the speed settings between the gimbal movement and focus control speeds After connecting with the USB pressing the SPEED button will cause the device to...

Page 22: ...Gimbal Speed Follow Operation Mode REC Ready Ready to record Recording Recording SPEED Status Focus Adjustment Speed Remote Control Speed L Low L Low M Medium M Medium H High H High FOLLOW MODE Yaw Y...

Page 23: ...OFF 2 Adjusting the focus and gimbal movement speeds A single press will change speeds between Low Medium High A long press will change the speed settings between the gimbal movement and focus contro...

Page 24: ...h the Follow Modes between pan follow tilt follow and all locked OPTIONS button 4 Adjusting the camera focus Roll theroller 5 Adjusting the camera focus Entering the Main Menu interface long press the...

Page 25: ...ns ultralight Lens light Lens heavy EOSCinema Lens u ltra l ight Lens light Lens heavy Alpha Ditto GH Di tto BMCC Ditto BMPC Ditto BMPCC Ditto Habits Joystick Mode 4 Directions 8 Directions Up Down PI...

Page 26: ...firmware does not match the gimbal firmware You have to upgrade both the wireless thumb controller and gimbal firmware to the latest version Choosing Camera Types Because there are different weights...

Page 27: ...n reads Set OK it means you were successful Set ERR means the save was unsuccessful Calibrating the Sensor Sensor calibration is necessary if each axis of the gimbal starts to drift when the MOZA Pro...

Page 28: ...ove the joystick and the corresponding power motor will follow Reverse will make the power motor move the opposite way of the joystick You can adjust according to your own needs Operation direction ha...

Page 29: ...It is necessary to manually install the Virtual Serial Port Driver the first time you connect the MOZA Pro to a windows computer There are a few devices that cannot install the drive due to compatibi...

Page 30: ...the USB cable 3 Install the intelligent battery and turn on the gimbal III Upgrade Thumb Controller Firmware 1 Open the MOZA Assistant software 2 Turn off the thumb controller 3 Long press SPEED and...

Page 31: ...red Sensor Calibration Calibrate the gyroscope sensor Power The output value of each motor When the loaded camera is relatively light but the torque is high the gimbal may shake or generates noise Whe...

Page 32: ...Follow Mode Accel Adjusts the accelerated speed from still torotate DeadCorner Deviation angle allowed before a Follow movement Smoothi ng The smoothing of each axis when the outer remote operates th...

Page 33: ...e camera The mechanical angle is the actual rotation angle of the motor The monitor angle is the angle calculated by the gyro sensor which is the deviation angle of the camera along three axes The mec...

Page 34: ...umb controller operating the gimbal There are three options for the thumb controller Low Middle High Dead Range The gimbal will not rotate when moving the joystick of the thumb controller in the dead...

Page 35: ...Angle Offset When there is a slight deviation between the locked and absolute positions the angle offset can be used to offset the deviation...

Page 36: ...r firmware upgrade mode is decided by if you first open the software or turn on the battery A few computers may fail to enter the firmware upgrade state Setting the upgrade wait time will help avoid s...

Page 37: ...bal on a sturdy and stationary surface Click Sensor Calibrate to begin calibration Wait for at least three minutes and then check for any changes in the gyroscope s data The calibration is complete wh...

Page 38: ...USB Cable 3 Install the intelligent battery and turn it on First connect the gimbal to a PC or Mac through the USB cable Then turn on the MOZA Pro It will enter the firmware upgrade mode Choose the co...

Page 39: ...sistant software 2 Turn off the wireless thumb controller 3 Long press on SPEED and connect the USB cable The MOZA Assistant software will automatically access information from the wireless thumb cont...

Page 40: ...tooth Control Range 5M 2 4G Remote Control Range 50M Mechanical Performance Supported Device Dimensions 18 15 25 CM Max Rotation Range Tilt 360 Roll Left 75 Right 235 Yaw 360 Wireless Thumb Controller...

Page 41: ...are correctly and properly connected Then turn on the thumb controller and choose the proper type of camera The types of cameras are listed on Page 16 of this manual 5 Gimbal movement is beyond the c...

Page 42: ...he MOZA Lite 2 and accessories in the inner box The product should be stored in a dry and cool place away from direct sunlight damp conditions and water Accessories should be stored in the tool bag to...

Page 43: ...Please retain this user manual Website www gudsen com Customer Service support gudsen com...

Page 44: ......

Reviews: