12
What are wooden pellets?
•
Wooden pellets consist of 100 percent of remains of wood kept in a
natural state (wood shavings, sawdust, etc.). Dry wood remains are
crushed and compressed under high pressure to wooden pellets.
Adding binders or additives is not allowed.
DIN 51731 and the Austrian standard ÖNORMM7135 specify the
quality of wooden pellets:
Length app.
10 - 30 mm
Diameter:
app. 6 – 6.5 mm
Bulk density:
app. 650 kg/m
3
Calorific value:
app. 4.9 kWh/kg
Residual moisture:
app. < 10 %
Ash content:
< 1.5 %
Density:
>1.0 kg/dm
3
Wooden pellets in practice:
2 kg of wooden pellets have approximately the same energy content
as one litre of light fuel oil.
Assessed in terms of space, 3 m
3
of wooden pellets correspond to
app. 1,000 litres of fuel oil. Wooden pellets must be transported and
stored in an absolutely dry state. They swell a lot when in contact
with moisture. Therefore, wooden pellets must be protected against
moisture when transported and stored.
How do we recognise "good" wooden pellets?
Depending on raw material conditioning and mass compressing,
there can be some difference in the quality of wooden pellets.
The qualitative properties given below are used for the first visual
evaluation of wooden pellets when buying them. Precise qualitative
properties can only be determined using suitable technical analysing
devices.
Good quality
: shiny, smooth, uniformly long, low dust
Worse quality:
longitudinal and transverse cracks, high dust level,
various sizes.
Simple quality test:
Put some wooden pellets to a glass of water:
Good quality: pellets get plunged.
Worse quality: pellets floating.
According to the manufacturer, pellets differ in their colour, length
and compression. Also, various supplies from the same
manufacturer can be of a different quality. Pellets are made of wood
kept in a natural state; bigger remains after burning can fall out,
depending on the type of wood.
Important information before installation
When unpacking, make sure the product does not get damaged or
scratched. Take packaged parts of accessories out of the
combustion chamber and remove any foam or cardboard parts used
for securing movable parts.
Please note that the package (plastic bags, foam parts, etc.) must
not be kept within the reach of children as it represents a potential
source of danger and must be disposed of in accordance with the
applicable regulations.
To prevent injuries and damage to the product, please follow these
instructions and notices:
Unpacking and installation must be provided by at least two persons;
Every working step must be taken using appropriate devices, in
accordance with the applicable safety directives;
Unpack the stove as shown in pictures and instructed in the manual;
If auxiliary means, such as ropes, belts, chains, etc., are used, they
must be in a proper state and be appropriate for the respective
weight.
When unpacking, proceed carefully and make sure the ropes,
chains, etc. do not get broken.
To avoid tipping over, do not lean the package too much;
Never stand in the operational area of the loading/unloading
equipment (lift trucks, cranes, etc.).
Flue gas exhaust connection
The product is suitable for multiple chimney engagement!
Precondition:
The chimney has been dimensioned according to EN 13384.
Vacuum is provided (higher than 1 Pa). The pellet stove is not a
burner but an automatically filled stove with a daily container
for burning solid biomass (pellets) with a blower of exhaust
gases. The blower transports exhaust fumes or flue gases to
the chimney. There is no overpressure in the connecting piece
or in the chimney. The regional regulations must be complied
with in any case.
Please contact your chimney master before connecting the
equipment!
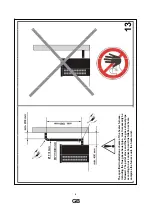
Connection to a chimney is not allowed at a height lower than 4 m (5
m in case of multiple engagement).
The connecting piece must be connected to the chimney tightly.
The connecting pieces to chimneys must keep a distance of at least
40 cm
from flammable parts. A distance of at least
10 cm
is enough
for connecting pieces with a thickness of at least
2 cm
and sheathed
with non-combustible insulation materials. If connecting pieces lead
to chimneys through parts out of combustible building materials, they
must be fitted with a protective pipe out of non-combustible building
materials in a distance of at least
20 cm
or they must be sheathed
with non-combustible building materials with low thermal conductivity
in a circuit with a thickness of at least
20 cm
.
A draught limiter is recommended for supply pressure > 20 Pa. The
supply pressure must be at least 11 Pa.
Regulations
To install and connect on the side of exhaust fumes or flue gases, it
is necessary to meet the requirements of the regulations relating to
furnaces of heating equipment of the respective national building
code and
DIN 4705
and
DIN 18160
. The chimney to which the
equipment is to be connected must be in a perfect state to make
sure the stove works properly.
Installation space
As the stove taking air necessary for burning from space or the room
of installation, it is necessary to make sure a sufficient amount of air
flows to the room through window or exterior door leaks. Moreover, it
is necessary to make sure a space and power ratio of 4 m
3
per kW of
the rated heat output is guaranteed. If the volume is lower,
connection of the combustion air supply with other spaces
(connecting holes of at least 150 cm
2
) must be created by vents.
CAUTION:
The pellet stove works differently than conventional
stoves. Smoke is taken away using a fan. As a result, light
vacuum is created in the area of burning in the combustion
chamber and overpressure in the connecting piece; make sure
the pipe is tightly sealed and installed correctly.
The flue gas exhaust pipe
can only be
installed
by professionals
or specialised companies.
GB
Summary of Contents for 68032
Page 3: ...3 2 1 D ...
Page 4: ...4 3 4 a b a D ...
Page 5: ...5 5 6 D ...
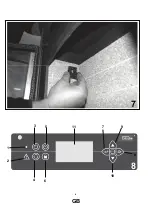
Page 6: ...6 7 8 1 2 4 6 10 8 9 7 11 5 3 D ...
Page 7: ...7 9 10 D ...
Page 8: ...8 11 12 12 D ...
Page 9: ...9 13 D ...
Page 15: ...15 D ...
Page 29: ...3 2 1 GB ...
Page 30: ...4 3 4 a b a GB ...
Page 31: ...5 5 6 GB ...
Page 32: ...6 7 8 1 2 4 6 10 8 9 7 11 5 3 GB ...
Page 34: ...8 12 11 GB ...
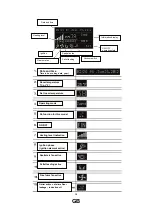
Page 42: ...16 On Off Temperature mode Down Keep mode deactivation Manual mode Up Keep button GB ...
Page 55: ...3 2 1 F ...
Page 56: ...4 3 4 a b a F ...
Page 57: ...5 5 6 F ...
Page 58: ...6 7 8 1 2 4 6 10 8 9 7 11 5 3 F ...
Page 59: ...7 9 10 F ...
Page 60: ...8 11 12 12 F ...
Page 67: ...15 F ...
Page 81: ...3 2 1 I ...
Page 82: ...4 3 4 a b a I ...
Page 83: ...5 5 6 I ...
Page 84: ...6 7 8 1 2 4 6 10 8 9 7 11 5 3 I ...
Page 86: ...8 12 11 I ...
Page 107: ...3 2 1 CZ ...
Page 108: ...4 3 4 a b a CZ ...
Page 109: ...5 5 6 CZ ...
Page 110: ...6 7 8 1 2 4 6 10 8 9 7 11 5 3 CZ ...
Page 112: ...8 11 12 CZ ...
Page 133: ...3 2 1 SK ...
Page 134: ...4 3 4 a b a SK ...
Page 135: ...5 5 6 SK ...
Page 136: ...6 7 8 1 2 4 6 10 8 9 7 11 5 3 SK ...
Page 138: ...8 12 11 SK ...
Page 159: ...3 2 1 H ...
Page 160: ...4 3 4 a b a H ...
Page 161: ...5 5 6 H ...
Page 162: ...6 7 8 1 2 4 6 10 8 9 7 11 5 3 H ...
Page 164: ...8 11 12 H ...
Page 185: ...3 2 1 P ...
Page 186: ...4 3 4 a b a P ...
Page 187: ...5 5 6 P ...
Page 188: ...6 7 8 1 2 4 6 10 8 9 7 11 5 3 P ...
Page 190: ...8 12 11 P ...


