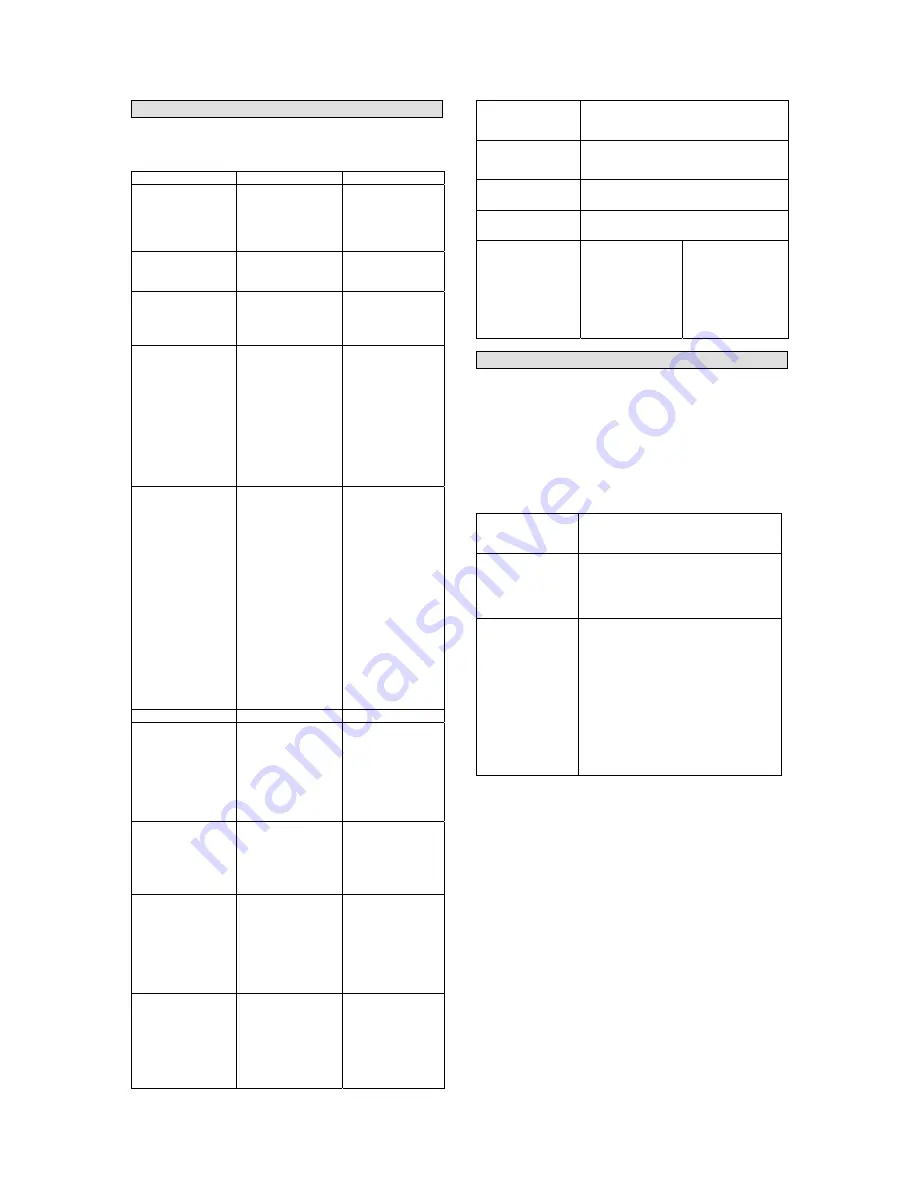
Troubleshooting
At all failures it is first necessary to check whether the
appliance is sufficiently and permanently supplied
with pneumatic oil.
Failure
Cause
Removal
Compressed air
leaking from the
cover hole
•
O-rings are
damaged or
dirty, which has
been caused by
a foreign item.
•
Clean or
replace the O-
rings.
Compressed air
leaking from the
valve
•
O-rings are
damaged or the
valve is faulty.
•
Replace the O-
rings and valve.
Compressed air
leaking between
the body and
cylinder cover
•
Screws are
loosened. O-
rings are
damaged.
•
Tighten the
screws.
Replace the O-
rings.
Piston not fully
returning, idle
strokes
•
Appliance
placed too
weakly or too
shortly.
•
Piston dragging
as it is not
lubricated.
•
O-ring is faulty.
•
Place the
appliance
stronger.
•
Lubricate the
cylinder surface
contact.
•
Replace the O-
ring, check the
operating
pressure.
Nails not fully
fired
•
Air pressure too
low.
•
Hose piping with
a too small
cross section.
•
Appliance not
lubricated.
•
Firing
mechanism
worn out.
•
Gradually
increase the
pressure by 0.5
bar to make
sure nails are
fired properly.
•
Hose piping
inner diameter
at least 6 mm.
•
Clean and
lubricate the
parts.
•
Grind the firing
mechanism
down by app.
0.2 mm.
Failure
Cause
Removal
Nails breaking
and overlapping
•
Firing
mechanism
significantly
worn out.
•
Appliance
placed too
weakly.
•
Replace the
firing
mechanism.
•
Place the
appliance
stronger.
Appliance
running too
slowly
•
O-ring is
damaged.
•
Valve is
damaged.
•
Replace the O-
ring.
•
Replace the
valve
completely.
Firing
mechanism is
blocked by nails
•
Wrong nails
used.
•
Firing
mechanism has
fray.
•
Insert correctly
appropriate
nails.
•
Remove the
firing
mechanism off
fray.
Appliance not
working
•
Check the air
inlet. Operating
pressure may
be too low.
•
Increase the
operating
pressure.
However, max.
operating
pressure must
be adhered to.
Irregular
appliance
operation
•
Install a set of pins with a head
valve.
Air leaking from
the appliance in
the bottom part
•
Tighten the screws or install the
absorber or a set of pins.
Wrong reverse
movement
•
Clean the appliance and install an
absorber or a set of pins.
Other failures
•
Contact an expert, seller or
distributor.
Clamps/nails
blocked in the
guide plate
•
Magazine dirty
•
Belt with
clamps/nails
not moving fully
forward
•
Ram worn-out
•
Clean (blow) the
magazine.
Wrong
clamps/nails
have been used.
Use appropriate
clamps/nails
Maintenance table
Following the maintenance instructions specified in
this document will provide this high-quality product
with long and trouble-free operation. Disconnect the
appliance from the compressed air source for
maintenance and treatment. To ensure long and
trouble-free working of your tacker/nailer, it is
necessary to clean it every day and regularly lubricate
it. For this purpose, special tool oil should only be
used:
Via oil mist
lubricator
A complete maintenance unit includes
an oil mist lubricator and is fitted on
the compressor.
Via lubricator on
the piping
In the immediate vicinity of the
appliance (app. 50 cm distance), a
lubricator sufficiently providing the
appliance with oil is installed on the
lubricator piping.
Manually
If your appliance has no maintenance
unit or lubricator on piping, 3-5 oil
drops must be added to the
compressed air connection before the
pneumatic appliance is put into
operation. If the pneumatic appliance
has been out of service for several
days, 5-10 oil drops must be added to
the compressed air connection before
switching the appliance on. Store your
pneumatic appliances only in dry
rooms.
Lubricate the appliance with special oil for pneumatic
appliances using an extension if there has been a long
operation break.
Store the appliance in a cleaned, dry, dust-free condition
and at temperatures above 5° C.
19


