


Bit Pad Two 35
1.
Configure Bit Pad Two Data Tablet
The Bit Pad Two’s configuration parameters are set at the factory to your
specifications. If however, you want to adjust the configuration, you can do so by
setting the switches inside the tablet. It is advantageous to do this step before
connecting the unit with the host since it requires disassembling the tablet.
NOTE:
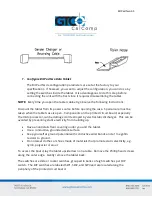
Every time you open the tablet cabinetry, observe the following instructions:
Discount the tablet from its power source before opening the case. Special care must be
taken when the tablet case is open. Components on the printed circuit board, especially
the microprocessor, can be damaged or destroyed by electrostatic discharges. This can be
avoided by preventing static electricity from building up.
Have an antistatic floor covering under you and the tablet.
Use a conductive, grounded work surface.
Keep yourself at ground potential with conductive wrist bands and a 1 megohm
resistor to ground.
Do not wear clothes or shoes made of materials that promote static electricity, e.g.
nylon, polyester or wool.
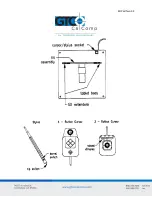
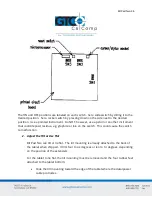
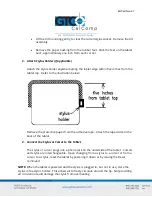
To access the board, lay the tablet upside down on a table. Remove the Phillip head screws
along the outer edge. Gently remove the tablet back.
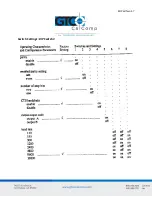
The switches are slide or rocker switches, grouped in banks of eight switches per DIP
switch. The DIP switches are labeled SW1, SW2, and SW3 and are located along the
periphery of the printed circuit board.
Summary of Contents for BIT PAD TWO DATA
Page 14: ...Bit Pad Two 14 General Flowchart for Master Program to Read and Process Data Tablet Reports...
Page 15: ...Bit Pad Two 15 Detail A Get and Decode Reports Subroutine...
Page 16: ...Bit Pad Two 16 Detail B Data Input Subroutine...
Page 34: ...Bit Pad Two 34...
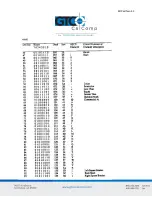
Page 42: ...Bit Pad Two 42 Appendix B ASCII Conversion Chart...
Page 43: ...Bit Pad Two 43...
Page 44: ...Bit Pad Two 44...
Page 46: ...Bit Pad Two 46 Switch Settings DIP Switch 1...