background image

12

Contents

1.Specifications. . . . . . . . . . . . . . . . . . . . . . . . . . . . . . . . . . . . . . . . . . . . . . . . . . . . . . . . . . . . . . . . . . . .  2

2.The exterior appearance of the unit . . . . . . . . . . . . . . . . . . . . . . . . . . . . . . . . . . . . . . . . . . . . . .  3

3. Warnings and safety notes . . . . . . . . . . . . . . . . . . . . . . . . . . . . . . . . . . . . . . . . . . . . . . . . . . . . . .  4

4. Program flow chart   . . . . . . . . . . . . . . . . . . . . . . . . . . . . . . . . . . . . . . . . . . . . . . . . . . . . . . . . . . . . .  6

5. Charging current setting . . . . . . . . . . . . . . . . . . . . . . . . . . . . . . . . . . . . . . . . . . . . . . . . . . . . . . . .  7

6. Power Allocation . . . . . . . . . . . . . . . . . . . . . . . . . . . . . . . . . . . . . . . . . . . . . . . . . . . . . . . . . . . . . . . .  7

7. Lithium Battery (LiLo/LiPo/LiFe/LiHv) Mode Instruction . . . . . . . . . . . . . . . . . . . . . . . . . .  8

8. Operation process. . . . . . . . . . . . . . . . . . . . . . . . . . . . . . . . . . . . . . . . . . . . . . . . . . . . . . . . . . . . . . .  8

9. Cell meter test program . . . . . . . . . . . . . . . . . . . . . . . . . . . . . . . . . . . . . . . . . . . . . . . . . . . . . . . .  10

10. Data save program . . . . . . . . . . . . . . . . . . . . . . . . . . . . . . . . . . . . . . . . . . . . . . . . . . . . . . . . . . . .  10

11. Load data setting. . . . . . . . . . . . . . . . . . . . . . . . . . . . . . . . . . . . . . . . . . . . . . . . . . . . . . . . . . . . . .  11

12. User setting . . . . . . . . . . . . . . . . . . . . . . . . . . . . . . . . . . . . . . . . . . . . . . . . . . . . . . . . . . . . . . . . . . .  11

13. Warning and error messages . . . . . . . . . . . . . . . . . . . . . . . . . . . . . . . . . . . . . . . . . . . . . . . . . .  13

14. Warranty and service  . . . . . . . . . . . . . . . . . . . . . . . . . . . . . . . . . . . . . . . . . . . . . . . . . . . . . . . . .  14

Summary of Contents for X2mini

Page 1: ...els charging can charge 2 different battery types at the same time This charger with fashion design easy to operate Please read the manual completely and carefully before using Include Intelligent power allocation and average power allocation Single channel AC Power Max 100W in intelligent allocation mode watt 200 power 2 Channels Intelligent Charger For LiPo LiFe LiHv Lilon NiMH NiCd Pb batteries...

Page 2: ...Program flow chart 6 5 Charging current setting 7 6 Power Allocation 7 7 Lithium Battery LiLo LiPo LiFe LiHv Mode Instruction 8 8 Operation process 8 9 Cell meter test program 10 10 Data save program 10 11 Load data setting 11 12 User setting 11 13 Warning and error messages 13 14 Warranty and service 14 ...

Page 3: ...0V DC 19 26V Charge Current 0 1 10 0A 2 Charge Power AC Max 100W DC Max 100W 2 Balance Current 500mA Balance Precision 0 01V Charging Capability LiPo LiFe LiIon LiHv 1 4cells NiMH NiCd 1 8cells Pb 2 14V Weight 554g Dimensions 137 5 141 5 55 5mm ...

Page 4: ... unit Air vent The first channel indicate light The second channel indicate light Screen DEC key INC key ENTER START key STOP key CHANNEL SELECT key Balance port Battery connection interface Direct current input 19 26V AC input 100 240V ...

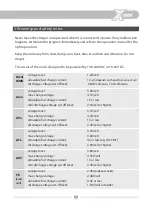
Page 5: ...ge voltage 4 1V cell allowable fast charge current 1C or less min discharge voltage cut off level 2 5V cell or higher voltage level 3 7V cell max charge voltage 4 2V cell allowable fast charge current 1C or less discharge voltage cut off level 3 0V cell or higher voltage level 3 3V cell max charge voltage 3 6V cell allowable fast charge current 4C or less e g A123M1 discharge voltage cut off level...

Page 6: ...to the battery Always make sure that no batteries are connected to leads before disconnecting them from the charger You have to pay attention to verify the capacity and the voltage of the Lithium battery pack It may be composed of parallel and series connection mixed In parallel link the capacity of the battery pack is multiplied by the number of cells but the voltage remains the same That kind of...

Page 7: ... 2S Battery Type Select Pb Pb CHARGE 10 0A 4V 2P Battery Type Select NiMH NiMH CHARGE 10 0A 2 4V 2S Battery Type Select NiCd Program Select Load Date Program Select Save Date Load 0 FAST LiPo 2S 5 0A Save 0 FAST LiPo 2S 5 0A Start Enter Load Memory 0 NO YES Start Enter LiPo FAST 5 0A 7 4V 2S Start Enter Cover Previous Memory 0 NO YES Start Enter NiCd CHARGE 10 0A 2 4V 2S Program Select Save Date U...

Page 8: ...erent battery performance 6 Power Allocation Power allocation is only effective under AC power supply have intelligent allocation and average allocation two modes Power Intelligent allocation is allocate power by channels it can improve charger s working efficiency shorten charging time with intelligent allocation design to meet different user s needs Single channel working power can reach to 100W...

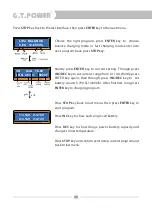
Page 9: ...uation the charging capacity may smaller than the charging capacity under normal charging but reduced the charging time This charger has two channels function each channel operation process is the same below use the first channel to illustrate the operation process When channel led light constantly lights you can switch channel and system setting program by CHANNEL SELECT key After choose the righ...

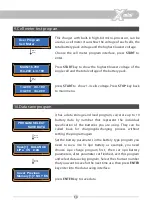
Page 10: ... key to show each single cell battery Press DEC key to show charge power battery capacity and charger s inner temperature Press STOP key and confirm exit to stop current program and back to last menu Shortly press ENTER key to current setting Through press INC DEC key to set current range from 0 1 10A shortly press ENTER key again then through press INC DEC key to set battery counts 3 7V 1S 14 8V ...

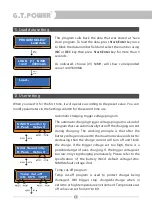
Page 11: ...mber that represent the individual specification of the batteries you are using They can be called back for charging discharging process without setting the program again press ENTER key to save data Set the battery parameters in the battery type program you need to save Use 3s lipo battery as example you need choose Lipo charge program first then set lipo battery parameters after parameter set fi...

Page 12: ...principle is that after the battery voltage increased to the maximum value and start to decreasing then the charge current will turn off and finish the charge If the trigger voltage set too high there is a possible danger of over charging If the trigger voltage set too low may stopcharging prematurely Please refer to the specification of the battery NiCd default voltage 12mv NiMH default voltage 7...

Page 13: ...ng discharg ing automatically if you ve set the maximum charging capacity range from 10mAh to 50000mAh Capacity cut off program Sound setting DC input power is 19 26V the program set the lowest cut off input voltage value is 19 26V If the voltage lower than the setting voltage level procedure will be forced to end to protect input power Input Power low cut off Resume to the default setting Load fa...

Page 14: ...sure input voltage fluctuation range not exceeds the normal allowable range 3 BATTERY VOL ERR CELL CONNECT unit battery voltage error please check the battery voltage one by one 4 TEMP OVER ERR The internal temperature of the unit goes too high you need to cooling down the unit 5 SHORT CIRCUIT ERROR Short circuit you need to check charge circuit and related equipment 6 CAP OUT Over the charger s c...

Page 15: ...Standards Title Result EN 60335 1 EN55014 1 EN55014 2 EN61000 3 2 EN61000 3 3 FCC Part 15B Conform Conform Conform Conform Conform Conform Conform Household and similar electrical appliances _ Safety _ Part 2 29 Particular requirements for battery chargers Household and similar electrical appliances Safety Part 1 General requirements Electromagnetic compatibility _ Requirements for household appli...

Page 16: ......

Reviews: