6
1.
The space in the room where the appliance is installed must not be smaller than
10
cubic mete
r
s.
2.
See pages
1
4
to
29
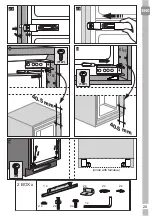
for detailed Installation Instructions including reversing door
opening direction.
3.
This appliance has been designed to operate in ambient temperatures up to
43
degrees C (
10
9
degrees F) and is equipped with
Freezer Guard technology which
ensures that even if the ambient temperature falls to -15°C, frozen food in the
freezer does not thaw thanks to this
.
So
,
you may then install your appliance in a
garage or an unheated room without
having to worry about frozen food in the freezer
being spoilt. However
,
at low
ambient temperatures mentioned above, fridge
contents
are likely to freeze, so
check and consume food in the fridge accordingly.
When the
ambient temperature
returns to normal, you may change the
temperature
setting
to
suit your needs.
If the ambient temperature is below 0°C, the food in the fridge compartment will
freeze. So, we recommend you don’t use the fridge compartment in such low
ambient
conditions. You can continue using the freezer compartment as usual.
4.
Do not place the appliance near cookers, radiators or in direct sunlight as this will
cause your appliance to work harder. If installed next to a source
of heat or
freezer,
maintain the following minimum side clearances:
From Cookers
50 mm (2")
From Radiators
300 mm (12")
From Freezers
25 mm (1")
5.
6.
IMPORTANT
INSTALLATION INSTRUCTIONS
Refer to cleaning and care section to prepare your appliance for use.
A special receptacle is supplied to store the
mains plug during transit.
The receptacle is fixed at the back of the
cabinet, on the side of the compressor
(
s
ee
diagram)
.
Gently remove the plug from the
receptacle. Never pull the mains cord, you may
damage the appliance. In the case of
transportation,
ensure you locate the plug in the
receptacle provided to avoid transit damage.
Summary of Contents for GKNEMI573
Page 1: ...Refrigerator Installation User instructions GKNEMI573 ENG...
Page 16: ...71 mm 40 mm 200 cm2 629 mm 1001 mm 16 mm 1778 1788 mm min 200 cm2 4 mm 15...
Page 18: ...17 1 A 1 B 1 C...
Page 19: ...1 D 40 5 mm 1 E 40 5 mm 1TW 1 F 1 F 1 G 1 H 1 2 click 2 click 1 1 F 2T 18...
Page 20: ...T 2 A 2 B 40 5 mm 40 5 mm 1TW 2 C 2 C 2 2 D 19...
Page 22: ...8 5 8 5 6 7 8 9 21...
Page 23: ...10 22...
Page 24: ...A A E Top view A 2 mm is recommended 11 23...
Page 25: ...X X W y W C HD1 X y 1072 HD3 C HD3 C HD1 C HD1 12 13 24...
Page 26: ...14 15 25...
Page 27: ...16 17 26...
Page 28: ...18 click click 27...
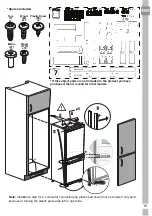
Page 29: ...W A2 A2 A2 A1 A2 A1 A2 A1 A2 A1 A2 19 20 21 22 2 mm 2 mm 2 mm 4 mm 28...
Page 35: ...Notes 34...


