


5
TRANSPORTATION INSTRUCTIONS
1.
The appliance should be transported only in a vertical upright position. The packing
as supplied must be intact during transportation.
2.
If transported horizontally, leave to stand upright for at least
4
hours before
switching
on, to allow compressor oil to settle.
3.
Failure to comply with the above instructions could result in damage occu
r
ring to
the
appliance. The manufacturer will not be held responsible if these instructions are
disregarded.
4.
The appliance must be protected against rain, moisture and other atmospheric
influences.
5.
When positioning your appliance take care not to damage your flooring, kitchen
furniture, related parts and doors, pipes, wall coverings etc. Do not move the
appliance by pulling by the door.
6.
Empty any water in the drain tray before moving. See section ‘
DEFROSTING
’ and
‘
CLEANING AND CARE
’ for further information.
7.
Make sure that the defrost water pipe at the back of the product is fixed to the
plastic
evaporating pan on the top of the compressor, to avoid defrost water spillage
on the
floor.
IMPORTANT:
Care must be taken while cleaning / carrying the appliance to avoid
touching the bottom of the condenser metal wires at the back of the appliance as you
might injure your fingers and hands.
Do not attempt to sit or stand on top of your appliance as it is not designed for such
use. You could injure yourself or damage the appliance.
"IMPORTANT:
Make sure that mains cable is not caught under the appliance during
and after carrying / moving the appliance, to avoid the mains cable becoming cut or
damaged."
Do not allow children to play with the appliance or tamper with the controls.
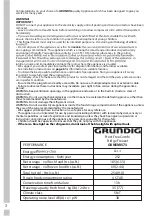
GRUNDIG
declines to accept any liability should the instructions not be followed.
Summary of Contents for GKNEMI573
Page 1: ...Refrigerator Installation User instructions GKNEMI573 ENG...
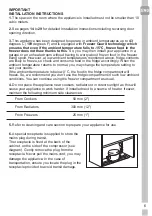
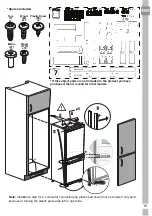
Page 16: ...71 mm 40 mm 200 cm2 629 mm 1001 mm 16 mm 1778 1788 mm min 200 cm2 4 mm 15...
Page 18: ...17 1 A 1 B 1 C...
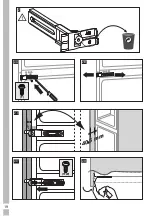
Page 19: ...1 D 40 5 mm 1 E 40 5 mm 1TW 1 F 1 F 1 G 1 H 1 2 click 2 click 1 1 F 2T 18...
Page 20: ...T 2 A 2 B 40 5 mm 40 5 mm 1TW 2 C 2 C 2 2 D 19...
Page 22: ...8 5 8 5 6 7 8 9 21...
Page 23: ...10 22...
Page 24: ...A A E Top view A 2 mm is recommended 11 23...
Page 25: ...X X W y W C HD1 X y 1072 HD3 C HD3 C HD1 C HD1 12 13 24...
Page 26: ...14 15 25...
Page 27: ...16 17 26...
Page 28: ...18 click click 27...
Page 29: ...W A2 A2 A2 A1 A2 A1 A2 A1 A2 A1 A2 19 20 21 22 2 mm 2 mm 2 mm 4 mm 28...
Page 35: ...Notes 34...


