background image

DEUTSCH

ANSCHLIESSEN/VORBEREITEN

 --------------------------------------------------------------

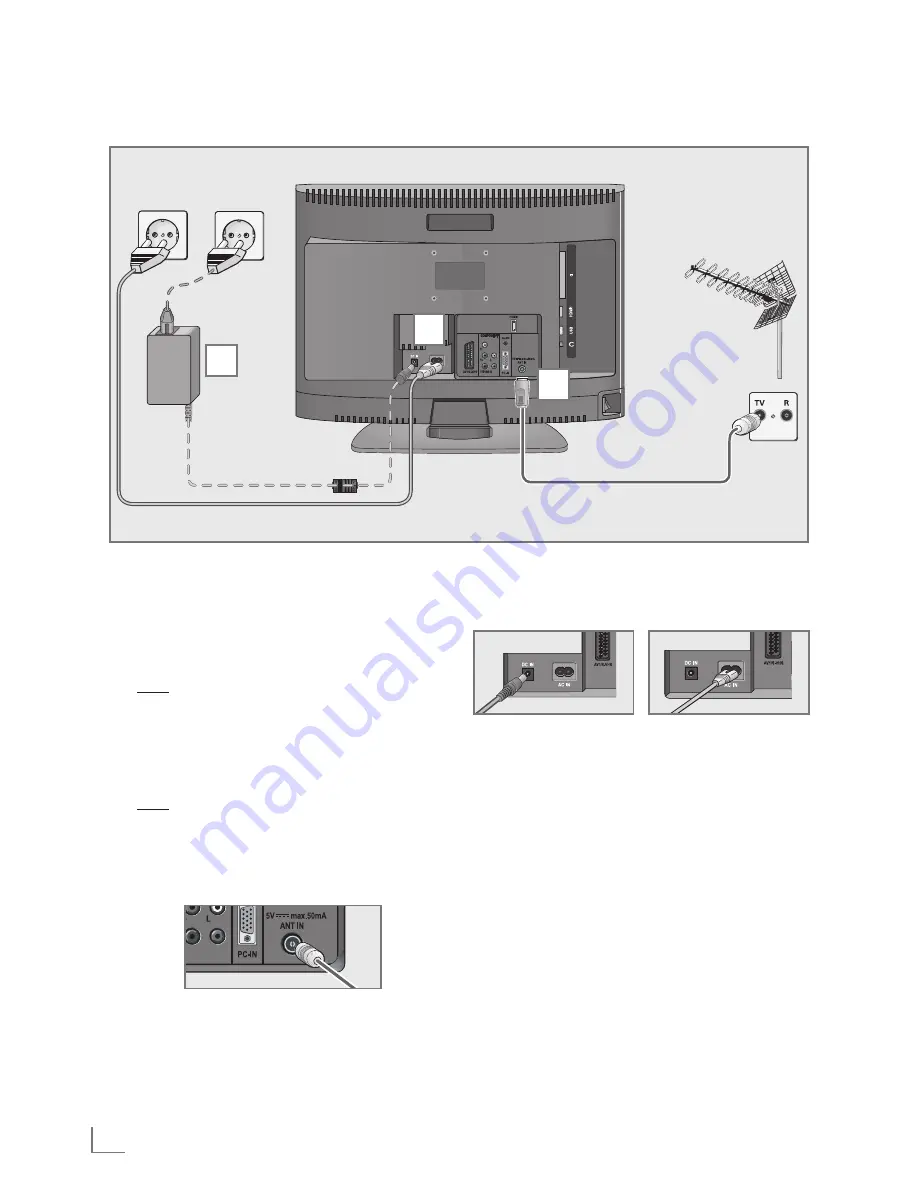
Antenne und Netzkabel anschließen

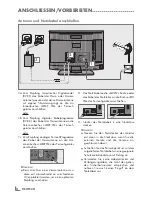
1a

 Zum  Empfang  terrestrischer  Digitalsender 

(DVB-T)  das  Kabel  der  Haus-  oder  Zimmer-

antenne (passive oder aktive  Zimmerantenne 

mit  eigener  Stromversorgung)  an  die  An-

tennenbuchse 

»

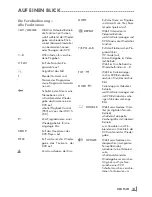
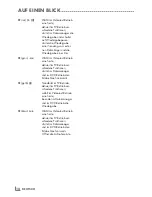
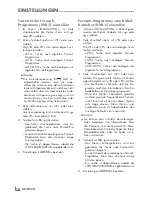
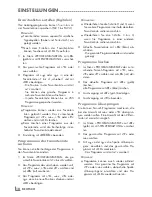
ANT  IN

«

  des  Fernseh-

gerätes anschließen;


oder

1b

 Zum  Empfang  digitaler  Kabelprogramme 

(DVB-C) das Kabel der Hausantenne an die 

Antennenbuches 

»

ANT  IN

«

  des  Fernseh-

gerätes anschließen;


oder

1c

  Zum Empfang analoger Fernseh-Programme 

das  Kabel  der  Hausantenne  an  die  Ant-

ennenbuches 

»

ANT IN

«

 des Fernsehgerätes 

anschließen

2

  Das Netzkabel an die 

»

AC IN

«

 Buchse oder 

das Kabel des Netzteiles an die Buchse 

»

DC 

IN

«

 des Fernsehgerätes anschließen.

Hinweis:

7


Beim  Anschluss  einer  Zimmerantenne  muss 

diese  evtl.  abwechselnd  an  verschiedenen 

Orten platziert werden, um einen optimalen 

Empfang zu erhalten.

3

  Stecker  des  Netzkabels  in  eine  Steckdose 

stecken.

Hinweis:

7


Stecken  Sie  den  Netzstecker  des  Ge rätes 

erst  dann  in  die  Steckdose,  wenn  Sie  die 

 externen  Geräte  und  die  Antenne  an-

geschlossen haben!

7

  Schließen Sie das Fernsehgerät nur mit dem 

mitgelieferten Netzkabel an eine geeignete 

Schutzkontaktsteckdose mit Erdung an. 

7

  Verwenden  Sie  keine  Adapterstecker  und 

Verlängerungskabel,  die  nicht  den  gelten-

den  Sicherheitsnormen  entsprechen  und 

nehmen  Sie  auch  keinen  Eingriff  an  dem 

Netzkabel vor.

1

3

2

Summary of Contents for 22 VLE 2100 DVD

Page 1: ...ions when using an external data medium 26 Connecting external data media 26 Settings for USB recording 27 Pausing time shift programmes 28 Recording programmes 29 Presetting programmes to be recorded 30 Playback 31 Deleting programmes in the recording list 32 DVD PLAYBACK 32 Special DVD features 33 Preparation 33 Inserting the disc 33 Removing the disc 33 Playing a track 34 Additional playback fu...

Page 2: ... for digital terrestrial TV channels automatically 62 Searching for digital terrestrial TV channels manually 63 Tuning analogue television channels 64 Changing stored analogue channels 66 DVD SETTINGS 66 Setting the TV system TV norm 66 Selecting the TV format for your television 66 Selecting the language of the screen menu 66 Displaying and concealing the multi angle symbol 67 Resetting the DVD t...

Page 3: ...claims are excluded for damage resulting from improper handling 7 Make sure the power cord or the power sup ply unit if provided are not damaged 7 Only operate the television with the power supply power cord provided For products with a power supply only 7 Thunderstorms are a danger to all electrical devices Even when the television is switched off it can be damaged by a lightning strike to the ma...

Page 4: ...equip ment and the antenna 7 Make sure the mains plug is freely accessible Caution 7 If you plan on using a wall bracket for your television make sure you read the assembly manual for the wall bracket or have a spe cialist assemble it 7 When purchasing the wall bracket make sure that all the fastening points on the televi sion are also on the wall bracket and that they are all used when mounting i...

Page 5: ...ovides an overview of all the broadcasters schedules for the next few days Detailed information on the individual television programmes are when provided by the broadcasting station are also avail able in the electronic TV guide 7 You can connect various data media such as an external hard drive a USB memory stick or a digital camera to the USB socket Using the file browser you can then select and...

Page 6: ...dealer The range of channels available from the pub lic broadcasting institutions ARD with EinsEx tra EinsFestival or ZDF with ZDF Info and all third party broadcasters are not encrypted and can be received without a SmartCard Important notes on environmental protection 7 The following information will help you to save resources and money as well 7 If you are not using your television set for seve...

Page 7: ...antenna to the an tenna socket ANT IN on the television set 2 Plug the power cable to the AC IN socket or the cable of the external power supply to the DC IN socket of your television Note 7 When connecting an indoor antenna you may have to try it out at different positions until you get the best reception 3 Plug the power cord into a wall socket Note 7 Do not plug in the power cord of the device ...

Page 8: ...le batteries batteries or on the packaging indicates that the rechargeable bat tery battery may not be disposed of with regular household rubbish For certain rechargeable batteries batter ies this symbol may be supplemented by a chemical symbol Symbols for mercury Hg or lead Pb are provided if the recharge able batteries batteries contain more than 0 0005 mercury or more than 0 004 lead Rechargeab...

Page 9: ...et for S Video camcorder COMPONENT Pb Pr Y CVBS Sockets for video input YUV signal L R Sockets for audio input YUV signal Audio socket for camcorder Y CVBS Video socket for camcorder Audio Socket for audio input for a PC PC IN VGA socket video input for PC ANT IN Antenna socket for a DVB T DVB C and analogue antenna HDMI2 HDMI socket audio video input U Headphone jack 3 5 mm jack plug Sockets for ...

Page 10: ...ot Controls on the television set O I Power switch switches the televi sion to off 8 Switches the television on and back into standby mode Adjusts the volume Selects channels in steps Selects menu functions V P Pre selection for volume or station Switches the television on from standby Adjusts the volume Selects channels in steps Selects menu functions ...

Page 11: ...menus OK Opens the channel list Activates various functions Sound on off mute Switches the television on from standby and back Into standby mode Switch the television on from standby mode Select stations directly Zapping function Opens the pre selection for AV channels and the USB input Then select with C D or B A and confirm using OK Switch the television on from standby mode select channels in s...

Page 12: ...ser and DVD mode EPG A B Opens the electronic TV guide Reveals answers in teletext mode Selects during disc modus the A B repeat function TXT X Selects the next track the next picture in the file browser and DVD mode HOLD Y Page hold in teletext mode Selects the previous track the previous picture in the file browser and DVD mode J DOUBLE Selects different subtitles in digital TV mode Switches to ...

Page 13: ...ous functions Selects a page in teletext mode Ends playback in the file browser and DVD mode O blue W Selects a page in teletext mode Activates in tv mode various functions Starts the forward picture search in the file browser and DVD mode Opens the recorded list OVERVIEW ...

Page 14: ...nctions starting on page 53 Note 7 Make the language and country selection for all types then continue reading the respective chapter Selecting language country and operating mode 1 Switch on the television set from standby with POWER 1 0 or P or P During initial set up the Installation Guide will be displayed Help 7 If this menu is not displayed restore the television set to its default settings ...

Page 15: ...annels from the cable provider DVB C 1 In the Source Setup menu in the Connec tion Type line select the option Cable with B or A 2 Select the line Scan Type with C or D Use B or A to set the required scan type DTV scan for digital television channels ATV scan for analogue television channels ATV DTV scan for analogue and digital television channels 3 Select the line Cabel Scan Type with C or D Sel...

Page 16: ...RCE SETUP menu with C or D and press OK to confirm The SOURCE SETUP menu appears 3 Select the line Programe Table with C or D and press OK to confirm The menu PROGRAM TABLE appears Important 7 Programe table and favourites lists are saved separately according to the different input sources cable and air 7 When opening the programme table the respective channel list for the current input signal app...

Page 17: ...e favourites list 1 to 4 2 Select the channel which should be moved with C D B or A and mark it with O red 3 Move the channel to its new position with C D B or A and press OK to confirm Notes 7 Repeat steps 2 and 3 if you would like to change other channels within the same favourites list 7 Repeat steps 1 to 3 if you would like to change channels in a different favourites list 4 Exit the current f...

Page 18: ...elect the line DNR Mpeg NR Vibrant Colour Perfect Clear Film Mode Gamma Dynamic Contrast Dynamic Backlight or Backlight with C or D Select the value with B or A and press OK to confirm Notes 7 You can only select the Mpeg NR function on digital and AV presets Mpeg NR reduces any interference from artefacts pixel blocks from digital pro grammes due to MPEG compression such as from DVB T receivers o...

Page 19: ...n you switch between channels 1 Select the line AVL with C or D and select the option On with B or A Note 7 If the SRS TS HD setting has been selected in the Audio Mode line the AVL line can not be selected Stereo two channel sound mono If the device receives two channel sound pro grammes e g a film with the original soundtrack on audio channel B display Dual II and the dubbed version on sound cha...

Page 20: ...d Medium as User 1 Select Equalizer with C or D and press OK to confirm The EQUALIZER menu appears Note 7 If the SRS TS HD setting has been selected in the Sound Mode line the Equalizer line will not indicate 2 Select the frequency bandwidth 120Hz with C or D Set the preferred value with B or A 3 Set the next frequency bandwidth with C or D and repeat the setting 4 Press W to save the setting Audi...

Page 21: ... confirm 3 Use 1 0 to switch back to the television channel Adjusting the volume 1 Adjust the volume with V or V Switching sound on off 1 Press MUTE to mute the sound or switch it on again Displaying information 1 Display information with İ The display disappears automatically after a short while Freeze frame If you wish to view a particular scene for longer you can freeze the frame of the current...

Page 22: ...de a detailed TV guide 7 Many broadcasters transmit the current schedule but do not offer detailed descrip tions 7 There are broadcasters which do not pro vide any information at all 2 Press C or D to select a television channel Today s programmes on the television channel selected are displayed 3 Switch to the information about the current programme with A Notes 7 You can open and switch off the ...

Page 23: ...etely and with the correct geometry 4 3 format The picture is shown in 4 3 format LetterBox format The letterbox format is especially suitable for programmes in 16 9 format The black borders which are usually at the top and bottom of the screen are eliminated 4 3 pic tures fill the screen The transmitted pictures are enlarged but are slightly cropped at the top and bottom The pic ture geometry rem...

Page 24: ...and direct playback of a DVD using the menu of the DVD player on the television screen Special DVD features 7 DVDs have an overview of all the tracks and track sections in the track menu 7 Some of the DVD player functions such as slow motion freeze frame and auto play can also be controlled by the DVD itself Because of this you may not be able to select these functions during certain scenes 7 Many...

Page 25: ...ss 8 to pause playback freeze frame 3 Press 8 to resume playback 4 To stop playback press 7 twice Viewing information You can view information about the track chap ter playing time and much more on the screen 1 Display info line by pressing i 2 Conceal the info line by pressing i Selecting tracks and chapters with the DVD menu The DVD may contain several tracks or chapters you can choose from You ...

Page 26: ...the picture section on the screen 3 Press N to return to normal picture size DVD PLAYBACK Selecting tracks using the info menu The function depends on the DVD you are using 1 During playback display the info bar by pressing GOTO 2 Press B or A to select the track 3 Enter the track with two digits using 1 0 and confirm with OK Playback begins with the track you selected Selecting chapters using the...

Page 27: ...suppressed by the structure of the DVD itself In this case you can usually make the setting in the DVD menu Selecting the camera angle for particular scenes or passages Some DVDs contain scenes or passages which were filmed several times from different camera angles You can choose from these different angles 1 Press ANGLE during playback to select the camera angle function 2 To select another came...

Page 28: ...epends on how the S VCD VCD was created 7 Depending on how they were created S VCDs can have various subtitles and dubbed languages PBC playback control 7 PBC is a navigation option for S VCDs VCDs PBC information is copied onto the disc when it is manufactured W switches between the playlist structure the menu on the S VCD VCD and the manual selection by the user 7 PBC is activated when it is rea...

Page 29: ...MP3 WMA audio data MP3 stands for MPEG 1 Audio Layer 3 and comes from the Motion Picture Expert Group MPEG standard which was developed for compressing audio and video data 7 WMA is a compression standard for audio data Windows Media Audio 7 These formats enable audio files to be saved on a computer with a sound quality similar to that of a CD 7 MP3 files can be organised into folders and subfolde...

Page 30: ... 2 Select the folder or track picture with D or C and open with OK A list of sub directories appears 3 Select the file with D or C 4 Start playback with OK or 8 Notes 7 Switch back to the main folder with B 7 The file browser is switched off when playing picture data Press W to switch back to the file browser 5 Press 8 to pause playback 6 Press 8 to resume 7 Press 7 to end playback Additional play...

Page 31: ...y for example Audio 1 3 AC3 5 1CH German is displayed briefly and the current dubbing language is displayed in the example the 1st of 3 possible dubbed languages sound format AC3 2 Select the dubbed language by pressing M repeatedly Playing picture CDs 1 In most cases playback starts automatically with the first picture after the data has been scanned 2 Once the file browser appears select the fol...

Page 32: ...functions Repeat the track or folder Options Track the selected track is repeated once All the selected folder is repeated once 1 Select the folder or track picture with D or C A list of sub directories appears 2 Select the first file with D or C 3 Press OK or 8 to start playback 4 Select the repeat function by pressing REPEAT repeatedly 5 Press 7 to end playback PLAYING AUDIO VIDEO DATA Repeating...

Page 33: ...hich was developed by the MPEG Motion Picture Expert Group AAC stands for Advanced Audio Coding and was also developed by MPEG AAC provides better sound quality at an identical data rate WMA Windows Media Audio is a compres sion standard for audio data developed by Microsoft These formats allow audio files to be recorded and played which sound as good as a CD while taking up only a fraction of the...

Page 34: ...ust also be disconnected from the power supply when the television is switched off 7 External data media may not be disconnect ed from the television set while files on the data medium are being accessed 7 A bi directional data transfer as defined for ITE Information Technology Equipment devices in EN 55022 EN 55024 is not possible 7 USB transfer is not in itself an operating mode It is only an ad...

Page 35: ...irm The USB SETUP menu appears Note 7 Additional functions are explained in the following sections Switching on automatic preview If this function is switched on a preview of the selected file then appears in the file browser 1 Select the line Auto Preview with C or D 2 Switch on the function with B or A On 3 Press MENU to end the setting Selecting the display mode 1 Select View Mode with C or D 2...

Page 36: ...mation on how to complete your registration USB OPERATION Basic playback functions 1 Select the data medium by pressing I use C D B or A to select the op tion USB and press OK to confirm The file browser appears 2 Select the file format video files audio files picture files with C or D 3 Switch to the folder file list with OK 4 Select the folder or file with C or D and press OK to open it A list o...

Page 37: ...at are supported The names of the subtitle and film files must be identical Otherwise no subtitles will be shown Additional playback functions Depending on the file format the following additional functions are available Selecting chapters on DivX files only video files 1 During playback select the next chapter with A 2 During playback select the previous chapter with B Note 7 You can also select ...

Page 38: ...1 Select the playback speed during playback with R or S 2 Press 8 to resume normal playback Enlarging or reducing the display for video and audio files only This function allows you to enlarge or reduce various picture sections 1 During playback or pause press N USB OPERATION Rotating pictures picture files only You can rotate pictures by 90 1 During playback press B or A to rotate the pictures by...

Page 39: ... as the page is found the page number is displayed 2 Press M to switch to the teletext page Enlarging the character height If you have difficulty reading the text on the screen you can increase the character height 1 To enlarge the character height of a teletext page keep pressing J Page hold A multiple page may contain several sub pages which are automatically scrolled by the broad casting statio...

Page 40: ...condary audio language The primary and secondary language is display at the top right in the menu 3 Press MENU to end the setting Changing the subtitle language and subtitle mode only for digital television channels You can switch the subtitles on and off select the subtitle language and allocate a second subtitle language 1 Select the line Subtitle with C or D and press OK to confirm The Select S...

Page 41: ... with 1 0 and press OK to confirm Timer settings Entering the switch off time sleep timer In the Sleep Timer menu you can enter a time for the television to switch off After this time has elapsed the television switches to standby mode 1 Select the line Sleep Timer with C or D 2 Enter the switch off time with B or A Note 7 To switch off the function use B or A to set the switch off time to Off 3 P...

Page 42: ...NVENIENCE FUNCTIONS Parental control settings Authorising programmes There are films which may be wholly or partially unsuitable for children These programmes contain information which marks the content or scenes with access levels of 4 to 18 You can select one of the access levels thereby authorising playback 1 Select the line Parental Guidance with C or D and press OK to confirm 2 Enter the PIN ...

Page 43: ...ock the channel 7 Enter the PIN code 1234 with 1 0 The channel is marked using Note 7 To remove the lock select the channel again with C or D press OK to confirm and then enter the PIN code 1234 using 1 0 8 Press MENU to end the setting Updating software for digital channels only 1 In the SETTINGS menu select the line Check For Updates updates with C or D and press OK to confirm A search for new s...

Page 44: ...guage is automatically selected on the external device e g DVD player The external device must support this function Switching off the external device automatically If you switch your television to standby the ex ternal device if it is switched on will also be switched to standby DIGI LINK is always active on your television set OPERATION USING EXTERNAL DEVICES Searching for and activating externa...

Page 45: ...al device which has been connected 7 Try out which type of remote control opera tion the external device reacts to the best 7 Read about the scope of functions of the DIGILINK compatible device in the respec tive operating manual 6 Press MENU to end the setting Switching the device to standby This option switches the external device to standby 1 Press I use C D B or A to select the preset HDMI1 or...

Page 46: ...epends on the sockets the external device is equipped with and the signals which are available 7 Please note With many external devices the resolution of the video signal must be adjusted to the input sockets of the television see the operating manual of the external device You can find out which values you need to set by referring to the guidelines in the sections about the various connection opt...

Page 47: ... corresponding sock ets of the external device with RCA cables audio signal OPERATION USING EXTERNAL DEVICES using the SCART socket FBAS RGB signal 7 Suitable devices Digital satellite receiver DVD player recorder set top box games con sole video recorder decoder 7 Video signal FBAS RGB 7 Audio signal stereo analogue 7 AV1 preset 1 Connect the AV1 S VHS socket on the television and the correspondi...

Page 48: ... video recorder or set top box 1 Switch on the external device and select the function you wish to use 2 Press I use C D B or A to select the preset for the input signal AV1 AV2 S VHS HDMI1 HDMI2 or Component and press OK to confirm Headphones Connecting the headphones 1 Plug the headphone jack 3 5 mm ø jack plug into the headphone socket on the left side of the television Changing the headphone v...

Page 49: ...tup with C or D and press OK to confirm The menu appears 4 Select the line Audio Out with C or D and press B or A to activate the audio output Line Out 5 Select the line Audio Out Status with C or D and select the option Fixed or Adjustable with B or A OPERATION USING EXTERNAL DEVICES Notes 7 When Adjustable is selected Line Out volume will be the same with the current speaker s volume When you ch...

Page 50: ...th MENU 2 Select the SOURCE SETUP menu item with C or D and press OK to con firm The SOURCE SETUP menu appears 3 Select the function or setting with C or D and then use C D or B A to implement it OPERATION AS A PC MONITOR Options Auto Ajust for automatic PC configura tion Auto Ajust Mode select the option On if the configuration should be imple mented automatically in PC mode Position to configure...

Page 51: ...dule with the smart card into the CI slot on the television Note 7 In the CA Module sub menu you can see which CA module has been inserted in the CI slot 7 If you are inserting a CA module into the CI slot of the television for the first time you will need to wait a moment until the CA mod ule is detected Access control for CI module and smart card 1 Open the menu with MENU 2 Select the line SOURC...

Page 52: ...take a long time with this option This op tion is recommended if your cable provider does not support the search type Quick Note 7 You can accelerate the search To do this you need information about the frequency and network ID You are usually able to get this data from your cable operator or find it in forums on the Internet For example the frequency 402MHz and network ID 61441 can be entered for...

Page 53: ...the menu with MENU 2 Select the line SOURCE SETUP with C or D and press OK to confirm The SOURCE SETUP menu appears 3 Select the line Source with C or D and press OK to confirm Select the option Air with B A C or D and press OK to confirm Caution 7 The antenna power supply line Active Antenna Power may only be switched on if the antenna is an active indoor antenna with a signal amplifier and it is...

Page 54: ... the automatic update with B or A On 5 Press MENU to end setting Searching for digital terrestrial TV channels manually 1 Open the menu with MENU 2 Select the line SOURCE SETUP with C or D and press OK to confirm The SOURCE SETUP menu appears 3 Select the line Source with C or D and press OK to confirm Select the option Air with B A C or D and press OK to confirm Caution 7 The antenna power supply...

Page 55: ...ing on the number of television channels received this can easily take a few minutes The search is complete as soon as the PRO GRAM TABLE appears 7 Press MENU to end the setting Tuning analogue television channels This setting is only necessary if you cannot re ceive any digital channels and you have not car ried out an analogue search during initial setup The television channels can be set direct...

Page 56: ...evision channels to be deleted 3 Press O green to confirm the deletion process Tuning the television channels by entering the channel numbers 1 Open the menu with MENU 2 Select the line SOURCE SETUP with C or D and press OK to confirm The SOURCE SETUP menu appears 3 Select the line Analogue Manual Tuning with C or D and press OK to con firm The menu appears Program No TSystem Band Channel Fine Tun...

Page 57: ...irm 2 Open the input keyboard with O green Note 7 If necessary delete the current channel name To do this select the button with B or A and delete repeatedly using OK 3 Select the required letters or numbers with C D B or A and confirm with OK Repeat the entry for further letters numbers Note 7 Use the ABC button to switch to upper case letters and use the 123 button to switch to symbols and numbe...

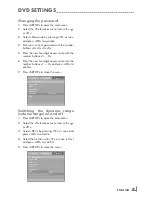
Page 58: ...ge Tv Type Tv Display Normal Ps Normal Lb Wide Selecting the language of the screen menu This sets the language of the screen menu for op eration 1 Press SETUP to open the main menu 2 Select the Language menu item with B or A 3 Select the OSD Language by pressing C or D and press OK to activate 4 Select the language by pressing C or D and press OK to confirm 5 Press SETUP to close the menu Video P...

Page 59: ...s OK to confirm Note 7 To deactivate the function repeat the setting and select Off 5 Press SETUP to close the menu Video Preference Language Preference Angle Mark Default Last Memory On Parental Off Password DRC Authorising the content of a DVD Films on DVD may be wholly or partially unsuit able for children These DVDs contain information which marks the content or scenes with access levels of 1 ...

Page 60: ...r buttons 1 0 and press OK to confirm 7 Press SETUP to close the menu Video Preference Language Preference Angle Mark Default Last Memory Parental Change Password DRC Switching the dynamic range volume range on and off 1 Press SETUP to open the main menu 2 Select the Preference menu item with B or A 3 Select DRC by pressing C or D and press OK to activate 4 Select the function with C or D On and p...

Page 61: ... and signal strength is displayed Notes 7 The signal information changes in accord ance with the current input source 7 The signal properties are displayed in the lower section of the menu The further the bars for Quality and Signal Strenght extend to the right the better the reception signal 7 The signal level not only depends on your receiver system but also on the channel which is currently act...

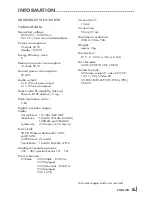
Page 62: ...Hz 862 MHz Modulation 16QAM 32QAM 64QAM 128QAM and 256QAM Symbol rate 4 0 Msym s to 7 0 Msym s Terrestrial VHF UHF band Bandwidth 7 MHz and 8 MHz COFDM modi 2k and 8k Constellation 16QAM 64QAM QPSK Analogue reception ranges C02 C80 special channels S01 S41 Preset channels TV Radio 1000 Cable DVB C or 100 Analogue 1000 Terrestrial DVB T or 100 Analogue 7 AV 1 USB Screen dm 13 dm Screen size 55 cm 2...

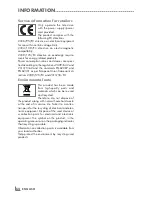
Page 63: ...087 and EN62301 as per European Union framework di rectives 2009 125 EC and 2010 30 EU Environmental note This product has been made from high quality parts and materials which can be re used and recycled Therefore do not dispose of the product along with normal household waste at the end of its service life Take it to a collec tion point for the recycling of electrical and elec tronic equipment D...

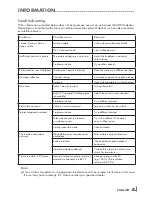
Page 64: ...erent position Ghosting reflection Channel setting Automatic or manual tuning fine tuning Antenna Have antenna cable or system checked No colour Colour intensity too low Turn up the colour Adjust TV standard if setting option is available Select the correct colour standard Problem at station Try a different channel Picture but no sound Volume is set to a minimum Turn up or switch on the volume Tel...

Page 65: ...wires in the mains lead are colour coded in accordance with the following code BLUE NEUTRAL BROWN LIVE As the colours of the wires in the mains lead of your appliance may not correspond with the col oured marking identifying terminals in your plug proceed as follows Connect the BLUE coloured wire to plug terminal marked with the letter N or coloured black Connect the BROWN coloured wire to the plu...

Page 66: ...www grundig com 72011 762 2000 11 30 ...

Page 67: ...LCD TV 22 VLE 2100 DVD EN DE ...

Page 68: ... USB Recording 27 Timeshift Sendungen anhalten 28 Sendungen aufnehmen 29 Sendungen für die Aufnahme programmieren 30 Wiedergabe 31 Sendungen in der Aufnahmeliste löschen 32 WIEDERGABE EINER DVD 32 Besonderheiten des DVD Betriebes 33 Vorbereiten 33 Disc einlegen 33 Disc entnehmen 33 Wiedergabe eines Titels 34 Zusatzfunktionen der Wiedergabe 35 Ein Kapitel einen Titel oder die Disc wiederholen 35 Wi...

Page 69: ...SONDEREINSTELLUNGEN 61 Digitale terrestrische Fernseh Programme automatisch suchen 62 Digitale terrestrische Fernseh Programme manuell suchen 63 Analoge Fernseh Programme einstellen 64 Programmbelegung der analogen Programme ändern 66 DVD EINSTELLUNGEN 66 TV System einstellen TV Norm 66 TV Format Ihres Fernsehgerätes wählen 66 Sprache der Bildschirmmenüs wählen 66 Multi Angle Symbol aus und einble...

Page 70: ...ingriffe entstehen geht der An spruch auf Gewährleistung verloren 7 Achten Sie darauf dass das Netzkabel oder wenn vorhanden der Netzadapter nicht beschädigt wird 7 Das Fernsehgerät darf nur mit dem bei liegenden Netzkabel Netzadapter betrieben werden nur bei Geräten mit Netzadapter 7 Gewitter stellen eine Gefahr für jedes elek trische Gerät dar Auch wenn das Fernseh gerät ausgeschaltet ist kann e...

Page 71: ... Achtung 7 Wenn Sie für Ihr Fernsehgerät eine Wand halterung vorsehen beachten Sie unbedingt die Montageanleitung zur Wandhalterung oder lassen Sie die Montage durch Ihren Fachhändler durchführen 7 Beim Kauf der Wandhalterung achten Sie bitte darauf dass alle am Fernsehgerät vorgesehenen Befestigungspunkte an der Wandhalterung vorhanden sind und bei der Montage verwendet werden AUFSTELLEN UND SICH...

Page 72: ...hiedensten Sendeanstalten für die nächs ten Tage Detaillierte Informationen zu den einzelnen Fernseh Sendungen sind falls von der Sen deanstalt angeboten ebenfalls im Elektro nischen Programmführer verfügbar 7 An die USB Buchse können Sie verschiedene Datenträger wie zum Beispiel eine externe Festplatte einen USB Memory Stick oder eine Digital Camera anschließen Mit Hilfe des Dateimanagers können ...

Page 73: ...einer SmartCard möglich Fra gen Sie bitte Ihren Fachhändler Das Programmangebot der öffentlich recht lichen Programmanbieter ARD mit EinsExtra EinsFestival oder ZDF mit ZDF Info und alle dritten Programme sind unverschlüsselt und können ohne SmartCard empfangen werden Wichtige Hinweise zum Umweltschutz 7 Die folgenden Hinweise helfen Ihnen na türliche Ressourcen zu schonen und es spart Kosten 7 We...

Page 74: ... Netzkabel an die AC IN Buchse oder das Kabel des Netzteiles an die Buchse DC IN des Fernsehgerätes anschließen Hinweis 7 Beim Anschluss einer Zimmerantenne muss diese evtl abwechselnd an verschiedenen Orten platziert werden um einen optimalen Empfang zu erhalten 3 Stecker des Netzkabels in eine Steckdose stecken Hinweis 7 Stecken Sie den Netzstecker des Gerätes erst dann in die Steckdose wenn Sie...

Page 75: ... oder an der Ver packung weist darauf hin dass der Akku die Batte rie nicht mit dem regulären Hausmüll ent sorgt werden darf Bei bestimmten Akku Batterien kann dieses Symbol durch ein chemisches Symbol ergänzt werden Sym bole für Quecksilber Hg oder Blei Pb werden angegeben wenn Akkus Batterien mehr als 0 0005 Quecksilber oder mehr als 0 004 Blei enthalten Die Akkus Batterien auch schwermetall fre...

Page 76: ...r COMPONENT Pb Pr Y CVBSBuchsen für Bildsignal Eingang YUV Signal L R Buchsen für Tonsignal Eingang YUV Signal Tonsignal Buchse für Camerarecorder Y CVBS Bildsignal Buchse für Camerarecorder Audio Buchse für Tonsignal Eingang für PC PC IN VGA Buchse Bildsignal Eingang für PC ANT IN Antennenbuchse für DVB T DVB C und analoge Antenne HDMI2 HDMI Buchse Ton Bild signal Eingang U Kopfhörerbuchse 3 5 mm...

Page 77: ...dienelemente des Fernsehgerätes I O Netzschalter schaltet das Fernsehgerät in Bereitschaft Stand by oder aus 8 Schaltet das Fernsehgerät aus Bereitschaft Stand by ein und wieder in Bereit schaft Lautstärke verringern Programmwahl abwärts V P Vorwahltaste für Lautstärke oder Programmwahl Schaltet das Fernsehgerät aus Stand by ein Lautstärke vergrößern Programmwahl aufwärts ...

Page 78: ...aus Stand by Programme wählen direkt Zapp Funktion Menü für AV Programmplätze USB Eingang und DVD Player aufrufen Anschließend mit C D oder B A wählen und mit OK bestätigen Einschalten aus Stand by Programme wählen schrtittweise Hauptmenü aufrufen Lautstärke ändern Umschalten zwischen Videotext und TV Betrieb Cursorsteuerung C D Bewegen den Cursor im Menü nach oben unten B A Bewegen Cursor im Menü...

Page 79: ...c GOTO Ruft das Menü zur Eingabe und Anwahl von Titel Kapi tel oder Spielzeit auf REPEAT Wählt Unterseiten im Videotext Betrieb wählt im Dateimanager und DVD Modus die Wiederhol Funktion EPG A B Ruft den Elektronischen Pro grammführer TV Guide auf Antwortfreigabe im Video text Betrieb Wählt im Disc Betrieb die Wiederholfunktion A B TXT X Wählt im Dateimanager und im DVD Betrieb den nächsten Titel ...

Page 80: ...ine Seite aktiviert im TV Betrieb ver schiedene Funktionen startet im Dateimanager und im DVD Betrieb den Bildsuchlauf rückwärts O gelb 7 Standbild im TV Betrieb aktiviert im TV Betrieb ver schiedene Funktionen wählt im Videotext Betrieb eine Seite beendet im Dateimanager und im DVD Betrieb die Wiedergabe O blau W Wählt im Videotext Betrieb eine Seite aktiviert im TV Betrieb ver schiedene Funktion...

Page 81: ...e Auswahl der Sprache und des Landes sind bei allen Varianten durchzuführen danach lesen Sie bitte im jeweiligen Kapitel weiter Sprache Land und Betriebsmodus wählen 1 Fernsehgerät mit POWER 1 0 oder P oder P aus Stand by einschalten Bei der ersten Inbetriebnahme wird das Menü Installationsassistent eingeblendet Hilfe 7 Wird dieses Menü nicht angezeigt setzen Sie das Fernsehgerät auf seine Werks e...

Page 82: ...ogramme vom Kabel betreiber DVB C einstellen 1 Im Menü INSTALLATION in Zeile Signal quelle die Option Kabel mit B oder A wählen 2 Zeile Suchlauf nach mit C oder D wählen Mit B oder A den notwendigen Such lauftyp einstellen DTV Suche nach digitalen Fernseh Programmen ATV Suche nach analogen Fernseh Programmen ATV DTV Suche nach analogen und digitalen Fernseh Programmen 3 Zeile Suchlaufart mit C ode...

Page 83: ...len und mit OK bestätigen Das Menü INSTALLATION wird ein geblendet 3 Zeile Programmtabelle mit C oder D wählen und mit OK bestätigen Das Menü PROGRAMMTABELLE wird eingeblendet Wichtig 7 Programmtabelle und Favoritenlisten werden nach den unterschiedlichen Signalquellen Kabel Terrestrisch getrennt gespeichert 7 Beim Aufrufen der Programmtabelle erscheint jeweils die Programmtabelle der aktuellen Si...

Page 84: ...t 1 bis 4 wählen 2 Das Programm das verschoben werden soll mit C D B oder A wählen und mit O rot markieren 3 Das Programm mit C D B oder A an seine neue Position schieben und mit OK bestätigen Hinweise 7 Wiederholen Sie die Schritte 2 und 3 wenn Sie weitere Programme innerhalb derselben Favoritenliste sortieren möchten 7 Wiederholen Sie die Schritte 1 bis 3 wenn Sie Programme in einer anderen Favo...

Page 85: ...hreduktion MPEG Artefakte Red Brillante Farben Perfect Clear Filmmodus Gamma Dynami scher Kontrast Dynamische Beleuchtung oder Hintergrundbeleuchtung mit C oder D wählen Gewünschten Wert mit B oder A ein stellen und mit OK bestätigen Hinweise 7 Die Funktion MPEG Artefakte Red kann nur bei digitalen und AV Programmplätzen ausgewählt werden MPEG Artefakte Red reduziert Störun gen durch Artefakte Pix...

Page 86: ...itliche Laut stärke wenn Sie von einem Fernseh Programm auf ein anderes umschalten 1 Zeile AVL mit C oder D wählen und mit B oder A die Option Ein wählen Hinweis 7 Wurde in der Zeile Ton Modus die Op tion SRS TS HD gewählt kann die Zeile AVL nicht angewählt werden Stereo Zweikanalton Mono Empfängt das Gerät Zweikanalton Sendungen z B einen Spielfilm im Originalton auf Tonkanal B Anzeige Dual II un...

Page 87: ...r Räumlich gewählt wurde und in Zeile Klang effekt die Option Benutzer 1 Zeile Equalizer mit C oder D wäh len und mit OK bestätigen Das Menü EQUALIZER wird eingeblendet Hinweis 7 Wurde in der Zeile Ton Modus die Op tion SRS TS HD gewählt wird die Zeile Equalizer nicht angezeigt 2 Frequenzband 120Hz mit C oder D wählen Gewünschten Wert mit B oder A ein stellen 3 Das nächste Frequenzband mit C oder ...

Page 88: ...it OK bestätigen 3 Mit 1 0 zum Fernseh Programm zurück schalten Lautstärke ändern 1 Lautstärke mit V oder V ändern Ton aus und einschalten 1 Ton mit MUTE stummschalten und wieder einschalten Informationen einblenden 1 Informationen mit İ einblenden Die Einblendung erlischt nach kurzer Zeit automatisch Standbild Wollen Sie bestimmte Szenen längere Zeit be trachten kann das Bild der momentan laufend...

Page 89: ... Programme bieten einen umfassenden TV Guide 7 Viele Sendeanstalten senden das aktuelle Tagesprogramm bieten jedoch keine Detail beschreibung 7 Es gibt Sendeanstalten die keinerlei Infor mationen anbieten 2 Gewünschtes Fernseh Programm mit C oder D wählen Die Sendungen des gewählten Fernseh Programmes für den heutigen Tag werden angezeigt 3 Zu den Informationen der aktuellen Sendung mit A schalten...

Page 90: ...etrie korrekt Format 4 3 Das Bild wird im Format 4 3 gezeigt Format LetterBox Das Letterbox Format eignet sich besonders für Sendungen im Format 16 9 Die bisher üblichen schwarzen Streifen oben und unten im Bild werden überschrieben 4 3 Bil der werden bildschirmfüllend angezeigt Die gesendeten Bilder werden vergrößert dabei geht oben und unten etwas Bildinhalt verloren Die Bildgeometrie bleibt abe...

Page 91: ...Fernsehgerätes kontrolliert und gesteuert werden Besonderheiten der DVD 7 DVDs bieten in einem Titelmenü eine Übersicht der vorhandenen Titel und oder Abschnitte der Titel 7 Einige Funktionen wie zum Beispiel Zeitlupe Standbild oder Autoplay können auch von der DVD gesteuert sein Es kann dadurch vorkommen dass zum Beispiel die Standbildfunktion in bestimmten Szenen nicht gewählt werden kann 7 Bei ...

Page 92: ... Auf Wiedergabe Pause Standbild mit 8 schalten 3 Wiedergabe mit 8 fortsetzen 4 Wiedergabe beenden dazu zweimal 7 drücken Informationen aufrufen Sie können Informationen über Titel Kapitel Spielzeit und vieles mehr auf dem Bildschirm ein blenden 1 Info Zeile mit i einblenden 2 Info Zeile mit i ausblenden Titel und Kapitel über das DVD Menü wählen Wenn eine DVD mehrere Titel und oder Kapi tel enthäl...

Page 93: ...kt fort gesetzt an dem sie zuvor unterbrochen wurde Wiedergabe beenden Die Wiedergabe kann jederzeit beendet wer den dazu 7 zweimal drücken Zusatzfunktionen der Wiedergabe Hinweise 7 Bei den Funktionen Bildsuchlauf Zeitlupe und Standbild ist der Ton stummgeschaltet 7 Einige Funktionen können nicht angewählt werden dies ist abhängig von der verwendeten DVD Bildsuchlauf Sie können zwischen unterschi...

Page 94: ...erden In diesem Fall ist die Einstellung meist im DVD Menü möglich Blickwinkel bestimmter Szenen oder Passagen wählen Einige DVDs enthalten Szenen oder Passagen die von unterschiedlichen Kamera Standorten verschiedene Blickwinkel mehrmals aufgenom men wurden Diese verschiedenen Blickwinkel können Sie wählen 1 Funktion Blickwinkel wählen dazu während der Wiedergabe ANGLE drücken 2 Einen anderen Bli...

Page 95: ...ig von der Erstellung der S VCD VCD 7 S VCDs können abhängig von der Erstellung verschiedene Synchron sprachen und Untertitel beinhalten PBC Play Back Control 7 PBC ist eine Navigationsmöglichkeit für S VCD VCDs PBC Informationen werden bei der Herstellung mit auf die Disc gebrannt W schaltet zwischen der Playliststruktur dem Menü auf der S VCD VCD oder der manuellen Auswahl durch den Benutzer um ...

Page 96: ...VI oder MP4 Datei verpackt MP3 WMA Audio Daten MP3 steht für MPEG 1 Audio Layer 3 und kommt aus dem Motion Picture Expert Group MPEG Standard der zum Komprimieren von Ton und Bilddaten entworfen wurde 7 WMA ist ein Komprimierungsstandard für Audiodaten Windows Media Audio 7 Durch diese Formate ist es möglich Audio Dateien in beinahe CD Qualität auf einem Computer abzuspeichern 7 MP3 Dateien können...

Page 97: ...ild vom gewählten JPEG Bild 7 Verwendetes Medium Disc Wiedergabe Grundfunktionen 1 Nach dem Einlesen der Daten wird der Dateimanager das Inhaltsverzeichnis an gezeigt 2 Gewünschten Ordner oder Titel Bild mit D oder C wählen und mit OK öff nen Eine Liste der Unterordner Subdirectory wird eingeblendet 3 Gewünschte Datei mit D oder C wäh len 4 Wiedergabe mit OK oder 8 star ten Hinweise 7 Zurückschalt...

Page 98: ...ird vergrößert 2 Bildausschnitt mit D C B oder A auf dem Bildschirm bewegen 3 Auf normale Bildgröße mit N zurück schalten Synchronsprache oder Tonformat umschalten nur MP4 Video Dateien Bei diesen Einstellungen wird die voreingestellte Synchronsprache umgeschaltet wenn die DVD Alternativen dazu bietet 1 Während der Wiedergabe M drücken Anzeige zum Beispiel Audio 1 3 AC3 5 1CH Deutsch wird kurz ein...

Page 99: ...hlen oder Nummer des gewünschten Titels mit den Zifferntasten 1 0 eingeben und mit OK bestätigen 8 Wiedergabe mit 7 beenden Wiederhol Funktionen Titel oder Ordner wiederholen Die Möglichkeiten Spur der gewählte Titel wird wiederholt abgespielt Alles der gewählte Ordner wird wiederholt abgespielt 1 Gewünschten Ordner oder Titel Bild mit D oder C wählen Eine Liste der Unterordner Subdirectory wird e...

Page 100: ...twickelt wurde AAC steht für Advanced Audio Coding und wurde ebenfalls von der MPEG entwickelt AAC liefert eine bessere Tonqualität bei identischer Datenrate WMA Windows Media Audio ist ein von Microsoft entwickelter Komprimierungsstandard für Audiodaten Solche Formate ermöglichen Aufzeichnung und Wiedergabe von Audiodateien die so gut wie eine CD klingen jedoch nur einen Bruchteil des Speicherpla...

Page 101: ...wenden muss dieses Netzkabel beim Ab schalten des Fernsehgerätes ebenfalls vom Stromnetz getrennt werden 7 Externen Datenträger dürfen nicht vom Fern sehgerät getrennt werden während auf Dateien des Datenträgers zugegriffen wird 7 Ein bidirektionaler Datenaustausch im Sinne eines ITE Gerätes Information Technology Equipment gemäß EN 55022 EN 55024 ist nicht möglich 7 Die USB Übertragung stellt kei...

Page 102: ...ndet Hinweis 7 Die weitere Bedienung entnehmen Sie bitte den folgenden Abschnitten Automatische Vorschau einschalten Ist diese Funktion eingeschaltet dann wird eine Vorschau der ausgewählten Datei im Dateima nager angezeigt 1 Zeile Auto Vorschau mit C oder D wählen 2 Funktion mit B oder A einschalten Ein 3 Einstellung mit MENU beenden Anzeigemodus wählen 1 Zeile Anzeigemodus mit C oder D wählen 2 ...

Page 103: ...rer Registrierung finden Sie unter vod divx com USB BETRIEB Wiedergabe Grundfunktionen 1 Datenträger anwählen dazu I drücken mit C D B oder A die Option USB wählen und mit OK bestätigen Der Dateimanager wird eingeblendet 2 Gewünschtes Dateiformat Videodateien Audiodateien Bilddateien mit C oder D wählen 3 Zur Ordner Dateiliste mit OK schalten 4 Gewünschten Ordner oder gewünschte Da tei mit C oder ...

Page 104: ...at SRT unterstützt Dabei müssen die Namen der Untertitel und Filmdatei iden tisch sein Andernfalls werden keine Unter titel angezeigt Zusätzliche Wiedergabe funktionen Je nach Dateiformat stehen die folgenden Zusatzfunktionen zur Verfügung Kapitel einer DivX Datei wählen nur bei Videodateien 1 Während der Wiedergabe das nächste Ka pitel mit A wählen 2 Während der Wiedergabe das vorherige Kapitel m...

Page 105: ...nd der Wiedergabe gewünschte Wiedergabe Geschwindigkeit mit R oder S wählen 2 Wiedergabe mit 8 fortsetzen Darstellung vergrößern und verkleinern nur bei Bild und Videodateien Mit dieser Funktion können Bildausschnitte ver größert oder verkleinert werden 1 Während der Wiedergabe oder Pause N drücken USB BETRIEB Bilder drehen nur Bilddateien Sie können die Bildanzeige um 90 drehen 1 Während der Wied...

Page 106: ... Sobald die Seite gefunden wurde wird die Seitennummer angezeigt 2 Auf die Videotextseite mit M umschalten Zeichenhöhe vergrößern Wenn Sie Schwierigkeiten haben den Text auf den Bildschirm zu lesen können Sie die Zeichen höhe vergrößren 1 Zeichenhöhe einer Videotextseite vergrö ßern dazu J wiederholt drücken Seitenstopp Unter einer Mehrfachseite können mehrere Unter seiten zusammengefasst sein die...

Page 107: ...er D wählen und mit OK bestätigen Das Menü Audiosprache wählen wird eingeblendet 2 Gewünschte Audiosprache mit B A C oder D wählen danach mit O rot als primäre Audiosprache oder mit O grün als sekundäre Audiosprache festle gen Primäre und sekundäre Sprache werden oben rechts im Menü angezeigt 3 Einstellung mit MENU beenden Untertitelsprache und Untertitel modus ändern nur bei digitalen Fernseh Pro...

Page 108: ...igen Timer Einstellungen Ausschaltzeit eingeben Sleep Timer Im Menü Abschalttimer kann für das Fernseh gerät eine Ausschaltzeit eingegeben werden Das Fernsehgerät schaltet nach Ablauf der ein gestellten Zeit in Bereitschaft Stand by 1 Zeile Abschalttimer mit C oder D wählen 2 Gewünschte Ausschaltzeit mit B oder A eingeben Hinweis 7 Funktion abschalten dazu die Ausschaltzeit mit B oder A auf Aus st...

Page 109: ...e Einstellung Aus wählen 3 Einstellung mit MENU beenden KOMFORTFUNKTIONEN Jugendschutzeinstellungen Sendungen autorisieren Es gibt Spielfilme deren Inhalt oder auch Szenen die nicht für Kinder geeignet sind Diese Sendungen enthalten Informationen die den Inhalt oder die Szenen markieren und sind mit Zugangslevel von 4 bis 18 versehen Sie kön nen einen der Zugangslevel wählen und damit die Wiederga...

Page 110: ... und das Programm mit OK sper ren 7 PIN Code 1234 mit 1 0 eingeben Das Programm wird mit markiert Hinweis 7 Zum Aufheben der Sperre das Programm mit C oder D wieder anwählen mit OK bestätigen und danach den PIN Code 1234 mit 1 0 eingeben 8 Einstellung mit MENU beenden Software aktualisieren nur bei digitalen Programmen 1 Im Menü EINSTELLUNGEN die Zeile Nach Updates suchen mit C oder D wählen und m...

Page 111: ...nüsprache wählen Am externen Gerät z B DVD Player wird auto matisch die Menüsprache des Fernsehgerätes eingestellt Das externe Gerät muss diese Funktion unter stüt zen Automatisches Abschalten des externen Gerätes Wenn Sie Ihr Fernsehgerät in den Bereitschaftsmo dus schalten wird auch das externe Gerät sofern eingeschaltet in den Bereitschaftsmodus versetzt DIGI LINK ist bei Ihrem Fernsehgerät gru...

Page 112: ...oder A wählen Hinweise 7 FB Durchleitung kann für sämtliche Geräte eingesetzt werden Deck und Tuner können je nach ange schlossenem externem Gerät ausgewählt werden 7 Probieren Sie aus bei welcher Steuerungs art das externe Gerät am besten auf die Fernbedienung reagiert 7 Lesen Sie den Funktionsumfang des DIGI LINK kompatiblen Gerätes in der jeweiligen Bedienungsanleitung nach 6 Einstellung mit ME...

Page 113: ...nschlüssen das externe Gerät ausgestattet ist und welche Signale zur Verfügung stehen 7 Beachten Sie Bei vielen externen Geräten muss die Auflösung des Videosignals an die Eingänge des Fernsehgerätes angepasst werden siehe Bedienungsanleitung des externen Gerätes Welchen Wert Sie ein stellen müssen entnehmen Sie bitte den an gegebenen Richtwerten in den Kapiteln über die verschiedenen Anschlussmög...

Page 114: ...ernen Gerätes mit Cinch Kabel verbin den Tonsignal BETRIEB MIT EXTERNEN GERÄTEN über die EURO AV Buchse FBAS RGB Signal 7 Geeignete Geräte Digitaler Satelliten Receiver DVD Player Recorder Set Top Box Spiele konsole Videorecorder Decoder 7 Bildsignal FBAS RGB 7 Tonsignal Stereo analog 7 Programmplatz AV1 1 Buchse AV1 S VHS des Fernsehgerätes und die entsprechende Buchse des externen Gerätes mit ei...

Page 115: ...deorecorder oder Set Top Box 1 Externes Gerät einschalten und die ge wünschte Funktion wählen 2 I drücken mit C D B oder A den Programmplatz des gewünschten Eingangssignals AV1 AV2 S VHS HDMI1 HDMI2 oder Component wählen und mit OK bestätigen Kopfhörer Kopfhörer anschließen 1 Kopfhörer Stecker 3 5 mm ø Klinke in die Kopfhörer Buchse an der rechten Seite des Gerätes stecken Kopfhörer Lautstärke änd...

Page 116: ...nü wird eingeblendet 4 Zeile Audio Ausgang mit C oder D wählen und mit B oder A den Ton ausgang aktivieren Option Line Out 5 Zeile Status mit C oder D wählen und mit B oder A die Option Fest oder Regelbar wählen BETRIEB MIT EXTERNEN GERÄTEN Hinweise 7 Wenn Einstellbar ausgewählt ist enspricht die Lautstärke des Line Ausgangs der aktuellen Lautsprecherlautstärke Wenn Sie die Lautstärke mit den Tast...

Page 117: ...er D wählen und mit OK bestädigen Das Menü INSTALLATION wird ein geblendet 3 Gewünschte Funktion oder Einstellung mit C oder D wählen anschließend mit C D oder B A ausführen BETRIEB ALS PC MONITOR Die Möglichkeiten Auto Einstellung zur automatischen An passung an den PC Autopositionmodus die Option Ein wählen wenn die Anpassungen im PC Modus automatisch ausgeführt werden sollen Position zum Anpass...

Page 118: ...tcard in den Schacht CI des Fernsehgerätes stecken Hinweis 7 Im CA Modul Untermenü können Sie ab lesen welches CA Modul im CI Steckplatz eingesetzt ist 7 Wenn Sie ein CA Modul zum ersten Mal in den CI Steckplatz des Fernsehgerätes ein setzen müssen Sie einen Moment warten bis das CA Modul erkannt wurde Zugriffskontrolle für CA Modul und Smartcard 1 Menü mit MENU aufrufen 2 Zeile INSTALLATION mit C...

Page 119: ... den Informationen ihres Ka belbetreibers im Übertragungssignal ein Wird die Option Komplett gewählt wird der gesamte Frequenzbereich durchsucht Die Suche kann mit dieser Option sehr lange dauern Diese Option wird empfoh len wenn ihr Kabelbetreiber den Suchtyp Schnell nicht unterstützt Hinweis 7 Sie können den Suchlauf beschleunigen Dazu benötigen Sie Informationen über die Frequenz und die Netzwe...

Page 120: ...it MENU aufrufen 2 Zeile INSTALLATION mit C oder D wählen und mit OK bestätigen Das Menü INSTALLATION wird ein geblendet 3 Zeile Signalquelle mit C oder D wählen und mit OK bestätigen Die Option Terr mit B A C oder D wählen und mit OK bestätigen Achtung 7 Die Antennenspannung Zeile Aktivanten ne darf nur eingeschaltet werden wenn die Antenne eine aktive Zimmerantenne mit Signalverstärker ist und d...

Page 121: ... und mit OK bestätigen 4 Aktualisierung mit B oder A einschal ten Ein 5 Einstellung mit MENU beenden Digitale terrestrische Fernseh Programme manuell suchen 1 Menü mit MENU aufrufen 2 Zeile INSTALLATION mit C oder D wählen und mit OK bestätigen Das Menü INSTALLATION wird ein geblendet 3 Zeile Signalquelle mit C oder D wählen und mit OK bestätigen Die Option Terr mit B A C oder D wählen und mit OK ...

Page 122: ...igen Die Option Terr oder Kabel mit B A C oder D wählen und mit OK bestätigen 4 Zeile Automatischer Suchlauf mit C oder D wählen und mit OK bestätigen Automatischer Suchlauf Signalquelle Auto Diensteaktual CA Modul Aktivantenne Manuelle Abstimmung Analog Signalinformation Manuelle Abstimmung Digital Programmtabelle Beenden Zurück INSTALLATION 20 09 2010 15 46 Terr Ein Entfernt Aus OK 5 Zeile Suchl...

Page 123: ...elle auswählen 1 Menü mit MENU aufrufen 2 Zeile INSTALLATION mit C oder D wählen und mit OK bestätigen Das Menü INSTALLATION wird einge blendet 3 Zeile Programmtabelle mit C oder D wählen und mit OK bestätigen Das Menü PROGRAMMTABELLE wird eingeblendet Hinweis 7 Die weitere Bedienung entnehmen Sie bitte den folgenden Abschnitten Analoge Fernseh Programme durch Eingeben der Kanalzahlen einstellen 1...

Page 124: ...nliste kann bis zu 255 Pro gramme aufnehmen Hinweis 7 Programme können auch aus Favoriten listen gelöscht werden Das zu löschende Programm mit C D B oder A wählen und mit OK löschen Einstellungen beenden 1 Einstellungen mit MENU beenden SONDEREINSTELLUNGEN Programme löschen 1 Im Menü PROGRAMMTABELLE das zu löschende Fernseh Programm mit V D B oder A wählen und mit O rot be stätigen 2 Löschenvorgan...

Page 125: ...ige 4 3 PanScan 4 3 Letterbox Wide Sprache der Bildschirmmenüs wählen Hiermit stellen Sie die Sprache der Bildschirm menüs für den Betrieb ein 1 Hauptmenü mit SETUP aufrufen 2 Menüpunkt Sprache mit B oder A wählen 3 Zeile Menü Sprache mit C oder D wählen und mit OK aktivieren 4 Gewünschte Sprache mit C oder D wählen und mit OK bestätigen 5 Menü mit SETUP abschalten Video Präferenz Sprache Sprachei...

Page 126: ... 7 Zum Ausschalten der Funktion die Einstellung wiederholen und Aus wählen 5 Menü mit SETUP abschalten Video Präferenz Sprache Präferenz Winkelmarkierung Voreinstellung Letzte Abspielposition Ein Jugendschutz Aus Kennwort DRC Inhalt der DVD autorisieren DVDs können Spielfilme anbieten deren Inhalt oder auch Szenen nicht für Kinder geeignet sind Diese DVDs enthalten Informationen die diesen Inhalt ...

Page 127: ...llig noch einmal eingeben und mit OK bestätigen 7 Menü mit SETUP abschalten Video Präferenz Sprache Präferenz Winkelmarkierung Voreinstellung Letzte Abspielposition Jugendschutz Ändern Kennwort DRC Dynamik ein ausschalten 1 Hauptmenü mit SETUP aufrufen 2 Menüpunkt Präferenzen mit B oder A wählen 3 Zeile DRC mit C oder D wählen und mit OK aktivieren 4 Funktion mit C oder D wählen Ein und mit OK bes...

Page 128: ...stärke werden angezeigt Hinweise 7 Die Signalinformation wechselt je nach aktueller Signalquelle 7 Im unteren Bereich des Menüs werden die Signaleigenschaften dargestellt Je weiter die Balken für Qualität und Signalstärke nach rechts ausschlagen desto besser ist das empfangene Signal 7 Der Signalpegel hängt nicht nur von Ihrer Empfangsanlage sondern auch von dem gerade aktiven Kanal ab Beachten Si...

Page 129: ... Gesamtband 110 MHz 862 MHz Modulation 16QAM 32QAM 64QAM 128QAM und 256QAM Symbolrate 4 0 Msym s bis 7 0 Msym s Terrestrisch VHF UHF Band Bandbreite 7 MHz und 8 MHz COFDM Modi 2k und 8k Constellation 16QAM 64QAM QPSK Analoge Empfangsbereiche0 C02 C80 Sonderkanäle S01 S41 Programmplätze TV Radio 1000 Kabel DVB C oder 100 analog 1000 Terrestrisch DVB T oder 100 analog 7 AV 1 USB Bildfläche dm 13 dm ...

Page 130: ...wendet werden können Das Produkt darf daher am Ende seiner Le bensdauer nicht über den normalen Hausmüll entsorgt werden sondern muss an einem Sam melpunkt zum Recycling von elektrischen und elektronischen Geräten abgegeben werden Lassen Sie das Altgerät über eine Sammelstelle für elektrische und elektronische Geräte entsor gen Nebenstehendes Symbol am Produkt in der Bedienungsanleitung oder auf d...

Page 131: ...en Geisterbilder Reflexion Programmeinstellung Automatische oder manuelle Programmeinstellung Feinabstimmung Antenne Antennenkabel oder anlage über prüfen lassen Keine Farbe Farbintensität auf Minimum Farbe hochregeln TV Norm anpassen wenn Einstellmöglichkeit vorhanden Richtige Farbnorm wählen Problem liegt am Programm Mit anderem Programm testen Bild vorhanden aber kein Ton Lautstärke minimal ein...

Page 132: ...lifiziertem Fachpersonal geöffnet oder gewartet werden Wenn andere als die hier spezifizierten Einstel lungen verwendet oder ANDERE VERFAHRENS WEISEN ausgeführt werden kann es zu gefährlicher Strahlungsexposition kommen Dieses Produkt enthält Komponenten die durch die Ansprüche bestimmter U S Patente geschützt sind bzw auf andere Weise als geis tiges Eigentum der Macrovision Corporation und andere...

Reviews: