background image

­19

ENGLISH

settinGs

­-----------------------------------------------------------------------------------------------------------------------------------------

sound­settings­

1

  Open the menu with 

»

m

«

.

2

  Select the menu item 

»

SOUND SETTINGS

«


with 

»

C

«

 or 

»

D

«

 and press 

»

oK

«

 to con-

firm.


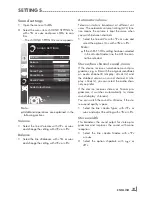
–  The 

»

SOUND SETTINGS

«

 menu appears.

Volume

10

Balance

Sound Type 

Stereo

Sound Preset

Audio Output Setup

AVL

Off

Sound Mode

Normal

Speech

End
Back

SOUND SETTINGS

External connections

20.09.2010

15:46

note:

7  

Additional operations are explained in the 

following sections. 

volume

1

  Select the line 

»

Volume

«

 with 

»

C

«

 or 

»

D

«


and change the setting with 

»

B

«

 or 

»

A

«

.

Balance

1

  Select the line 

»

Balance

«

 with 

»

C

«

 or 

»

D

«


and change the setting with 

»

B

«

 or 

»

A

«

.

Automatic­volume

Television  stations  broadcast  at  different  vol-

umes. The automatic volume limiting (AVL) func-

tion means the volume is kept the same when 

you switch between channels.

1

  Select the line 

»

AVL

«

 with 

»

C

«

 or 

»

D

«

 and 

select the option 

»

On

«

 with 

»

B

«

 or 

»

A

«

.

note:

7  

If the 

»

SRS TS HD

«

 setting has been selected 

in the 

»

Audio Mode

«

 line, the AVL line can-

not be selected.

stereo/two­channel­sound,­mono

If  the  device  receives  two-channel-sound  pro-

grammes, e.g. a film with the original soundtrack 

on  audio  channel  B  (display: 

»

Dual  II

«

)  and  

the  dubbed  version  on  sound  channel  A  (dis-

play: 

»

Dual I

«

), you can select the audio chan-

nel you prefer.
If  the  device  receives  stereo  or  Nicam  pro-

grammes,  it  switches  automatically  to  stereo 

sound (display: 

»

Stereo

«

).

You can switch the sound to 

»

Mono

«

 if the ste-

reo sound quality is poor.

1

  Select  the  line 

»

Audio  Type

«

  with 

»

C

«

  or 

»

D

«

 and adjust the setting with 

»

B

«

 or 

»

A

«

.

stereo­width

This broadens the sound output for stereo pro-

grammes  and  improves  the  sound  with  mono 

reception.

1

  Select  the  line 

»

Audio  Mode

«

  with 

»

C

«


or 

»

D

«

.

2

  Select  the  option 

»

Spatial

«

  with 

»

B

«

  or 

»

A

«

.

Summary of Contents for 22 VLC 2103 C

Page 1: ...LCD TV EN 22 VLC 2103 C...

Page 2: ...evision OPERATION 21 Basic functions 22 Zoom function 22 Zapping function 22 Electronic TV guide 23 Changing the picture format 24 USB RECORDING 24 Information on recording and playing television prog...

Page 3: ...s for the PC 48 Settings for PC mode 49 Operation with a Common Interface 49 What is a Common Interface 49 Inserting the CA module 49 Access control for CI module and smart card 50 Special settings 51...

Page 4: ...claims are excluded for damage resulting from improper handling 7 Make sure the power cord or the power sup ply unit if provided are not damaged 7 Only operate the television with the power supply po...

Page 5: ...quip ment and the antenna 7 Make sure the mains plug is freely accessible Caution 7 If you plan on using a wall bracket for your television make sure you read the assembly manual for the wall bracket...

Page 6: ...ys Detailed information on the individual television programmes are when provided by the broadcasting station are also avail able in the electronic TV guide 7 You can connect various data media such a...

Page 7: ...dealer The range of channels available from the pub lic broadcasting institutions ARD with EinsEx tra EinsFestival or ZDF with ZDF Info and all third party broadcasters are not encrypted and can be re...

Page 8: ...or the rooftop antenna to the an tenna socket ANT IN on the television set 2 Plug the power cable to AC IN input or DC external source input DC IN of your television 1 3 2 Note 7 When connecting an in...

Page 9: ...le batteries batteries or on the packaging indicates that the rechargeable bat tery battery may not be disposed of with regular household rubbish For certain rechargeable batteries batter ies this sym...

Page 10: ...Video camcorder COMPONENT Pb Pr Y CVBS Sockets for video input YUV signal L R Sockets for audio input YUV signal Audio socket for camcorder Y CVBS Video socket for camcorder Audio Socket for audio in...

Page 11: ...ideo input CI Common Interface Slot Controls on the television set 8 Switches the television on and back into standby mode Adjusts the volume Selects channels in steps Selects menu functions V P Pre s...

Page 12: ...enus OK Opens the channel list Activates various functions Sound on off mute Switches the television on from standby and back Into standby mode Switch the television on from standby mode Select statio...

Page 13: ...e file browser green E E Selects a page in teletext mode Activates various functions Starts the reverse picture search in the file browser yellow 7 Freeze frame Selects a page in teletext mode Activat...

Page 14: ...ctions starting on page 50 Note 7 Make the language and country selection for all types then continue reading the respective chapter Selecting language country and operating mode 1 Switch on the telev...

Page 15: ...annels from the cable provider DVB C 1 In the Source Setup menu in the Connec tion Type line select the option Cable with B or A 2 Select the line Scan Type with C or D Use B or A to set the required...

Page 16: ...ETUP menu with C or D and press OK to confirm The SOURCE SETUP menu appears 3 Select the line Programe Table with C or D and press OK to confirm The menu PROGRAM TABLE appears Important 7 Programe tab...

Page 17: ...t the favourites list 1 to 4 2 Select the channel which should be moved with C D B or A and mark it with red 3 Move the channel to its new position with C D B or A and press OK to confirm Notes 7 Repe...

Page 18: ...DNR Mpeg NR Vibrant Colour Perfect Clear Film Mode Gamma Dynamic Contrast Dynamic Backlight or Backlight with C or D Select the value with B or A and press OK to confirm Notes 7 You can only select th...

Page 19: ...you switch between channels 1 Select the line AVL with C or D and select the option On with B or A Note 7 If the SRS TS HD setting has been selected in the Audio Mode line the AVL line can not be sele...

Page 20: ...nd Medium as User 1 Select Equalizer with C or D and press OK to confirm The EqualiZer menu appears Note 7 If the SRS TS HD setting has been selected in the Sound Mode line the Equalizer line will not...

Page 21: ...onfirm 3 Use 1 0 to switch back to the television channel Adjusting the volume 1 Adjust the volume with V or V Switching sound on off 1 Press MUTE to mute the sound or switch it on again Displaying in...

Page 22: ...ovide a detailed TV guide 7 Many broadcasters transmit the current schedule but do not offer detailed descrip tions 7 There are broadcasters which do not pro vide any information at all 2 Press C or D...

Page 23: ...etely and with the correct geometry 4 3 format The picture is shown in 4 3 format LetterBox format The letterbox format is especially suitable for programmes in 16 9 format The black borders which are...

Page 24: ...A module Grundig does not accept liability for any loss of saved data on an external data medium Possible limitations when using an external data medium Depending on the broadcaster you may experi enc...

Page 25: ...hed off 7 External data media may not be disconnect ed from the television while files on the data medium are being accessed Settings for USB recording Selecting the menu 1 Open the menu with M 2 Sele...

Page 26: ...ing This is a useful function for example if the telephone rings while you are watching a film and you do not want to miss anything A freeze frame display of the last scene appears on the screen and t...

Page 27: ...continue the recording 4 After the recording is complete the recording willbeautomaticallysavedontheexternaldata medium To open the menu of recorded files open the menu with M button Use C or D butto...

Page 28: ...place automatically in the background as long as you do not select Yes when the timer countdown message is shown by manual data entry You can preset up to 25 programmes for timer recording 1 Press EP...

Page 29: ...s whether started manually or using the timer function are stored on the external data medium 1 Open the menu with M Use C or D button to open USB RECORDING menu 2 Select PRnP menu and confirm with OK...

Page 30: ...e recording continues in the background 5 Press 7 to end playback 6 Press 7 to stop recording 7 Confirm the display with green or press red to continue the recording USB RECORDING Deleting programmes...

Page 31: ...hich was developed by the MPEG Motion Picture Expert Group AAC stands for Advanced Audio Coding and was also developed by MPEG AAC provides better sound quality at an identical data rate WMA Windows M...

Page 32: ...ust also be disconnected from the power supply when the television is switched off 7 External data media may not be disconnect ed from the television set while files on the data medium are being acces...

Page 33: ...ss OK to con firm The USB SETUP menu appears Note 7 Additional functions are explained in the following sections Switching on automatic preview If this function is switched on a preview of the selecte...

Page 34: ...rmation on how to complete your registration USB OPERATION Basic playback functions 1 Select the data medium by pressing I use C D B or A to select the op tion USB and press OK to confirm The file bro...

Page 35: ...t are supported The names of the subtitle and film files must be identical Otherwise no subtitles will be shown Additional playback functions Depending on the file format the following additional func...

Page 36: ...Select the playback speed during playback with R or S 2 Press 8 to resume normal playback Enlarging or reducing the display for video and audio files only This function allows you to enlarge or reduce...

Page 37: ...the page is found the page number is displayed 2 Press M to switch to the teletext page Enlarging the character height If you have difficulty reading the text on the screen you can increase the chara...

Page 38: ...ondary audio language The primary and secondary language is display at the top right in the menu 3 Press M to end the setting Changing the subtitle language and subtitle mode only for digital televisi...

Page 39: ...with 1 0 and press OK to confirm Timer settings Entering the switch off time sleep timer In the Sleep Timer menu you can enter a time for the television to switch off After this time has elapsed the t...

Page 40: ...nience functions Parental control settings Authorising programmes There are films which may be wholly or partially unsuitable for children These programmes contain information which marks the content...

Page 41: ...ck the channel 7 Enter the PIN code 1234 with 1 0 The channel is marked using Note 7 To remove the lock select the channel again with C or D press OK to confirm and then enter the PIN code 1234 using...

Page 42: ...elevision will be selected Selecting the menu language The television menu language is automatically selected on the external device e g DVD player The external device must support this function Switc...

Page 43: ...he external device which has been connected 7 Try out which type of remote control opera tion the external device reacts to the best 7 Read about the scope of functions of the DIGILINK compatible devi...

Page 44: ...pends on the sockets the external device is equipped with and the signals which are available 7 Please note With many external devices the resolution of the video signal must be adjusted to the input...

Page 45: ...he corresponding sock ets of the external device with RCA cables audio signal OPERATION USING EXTERNAL DEVICES using the SCART socket FBAS RGB signal 7 Suitable devices Digital satellite receiver DVD...

Page 46: ...der video recorder or set top box 1 Switch on the external device and select the function you wish to use 2 Press I use C D B or A to select the preset for the input signal AV1 AV2 S VHS HDMI1 HDMI2 o...

Page 47: ...up with C or D and press OK to confirm The menu appears 4 Select the line Audio Out with C or D and press B or A to activate the audio output Line Out 5 Select the line Audio Out Status with C or D an...

Page 48: ...with M 2 Select the SOURCE SETUP menu item with C or D and press OK to con firm The SOURCE SETUP menu appears 3 Select the function or setting with C or D and then use C D or B A to implement it OPERA...

Page 49: ...module with the smart card into the CI slot on the television Note 7 In the CA Module sub menu you can see which CA module has been inserted in the CI slot 7 If you are inserting a CA module into the...

Page 50: ...take a long time with this option This op tion is recommended if your cable provider does not support the search type Quick Note 7 You can accelerate the search To do this you need information about...

Page 51: ...e menu with M 2 Select the line SOURCE SETUP with C or D and press OK to confirm The SOURCE SETUP menu appears 3 Select the line Source with C or D and press OK to confirm Select the option Air with B...

Page 52: ...he automatic update with B or A On 5 Press M to end setting Searching for digital terrestrial TV channels manually 1 Open the menu with M 2 Select the line SOURCE SETUP with C or D and press OK to con...

Page 53: ...ding on the number of television channels received this can easily take a few minutes The search is complete as soon as the PRO GRAM TABLE appears 7 Press M to end the setting Tuning analogue televisi...

Page 54: ...ion channels to be deleted 3 Press green to confirm the deletion process Tuning the television channels by entering the channel numbers 1 Open the menu with M 2 Select the line SOURCE SETUP with C or...

Page 55: ...m 2 Open the input keyboard with green Note 7 If necessary delete the current channel name To do this select the button with B or A and delete repeatedly using OK 3 Select the required letters or numb...

Page 56: ...and signal strength is displayed Notes 7 The signal information changes in ac cord ance with the current input source 7 The signal properties are displayed in the lower section of the menu The further...

Page 57: ...768 Weight approx 4 3 kg Dimensions W H D 52 3 cm 35 6 cm 6 9 cm Service information for retailers Only operate the television with the power supply power cord provided The product complies with the...

Page 58: ...rent position Ghosting reflection Channel setting Automatic or manual tuning fine tuning Antenna Have antenna cable or system checked No colour Colour intensity too low Turn up the colour Adjust TV st...

Page 59: ...of plug is used it must be pro tected by a 5A fuse either in the plug or at the distribution board If this type of plug becomes defective ensure that the fuse is removed before disposal to eliminate p...

Page 60: ...www grundig com 72011 760 1000 11 23...

Reviews: